> ## Documentation Index
> Fetch the complete documentation index at: https://docs.aiderx.io/llms.txt
> Use this file to discover all available pages before exploring further.
# GCP 배포하기
> A2를 Google Cloud Platform(이하 GCP)에 배포하는 방법에 대해 설명합니다.
이 가이드는 Google Cloud Platform(GCP)의 Compute Engine을 사용하여 A2를 배포하는 방법을 설명합니다.
### GCP Compute Engine 설정하기
#### 1. 사전 준비
GCP 프로젝트 설정 및 Compute Engine API 활성화가 필요합니다. 이 과정은 GCP 콘솔에서 쉽게 수행할 수 있습니다.
#### 2. 인스턴스 생성
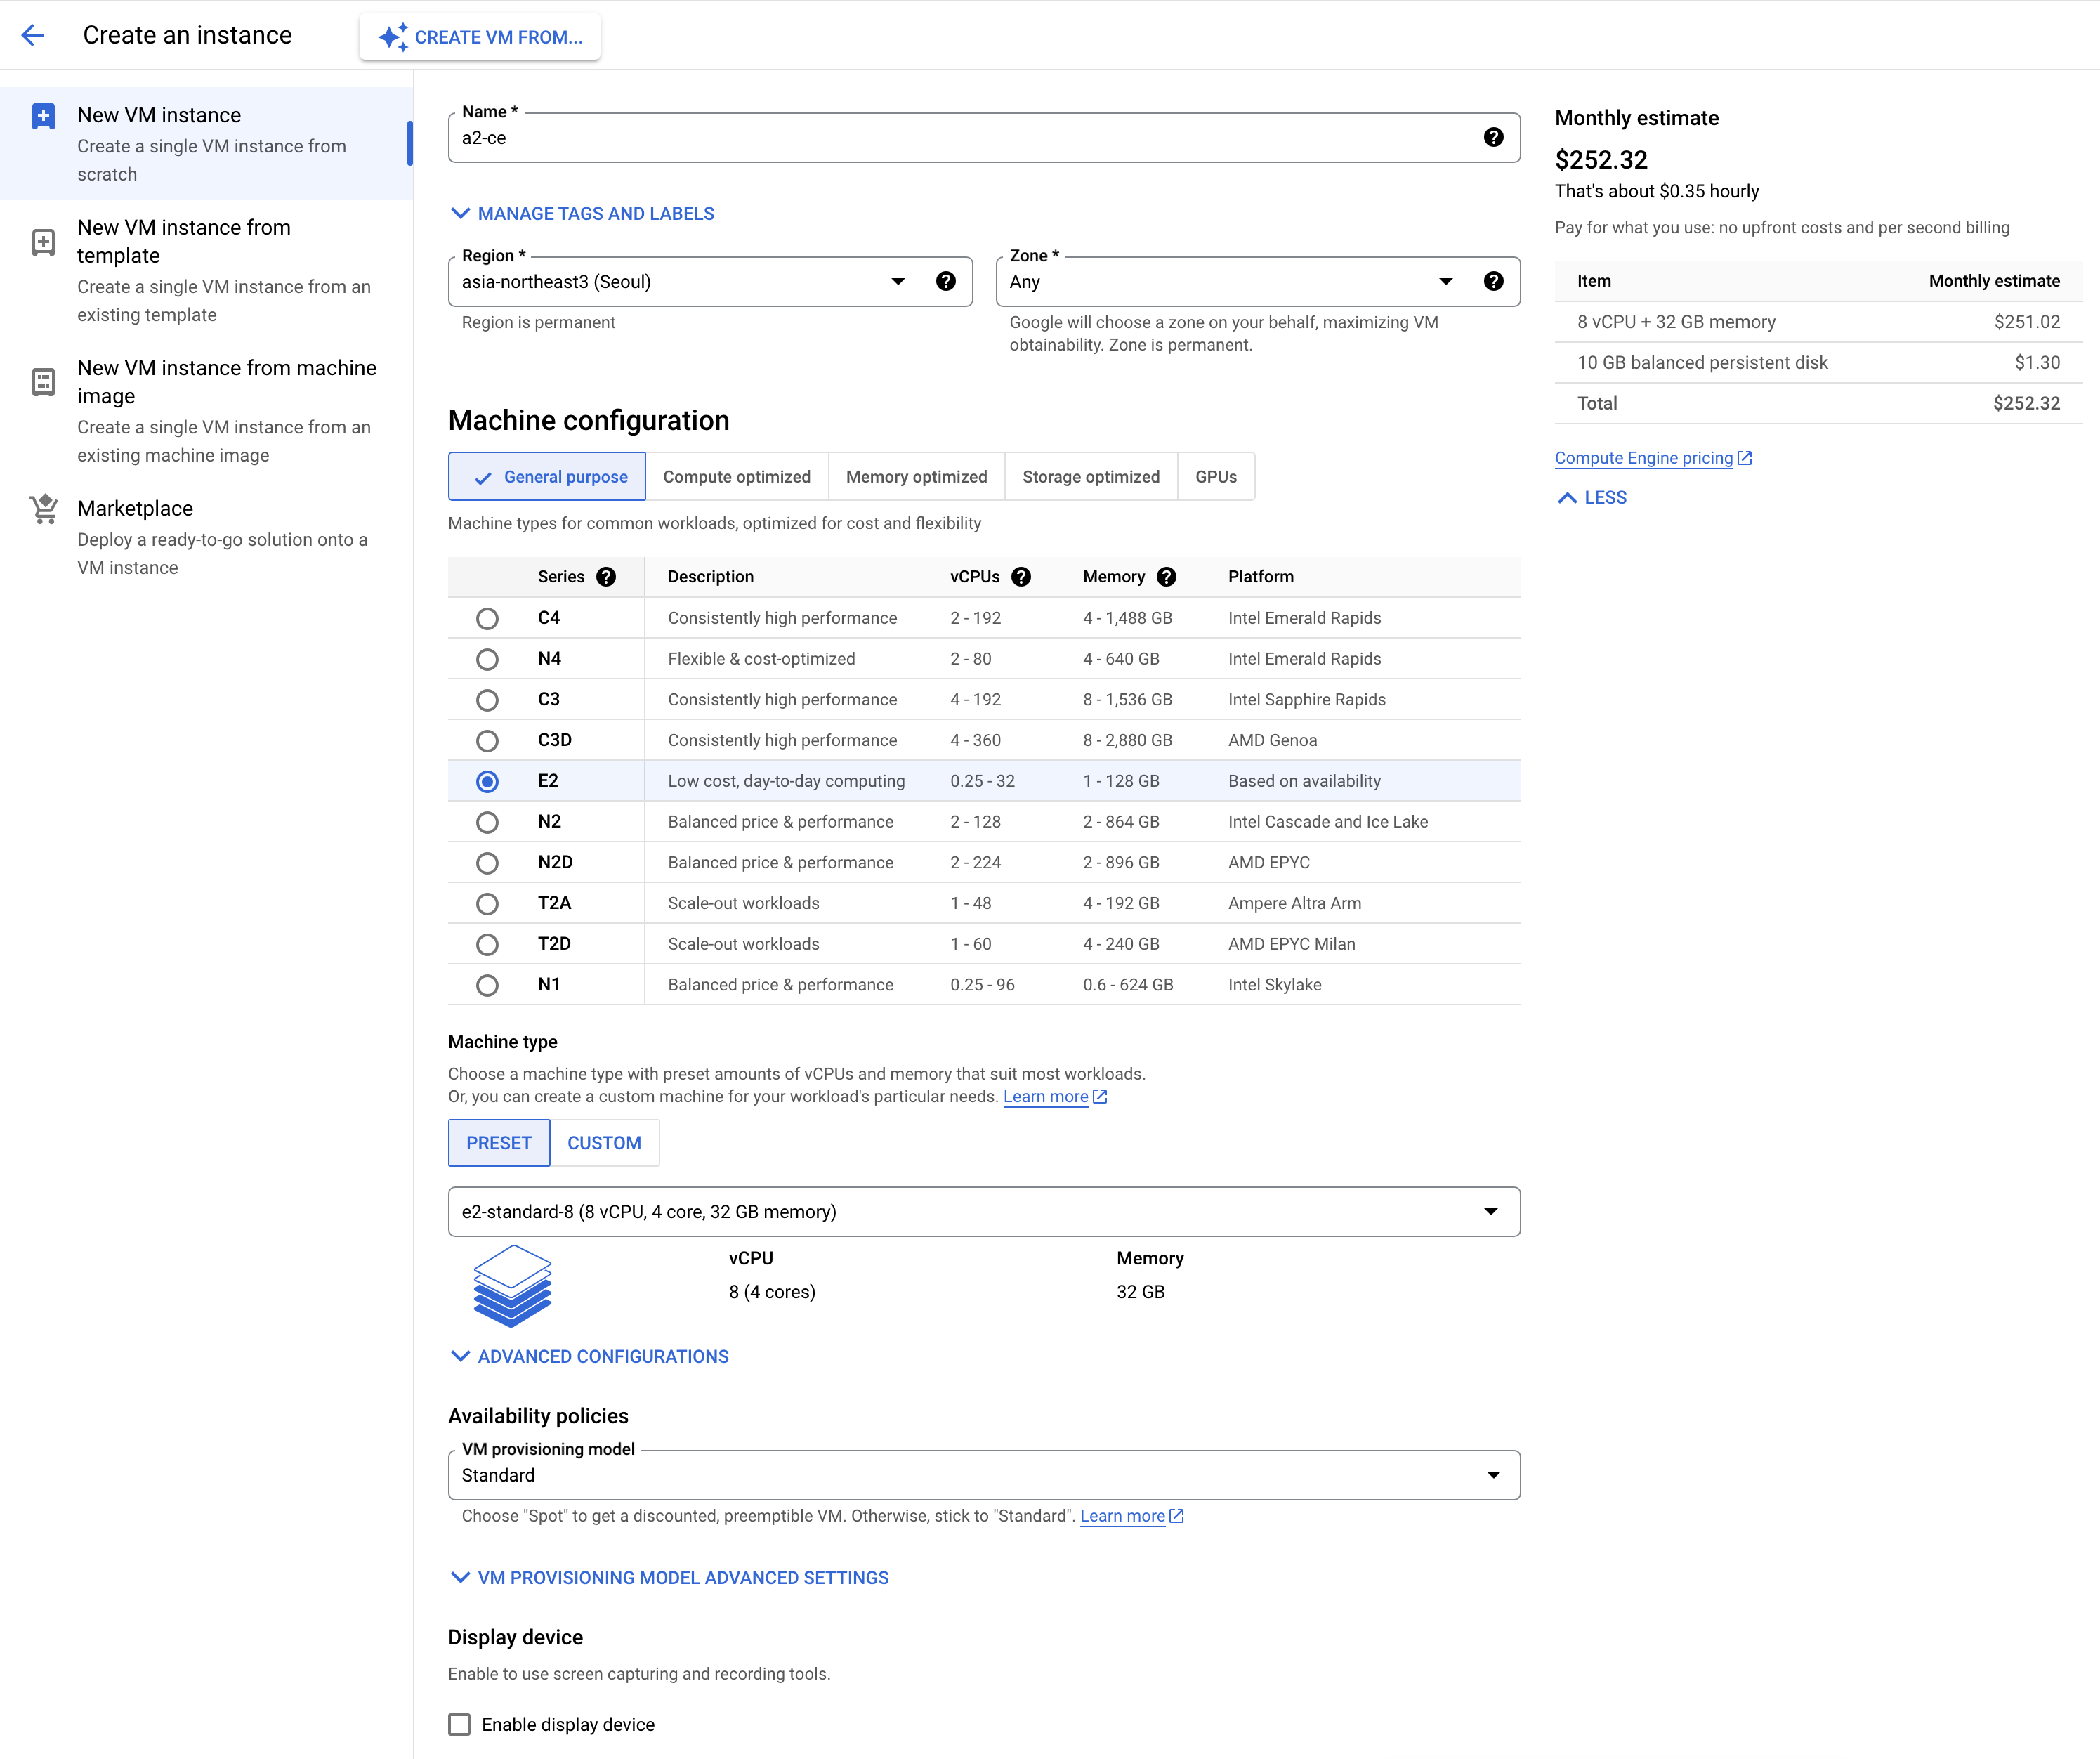
1. `Compute Engine` > `VM instances` 메뉴로 이동합니다.
2. `CREATE INSTANCE` 버튼을 클릭합니다.
3. 다음과 같이 설정합니다:
* `Name`: 인스턴스 이름 (예: "a2-ce")
* `Region`: 가까운 Region 선택 (예: "asia-northeast3 (Seoul)")
* `Machine configuration` > `Machine type`:
* CPU 8 vCPU, 메모리 16GB 이상을 권장합니다. (예: e2-standard-8)
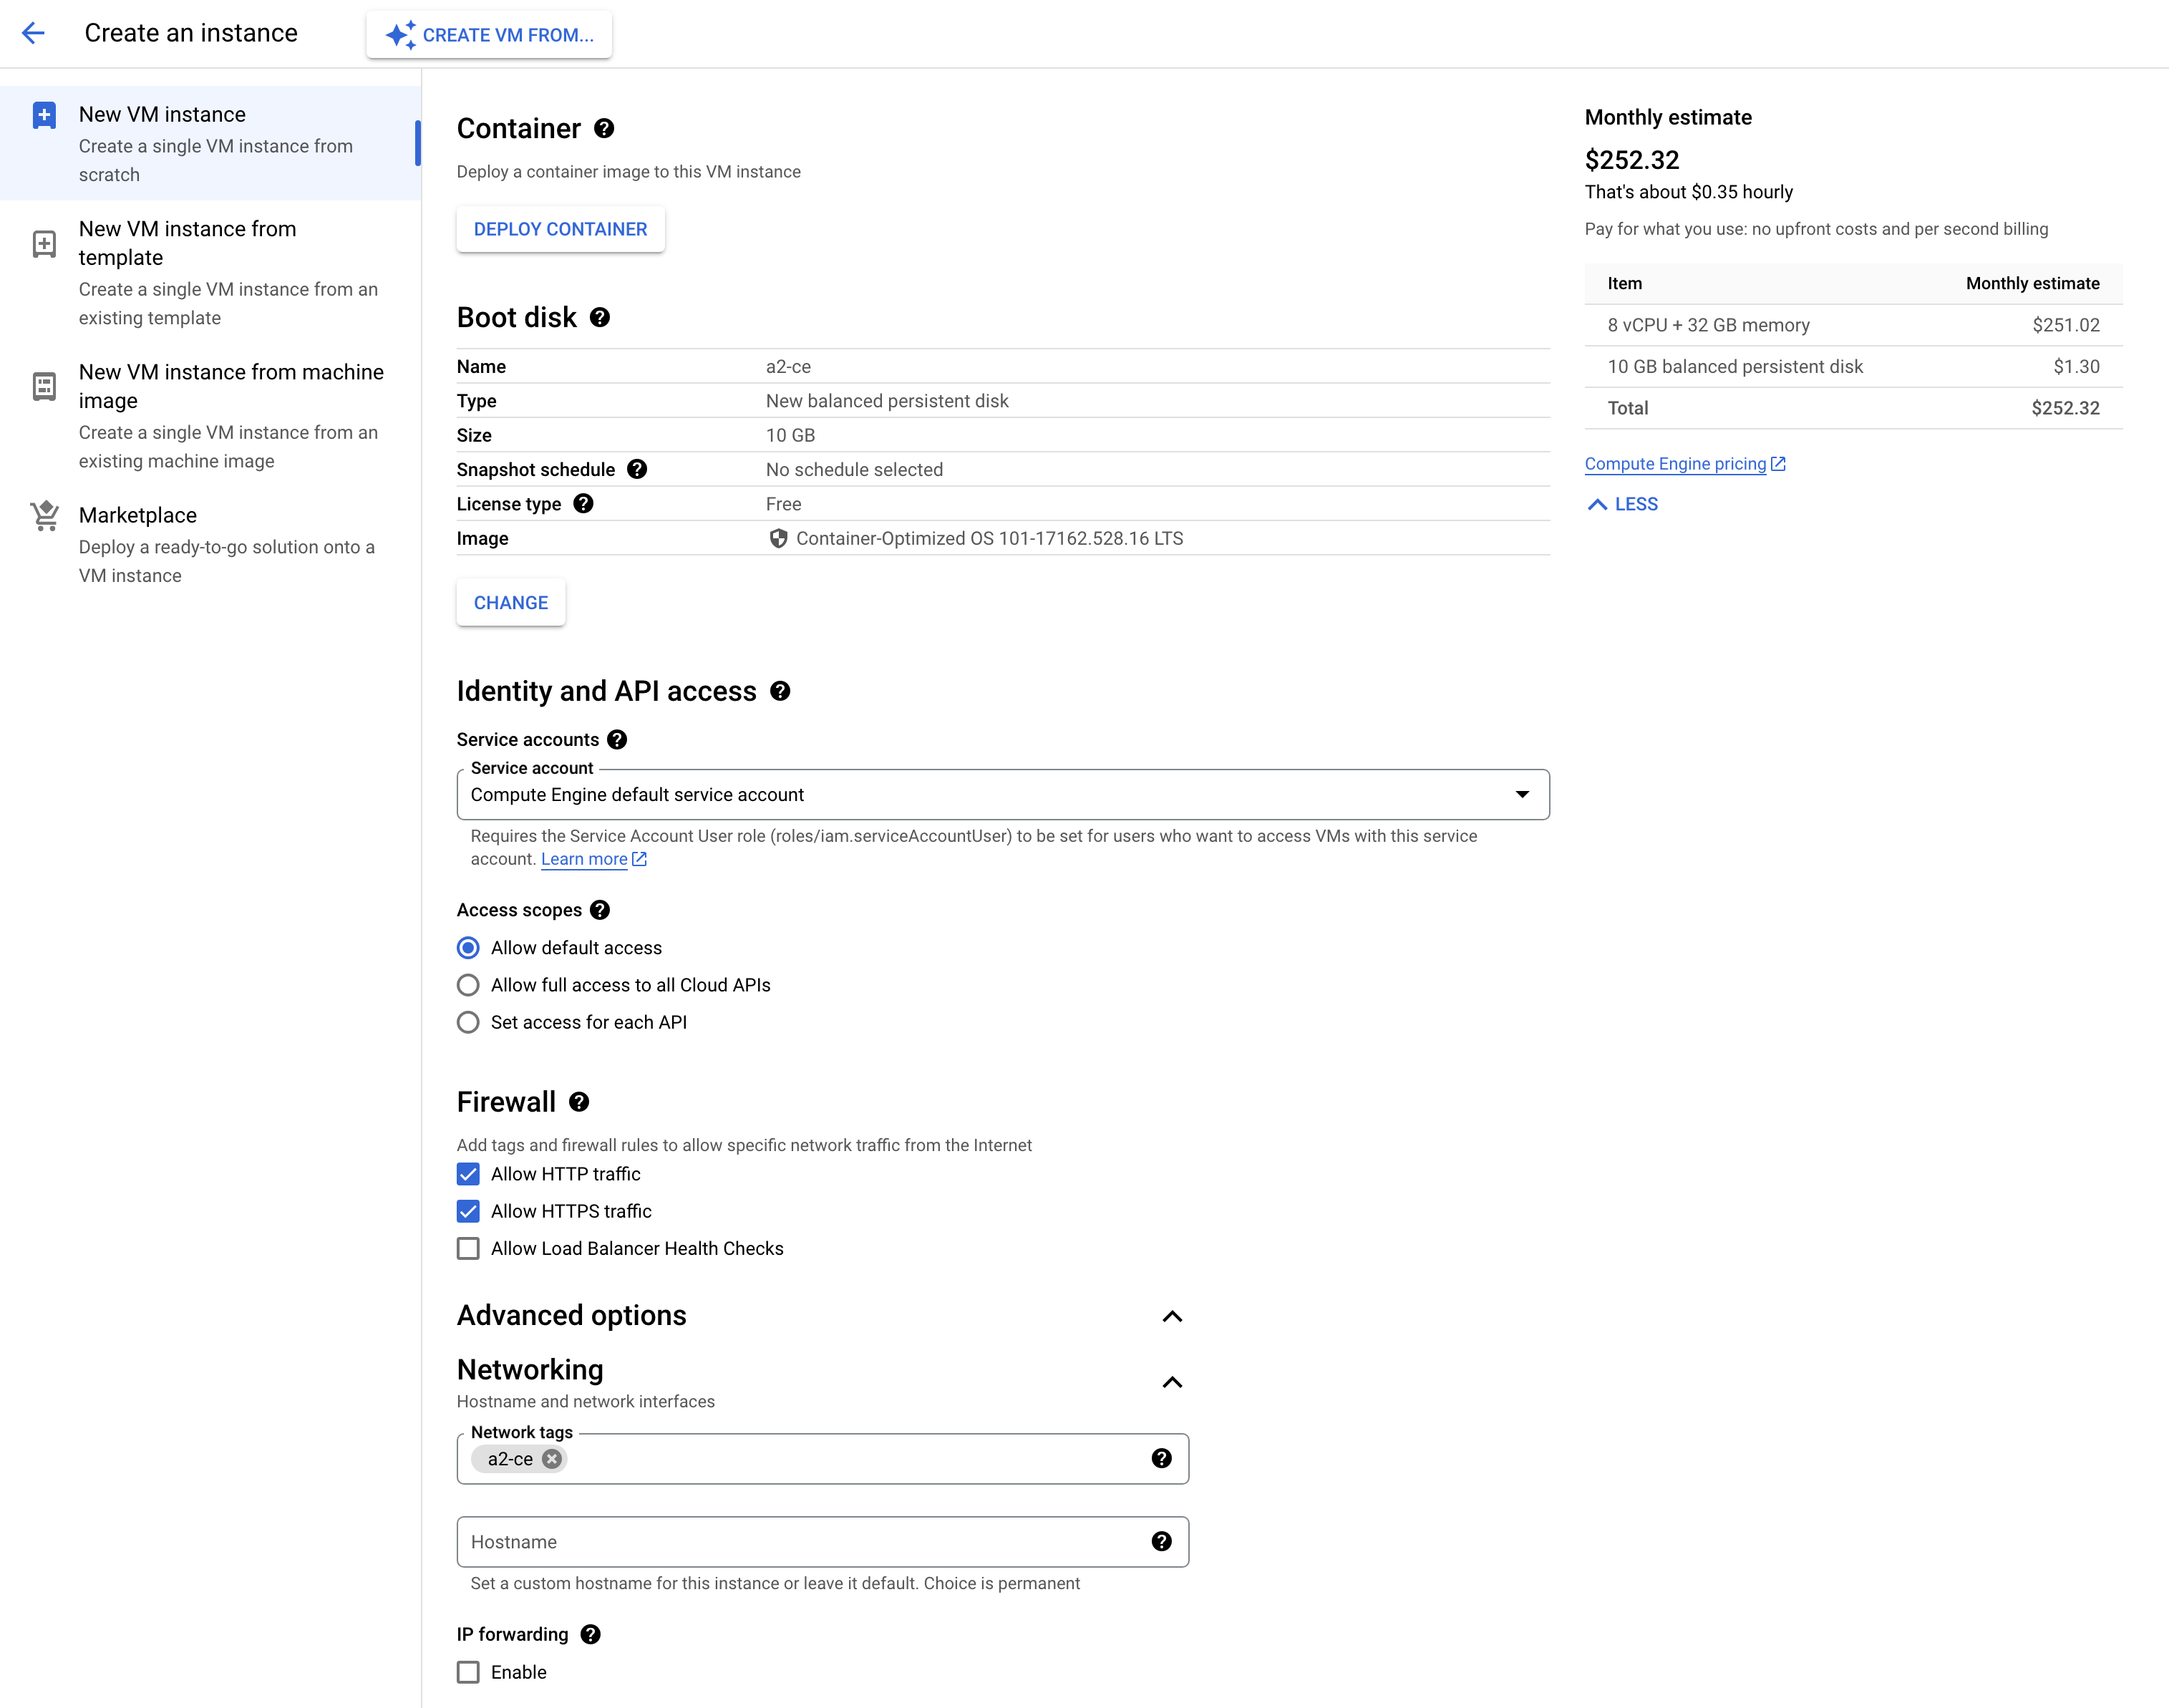
* `Boot disk` > `CHANGE` 버튼을 클릭:
* `Operating system`: "Container Optimized OS" 선택
* 자동 선택된 `Version`이 "x86/64" 아키텍처인지 확인
* (optional) 디스크를 영구보존하려면 `SHOW ADVANCED CONFIGURATION` > `Deletion rule` 의 `Keep disk` 를 선택
* `SELECT` 버튼을 클릭합니다.
* `Firewall`: `Allow HTTP traffic` 및 `Allow HTTPS traffic` 체크
* `Advanced options` 펼치기:
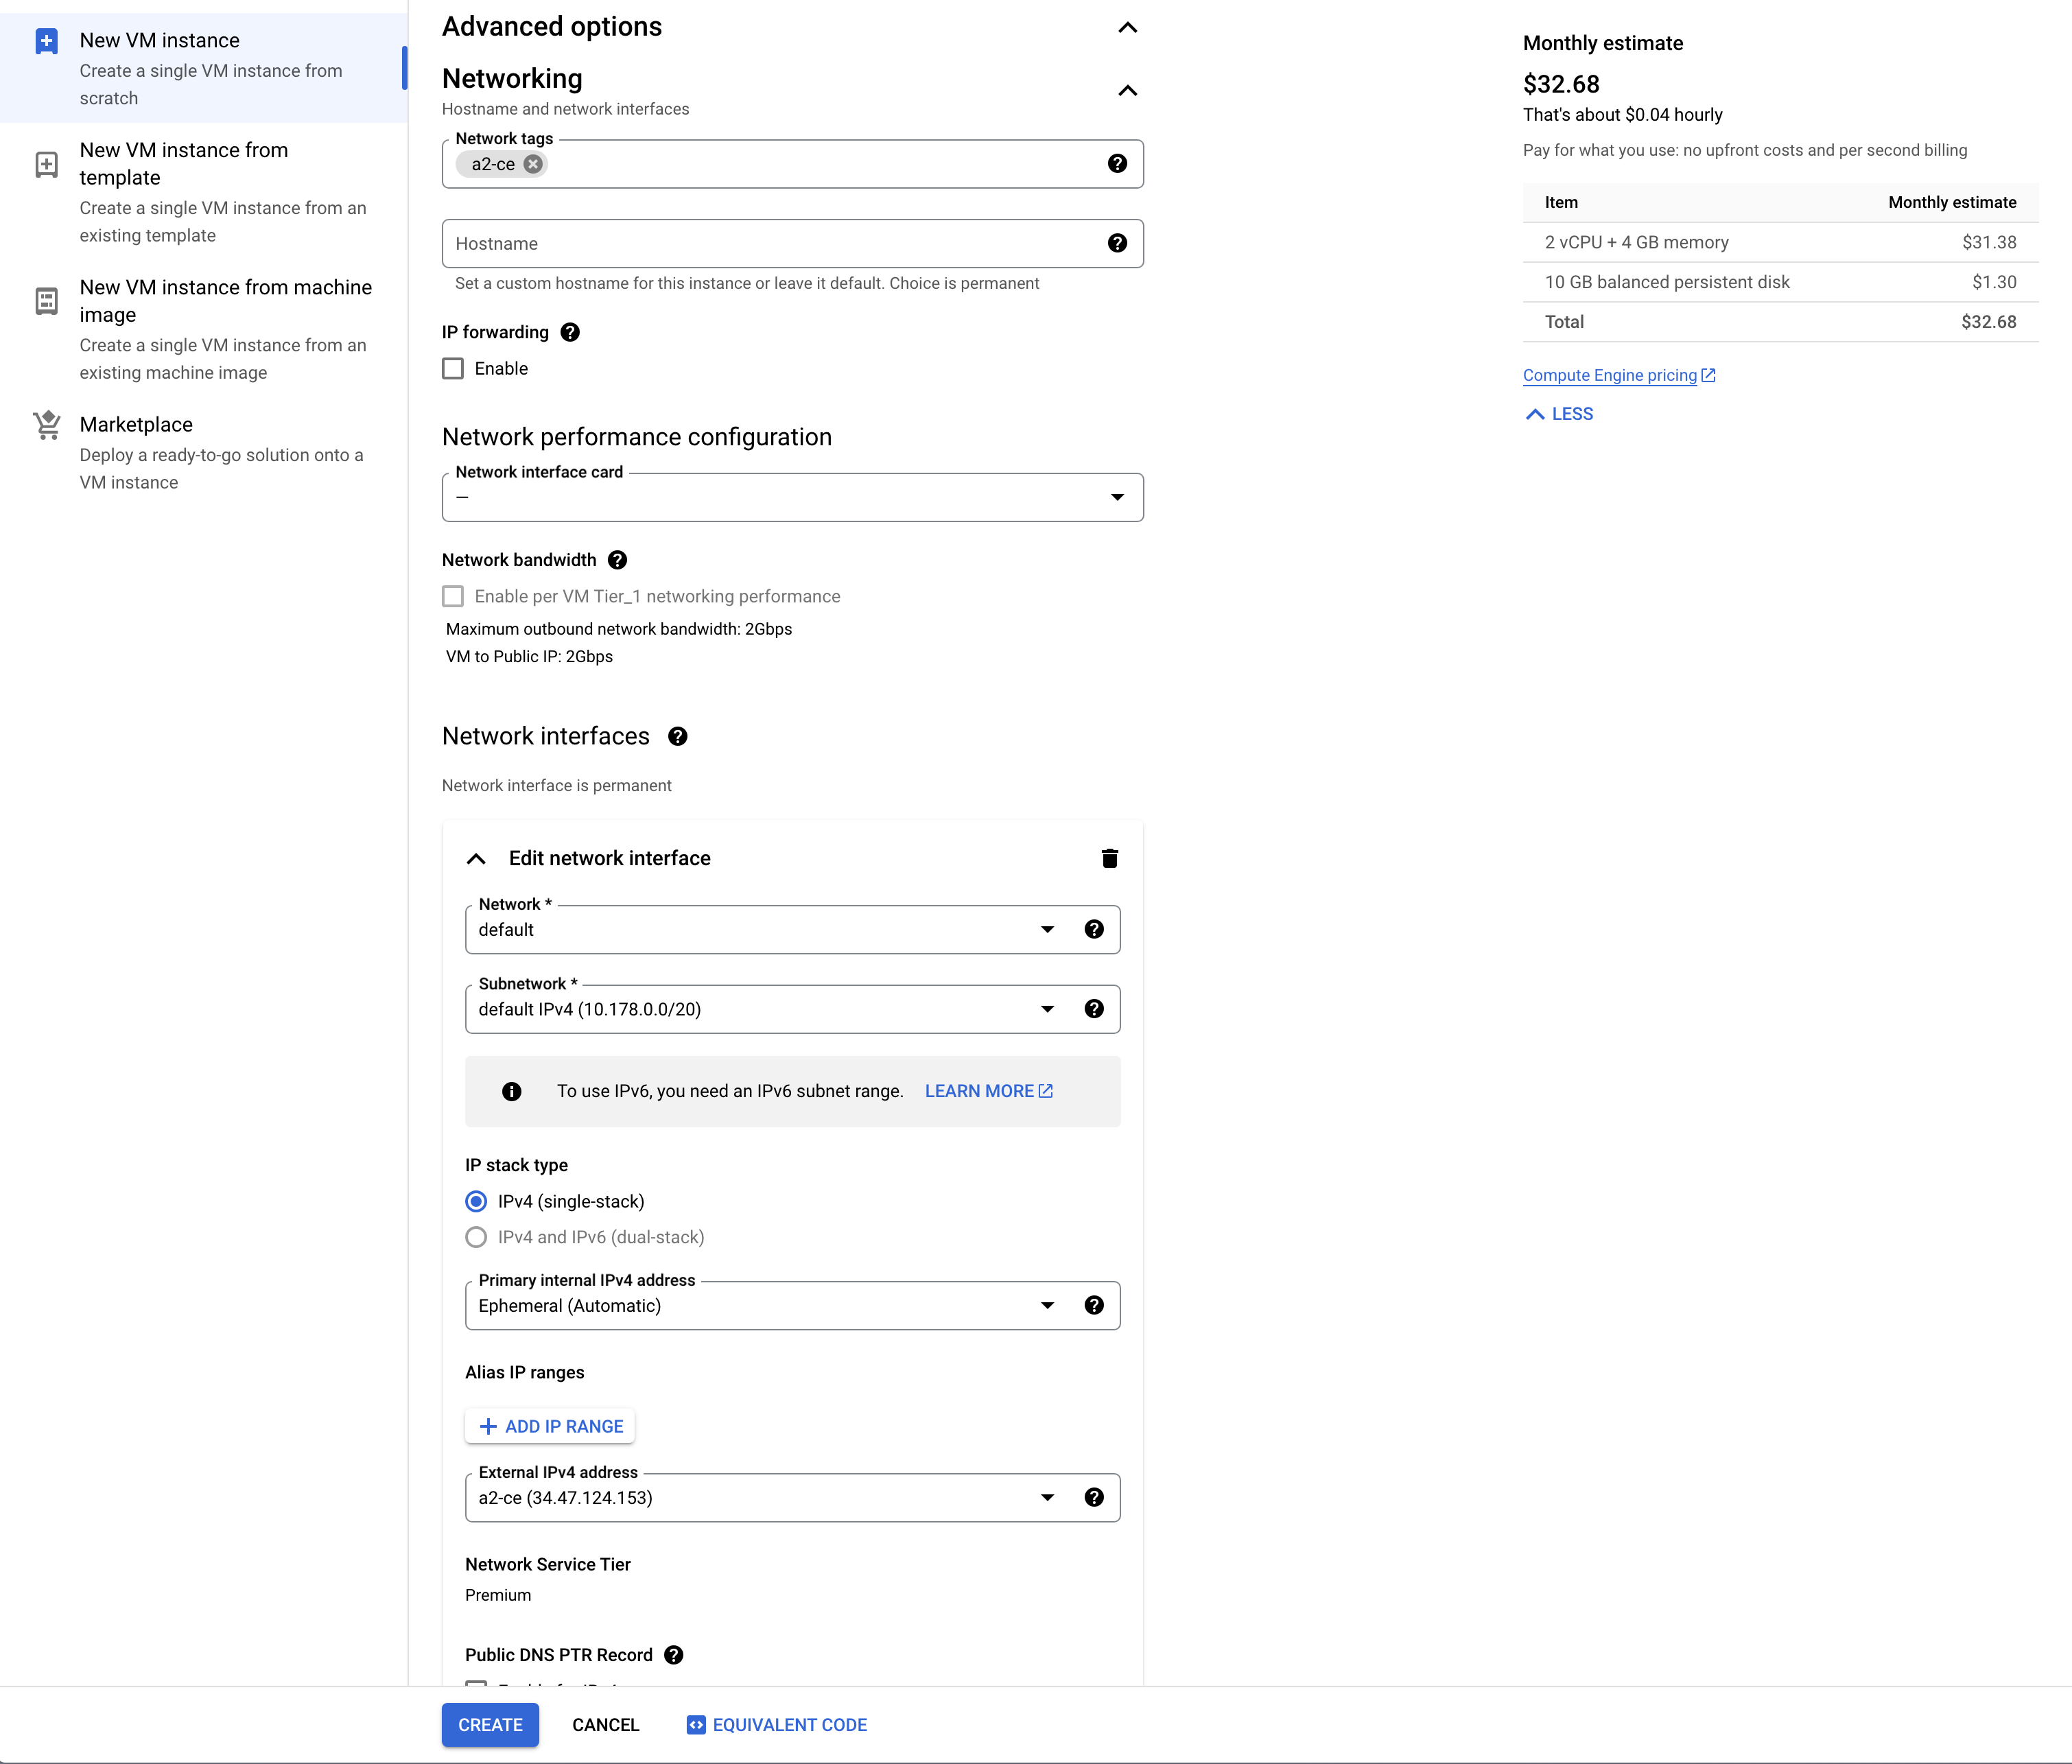
* `Networking` > `Network tags`: "a2-ce" 입력
* `Networking` > `Network interfaces` > `default` 펼치기 > `External IPv4 address`: `RESERVE STATIC EXTERNAL IP ADDRESS` 선택
* `name` 에 "a2-ce" 입력 후 `RESERVE` 클릭
4. 화면 하단의 "CREATE" 버튼을 클릭하여 인스턴스를 생성합니다.
#### 3. 방화벽 규칙 설정
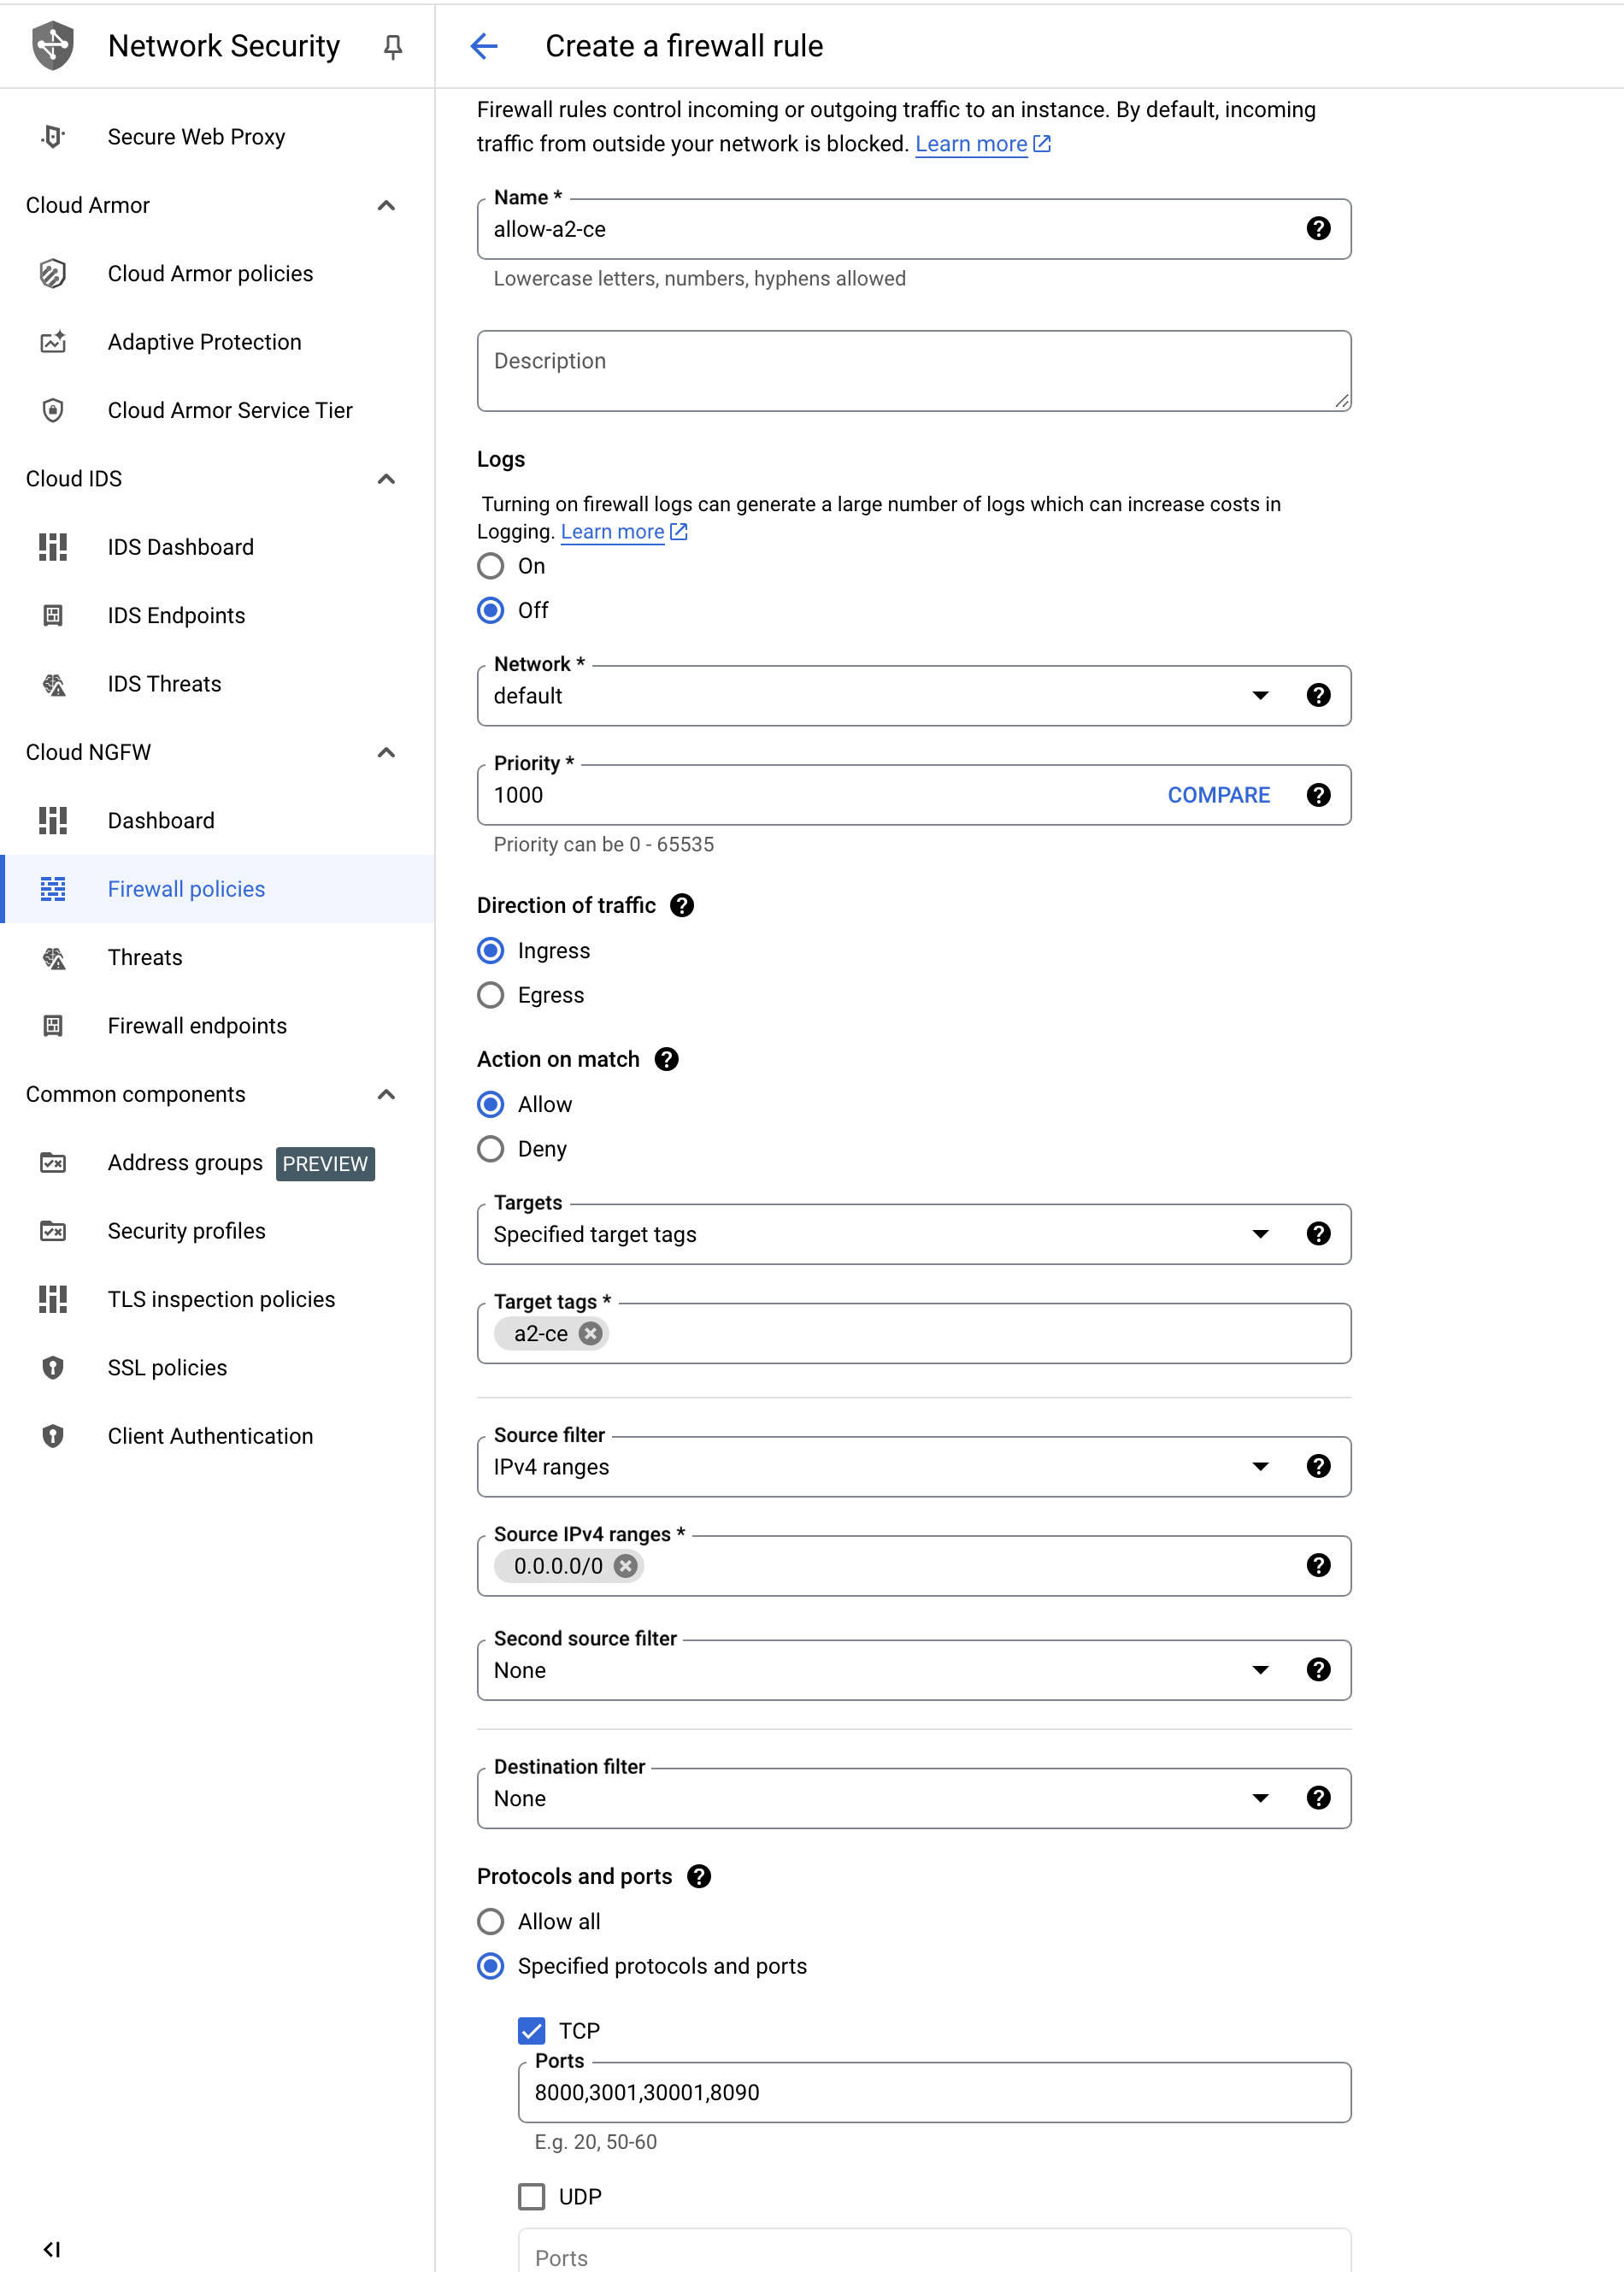
1. `VPC network` > `Firewall` 메뉴로 이동합니다.
2. `CREATE FIREWALL RULE` 버튼을 클릭합니다.
3. 다음과 같이 설정합니다:
* `Name`: 규칙의 이름을 지정합니다 (예: "allow-a2-ce")
* `Targets`: `Specified target tags`를 선택하고, 이전에 사용한 태그 입력 (예: "a2-ce")
* `Source filter`: `IPv4 ranges`를 선택하고 "0.0.0.0/0" 입력 (모든 IP에서의 접근 허용)
* `Protocols and ports`: `Specified protocols and ports`를 선택하고, `TCP` 체크 및 **"8000,8080"** 포트 입력
4. "CREATE" 버튼을 클릭하여 규칙을 생성합니다.
#### 4. 도커 이미지 배포
1. GCP 콘솔에서 SSH 버튼을 사용하여 인스턴스에 연결합니다.
2. docker compose 를 설치합니다
```sh theme={null}
curl -s https://gist.githubusercontent.com/kurokobo/25e41503eb060fee8d8bec1dd859eff3/raw/0d7cd29472f0eaa26ce424071456ad84b24fb318/installer.sh | bash
source ~/.bashrc
docker-compose version
```
3. docker-compose.yml 파일을 작성합니다
```yml theme={null}
---
services:
a2-ce:
image: { TO_BE_REPLACED }
restart: unless-stopped
logging:
options:
max-file: "1"
max-size: "512m"
volumes:
- /data:/var/a2/data
ports:
- 8000:8000
- 8080:8080
```
4. docker compose를 실행합니다:
```sh theme={null}
docker compose up -d
```
#### 5. 서비스 확인
1. 웹 브라우저를 엽니다.
2. `http://[YOUR_STATIC_EXTERNAL_IP]:8000`로 접속합니다.
3. 서비스가 정상적으로 실행되는지 확인합니다.
### 참고이미지
* settings 1
 * settings 2
 * network
 * firewall
 ***
이 가이드를 따라 GCP Compute Engine에 A2를 성공적으로 배포할 수 있습니다.
추가 설정이나 최적화가 필요한 경우 GCP 문서를 참고하시거나 언제든지 지원팀에 연락해 주세요.
***
이 가이드를 따라 GCP Compute Engine에 A2를 성공적으로 배포할 수 있습니다.
추가 설정이나 최적화가 필요한 경우 GCP 문서를 참고하시거나 언제든지 지원팀에 연락해 주세요.