> ## Documentation Index
> Fetch the complete documentation index at: https://docs.aiderx.io/llms.txt
> Use this file to discover all available pages before exploring further.
# Deploying A2 OnPrem on AWS
> This guide explains how to deploy A2 OnPrem on Amazon Web Service (AWS).
There are various ways to deploy Docker images on AWS platforms, such as [AWS EC2](https://docs.aws.amazon.com/AWSEC2/latest/UserGuide/concepts.html), [AWS App Runner](https://docs.aws.amazon.com/apprunner/latest/dg/what-is-apprunner.html), [AWS Lightsail](https://docs.aws.amazon.com/lightsail/latest/userguide/amazon-lightsail-container-services.html), and [AWS EKS](https://docs.aws.amazon.com/eks/latest/userguide/what-is-eks.html). This article will explain the simplest method, which is deploying on [AWS ECS](https://docs.aws.amazon.com/AmazonECS/latest/developerguide/Welcome.html).
### Registering Docker Image in ECR
To use Docker images in AWS, you need to register the image in the Elastic Container Registry (ECR). For detailed instructions on image registration, refer to the [official AWS document](https://docs.aws.amazon.com/AmazonECR/latest/userguide/docker-push-ecr-image.html), which covers repository creation and Docker image push.
Upon completion, you will see a screen like this in your ECR repository:
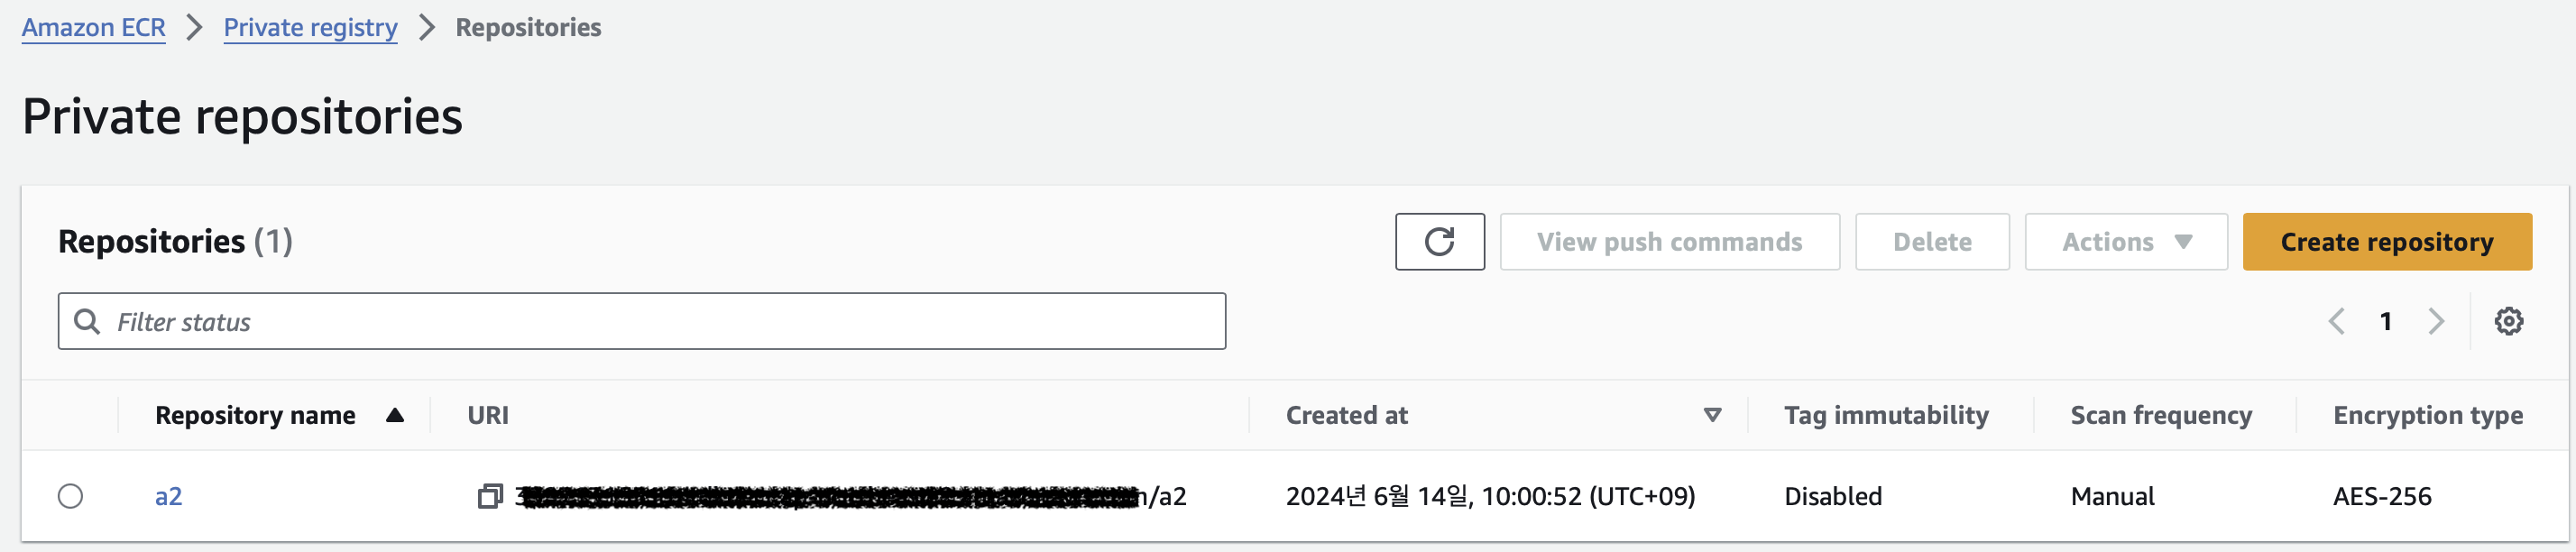 From now on, use the value in the URI column to deploy the image.
### Setting up AWS ECS
#### 1. Creating a Cluster
To use AWS Elastic Container Service (ECS), you first need to create a cluster. In the ECS `Clusters` > `Create Cluster` menu, you will see the following screen:
From now on, use the value in the URI column to deploy the image.
### Setting up AWS ECS
#### 1. Creating a Cluster
To use AWS Elastic Container Service (ECS), you first need to create a cluster. In the ECS `Clusters` > `Create Cluster` menu, you will see the following screen:
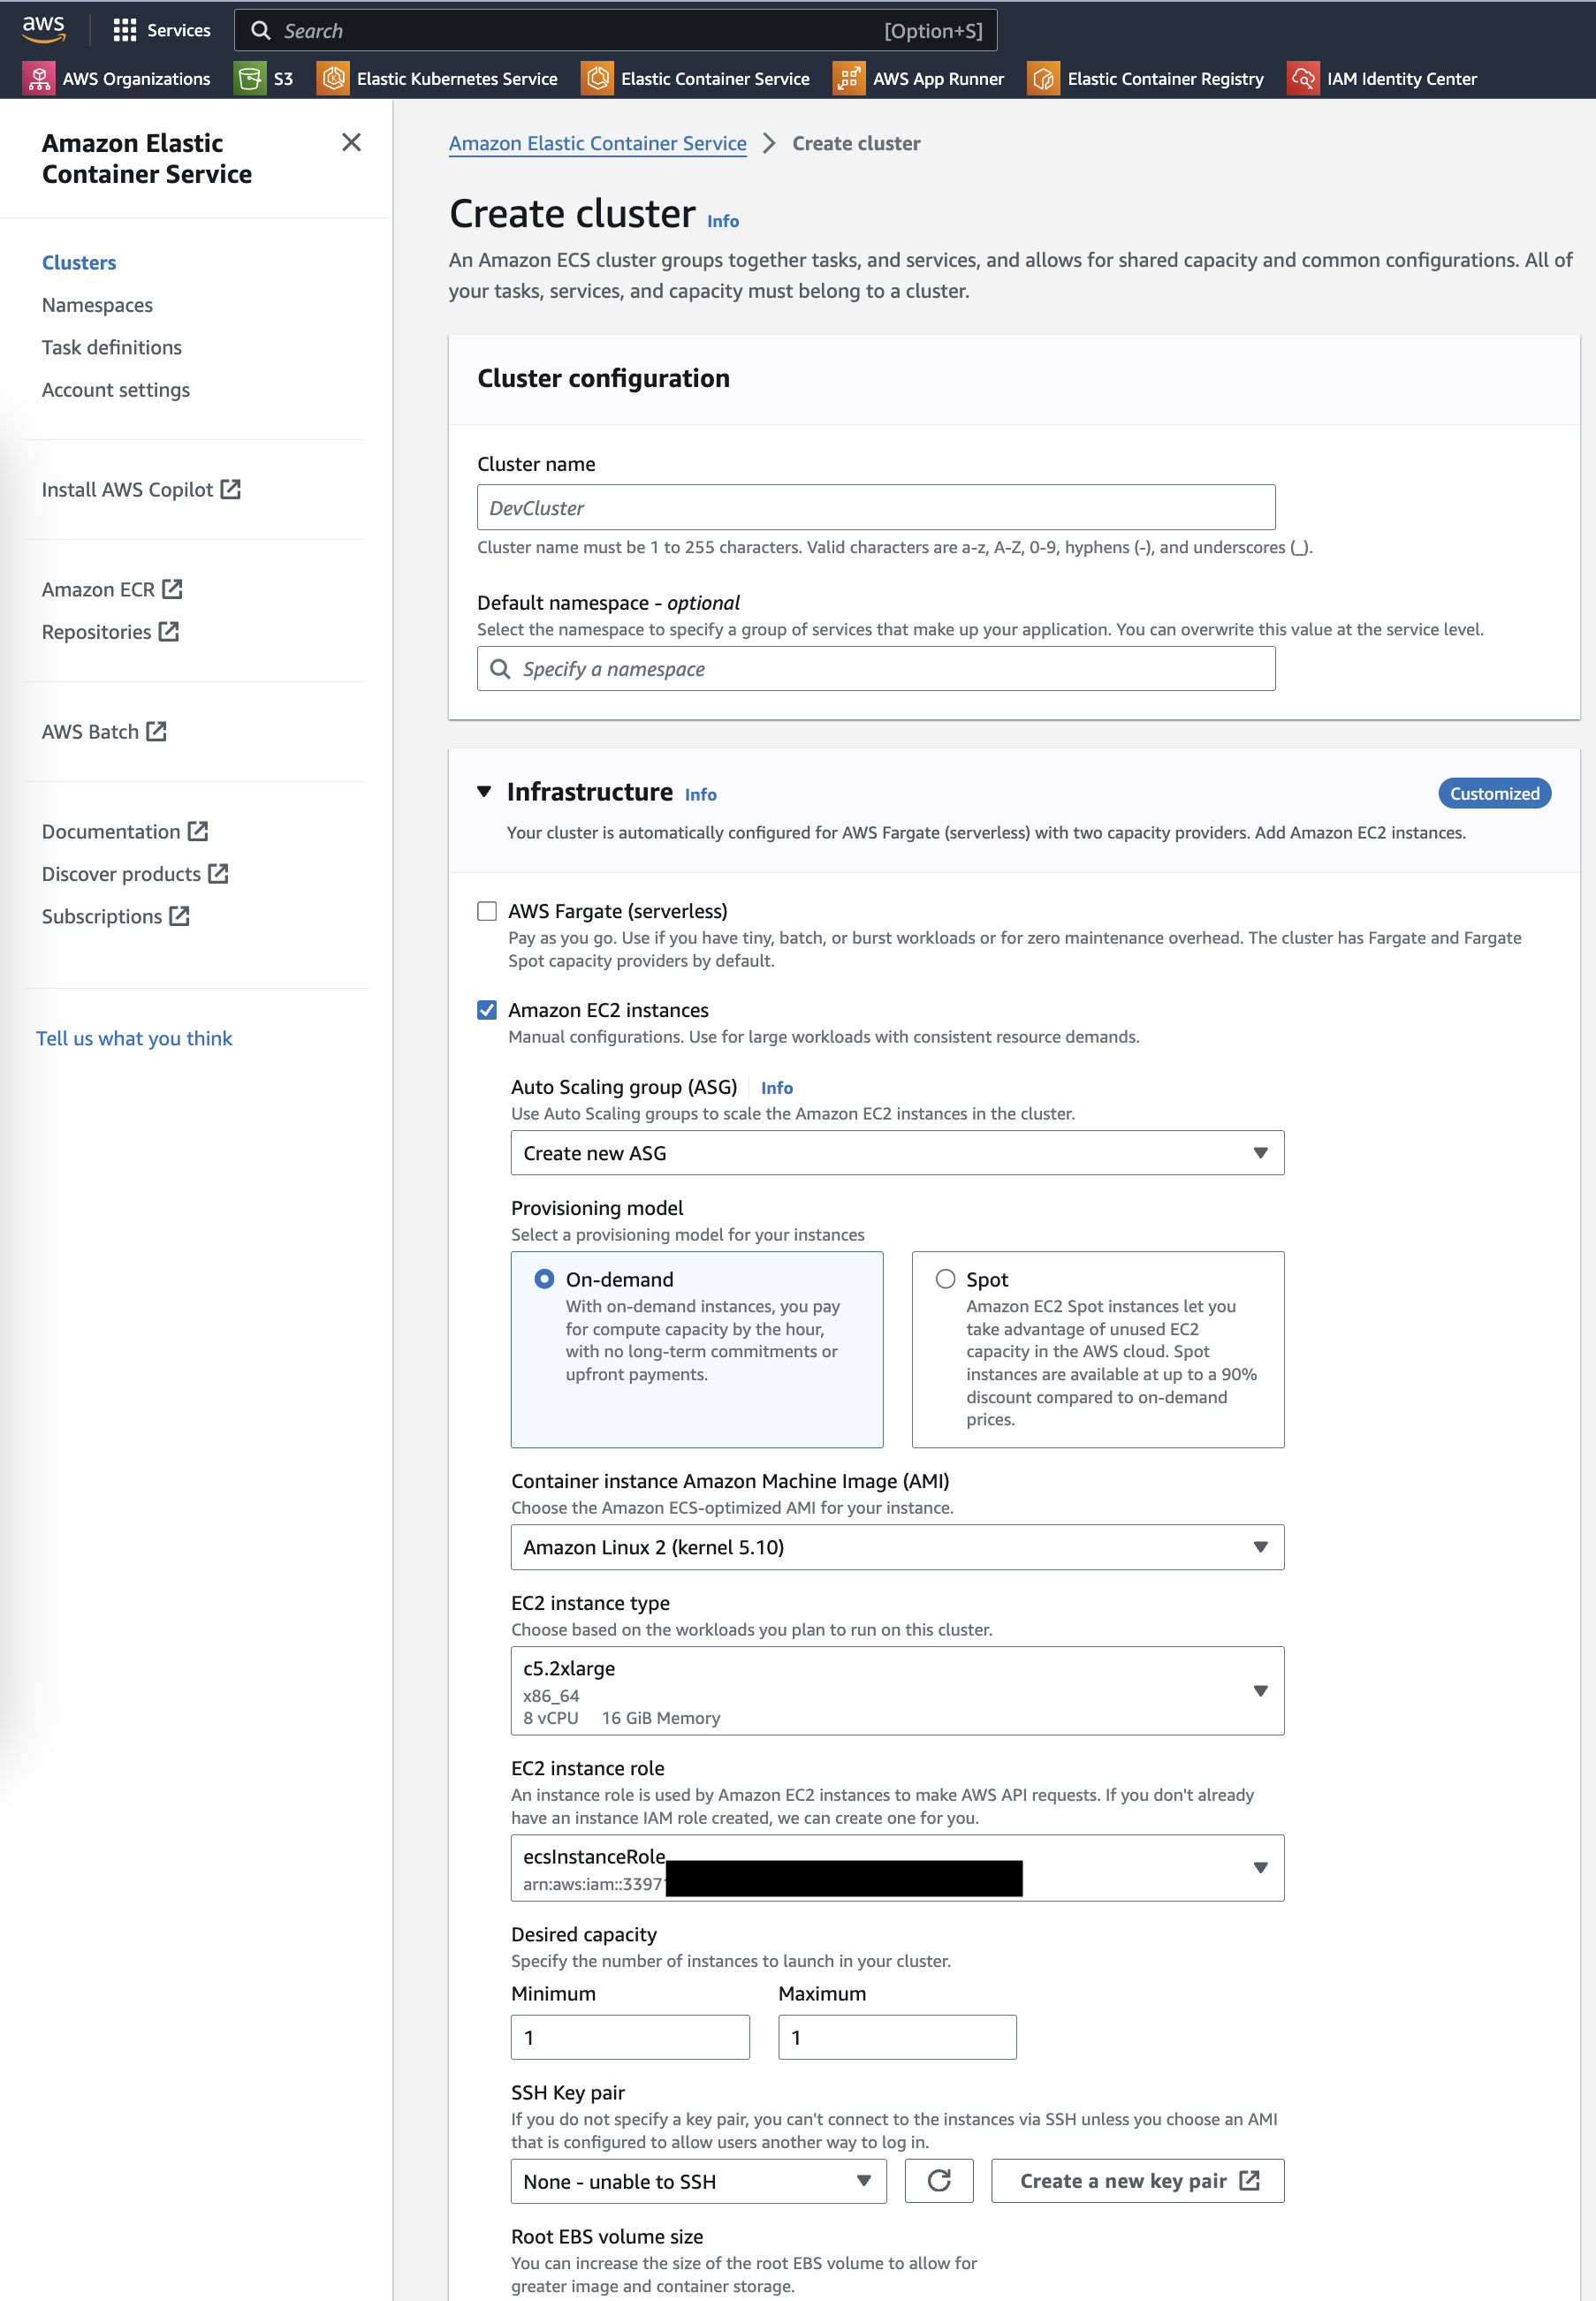 1. Enter an appropriate name in `Cluster name`.
2. To maintain volume, select Amazon EC2 instances, and it's recommended to choose an instance type of `c5.2xlarge` (8 vCPU, 16GB RAM) or higher.
3. Set the Desired capacity to Minimum: 1, Maximum: 1.
4. Create the cluster.
#### 2. Defining a Task
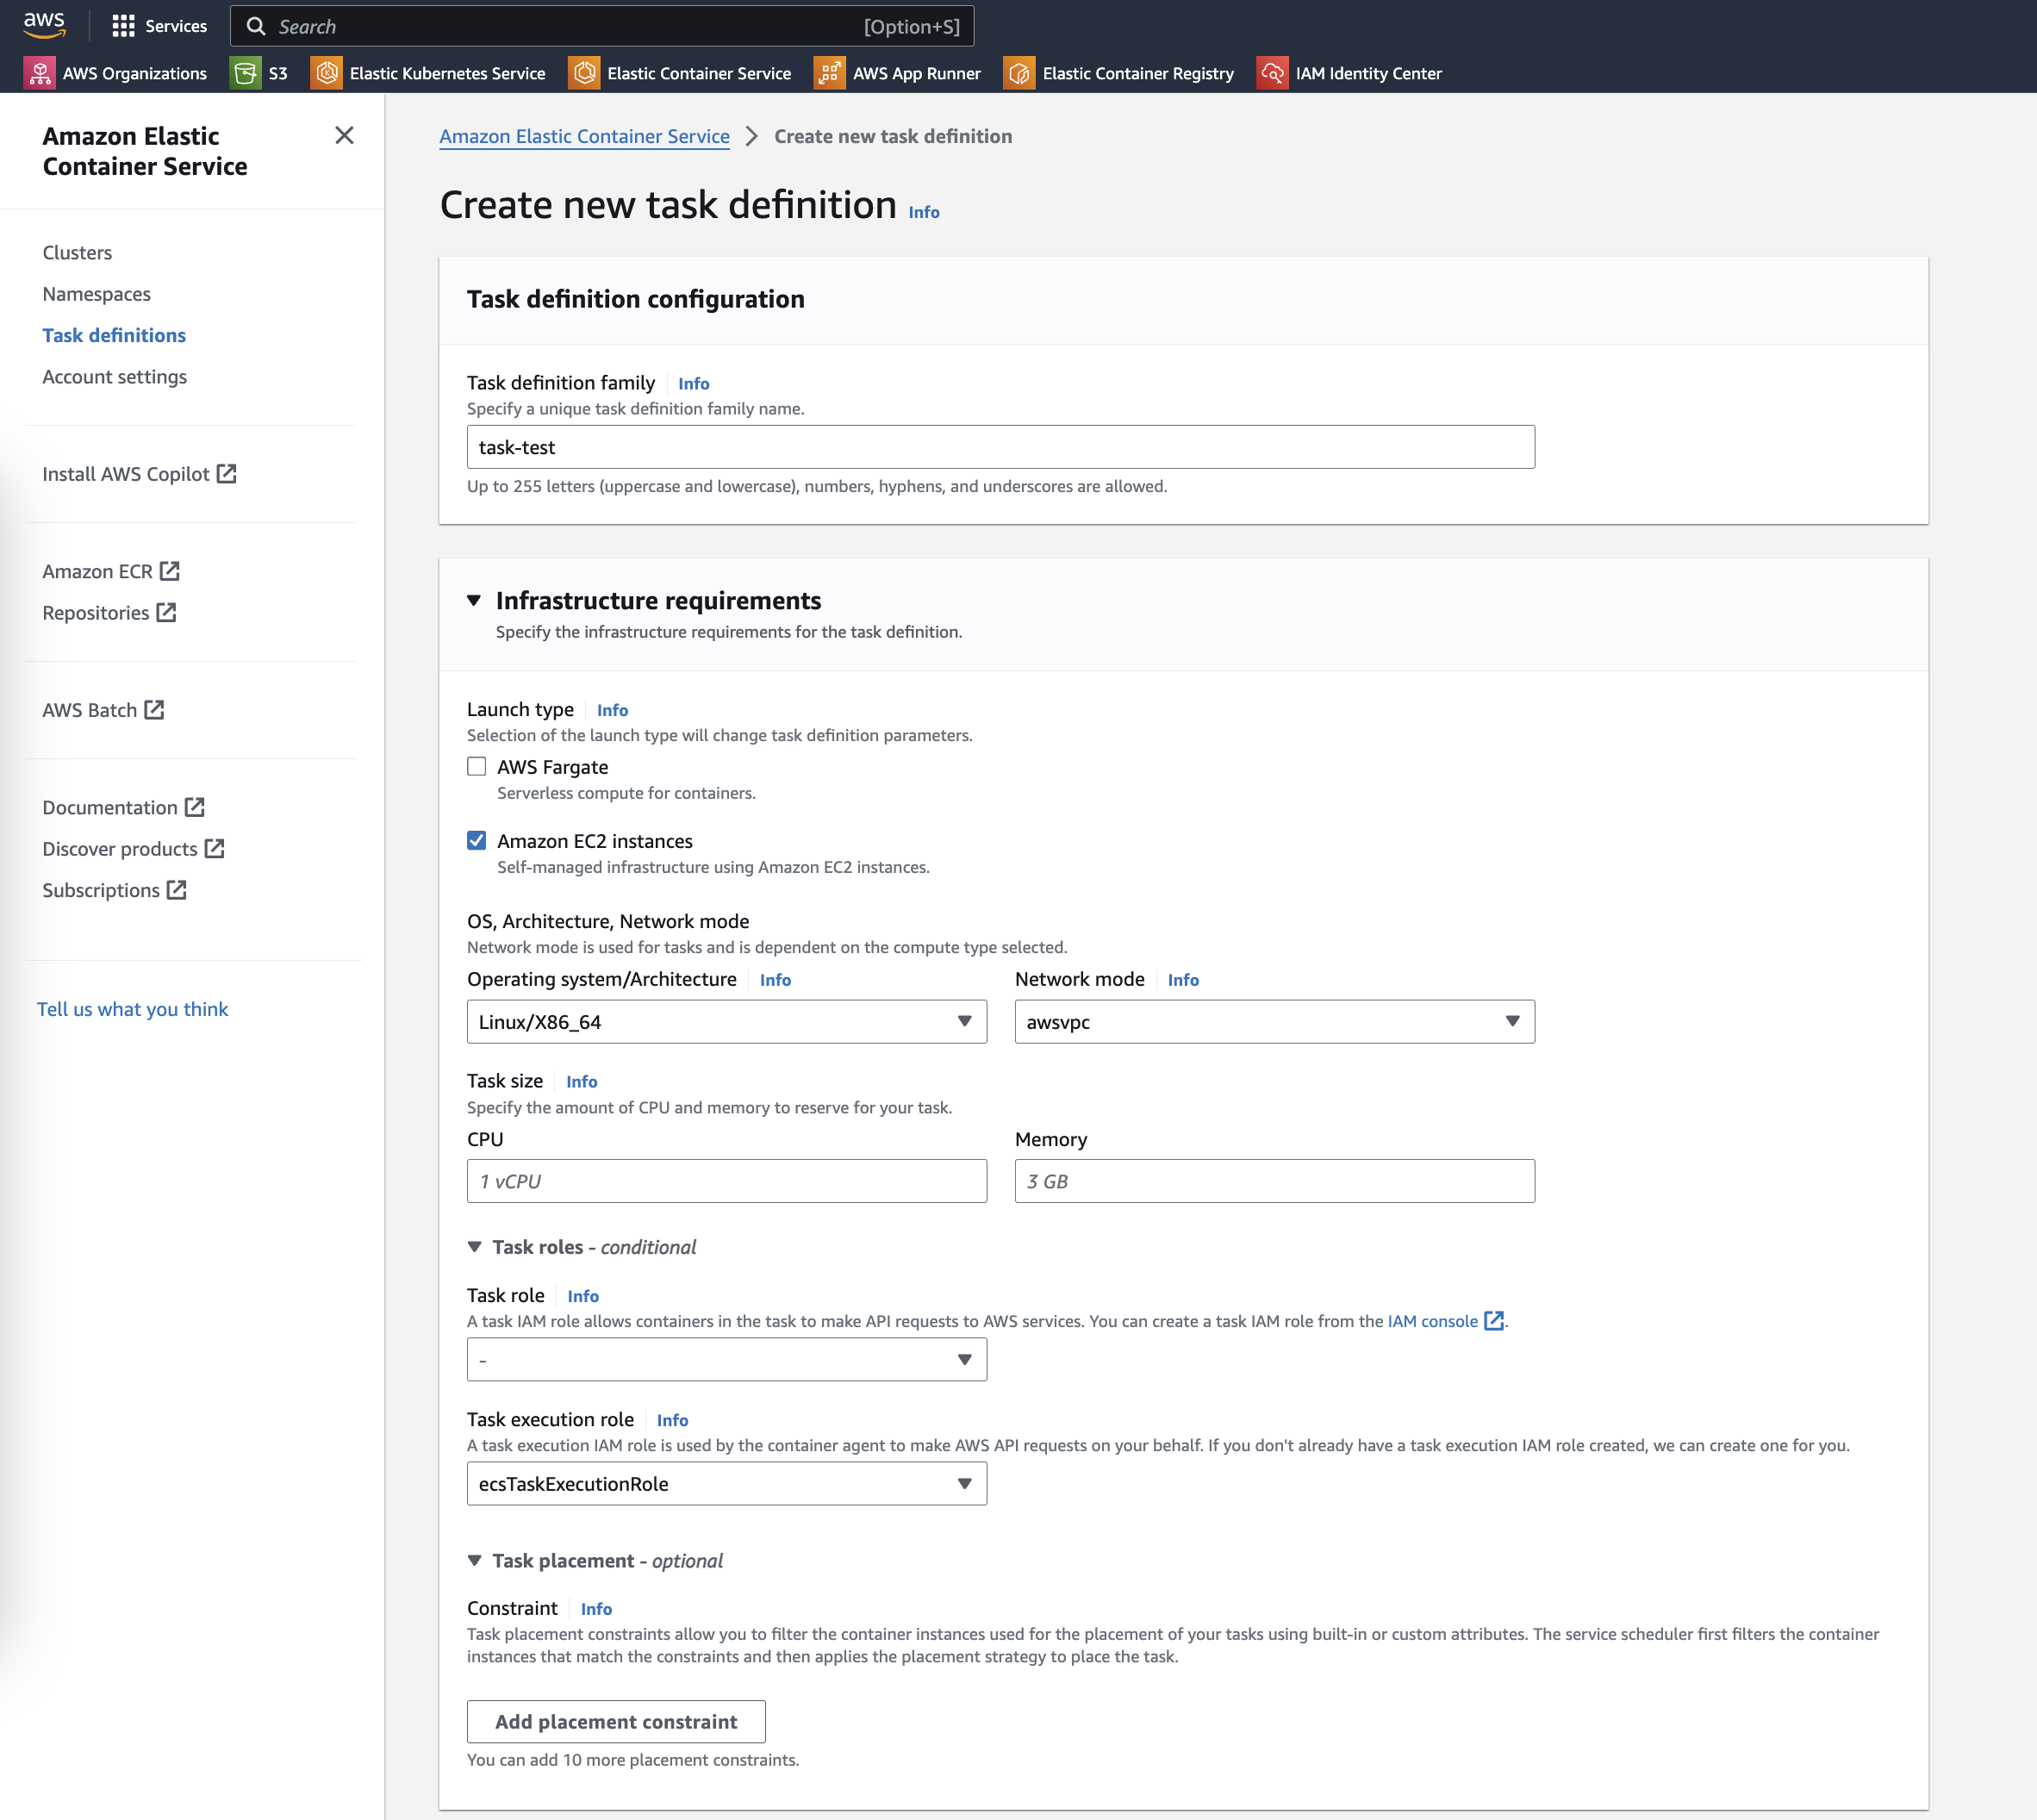
To use the image, you need to define a task first. In the ECS `Task definition` > `Create new task definition` menu, configure the following:
1. **Task definition configuration**
* Enter an appropriate task name.
2. **Infrastructure requirements**
* Set the `Launch type` to `AWS EC2 Instances`.
* Choose `Linux/X86_64` for `Operating system/Architecture`.
* Leave `Task size` blank.
1. Enter an appropriate name in `Cluster name`.
2. To maintain volume, select Amazon EC2 instances, and it's recommended to choose an instance type of `c5.2xlarge` (8 vCPU, 16GB RAM) or higher.
3. Set the Desired capacity to Minimum: 1, Maximum: 1.
4. Create the cluster.
#### 2. Defining a Task
To use the image, you need to define a task first. In the ECS `Task definition` > `Create new task definition` menu, configure the following:
1. **Task definition configuration**
* Enter an appropriate task name.
2. **Infrastructure requirements**
* Set the `Launch type` to `AWS EC2 Instances`.
* Choose `Linux/X86_64` for `Operating system/Architecture`.
* Leave `Task size` blank.
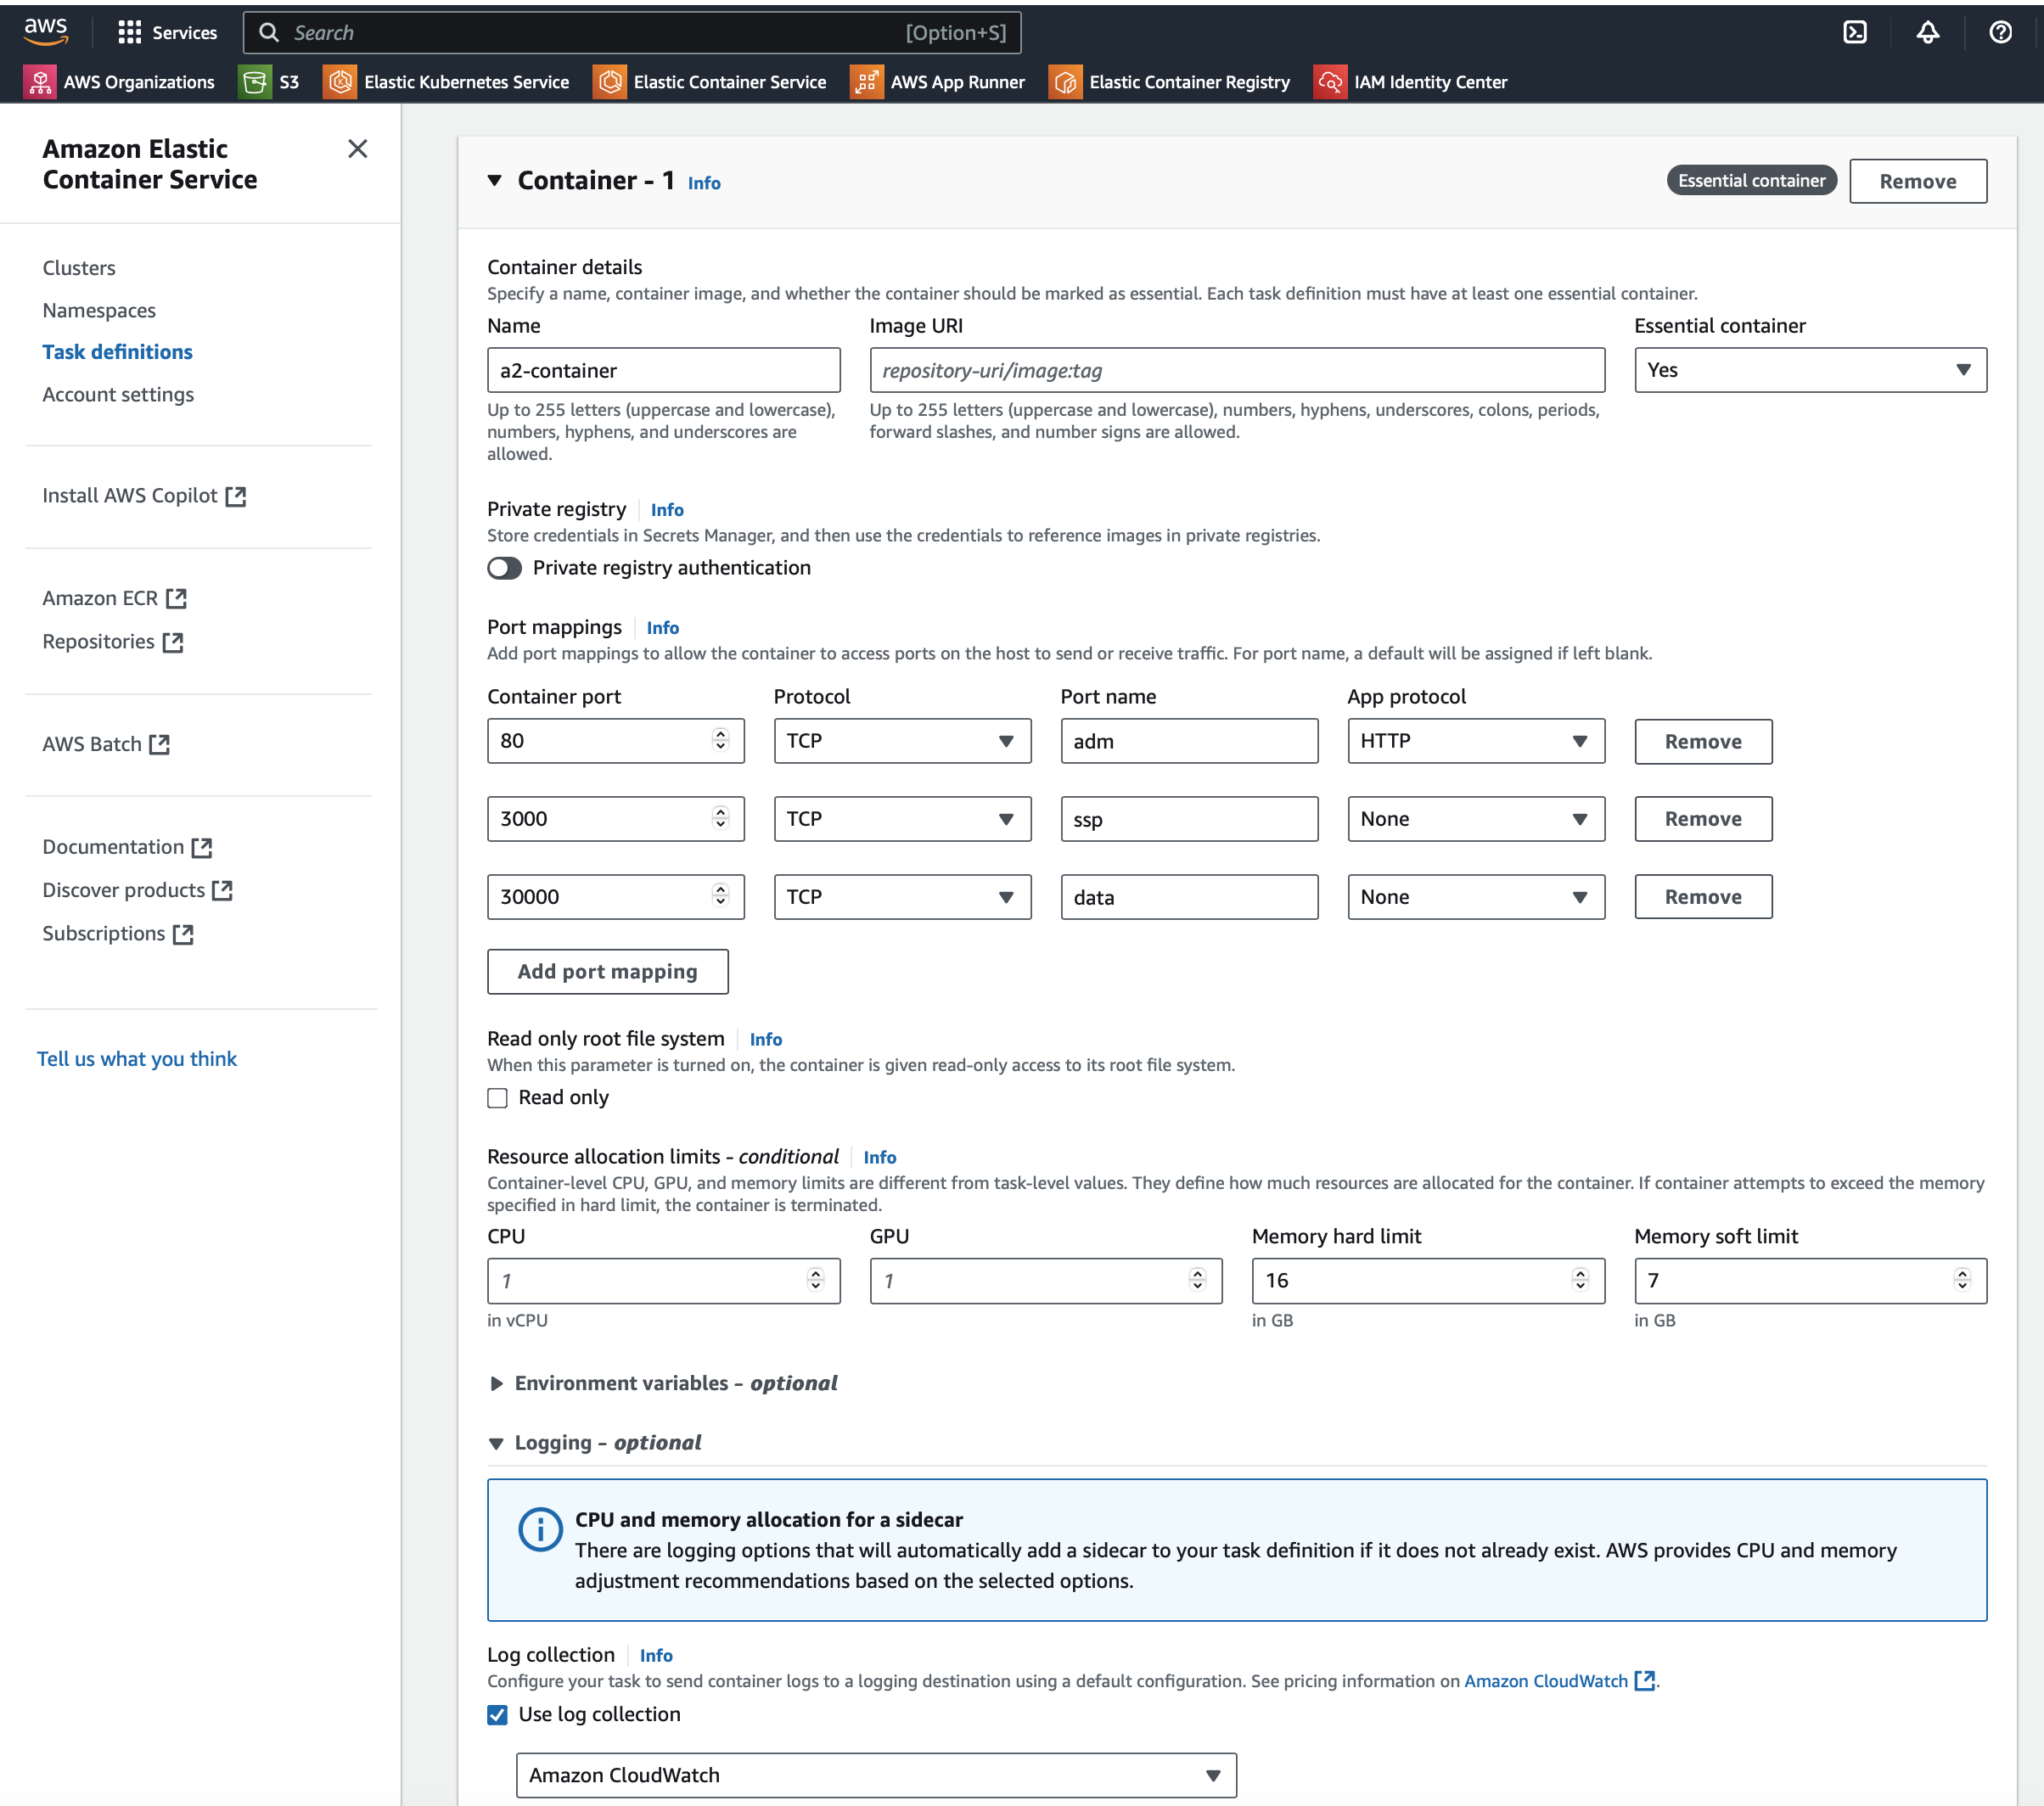
 3. **Container**
* Enter an appropriate container name and the image URI registered in ECR.
* Open the port `8000` for service.
* Allocate all resources to the container within the task.
* Enable the `Use log collection` option in `Logging`.
* Leave the CPU/GPU configuration blank.
* Set memory limits as follows:
* If the EC2 instance has N GB of memory (e.g., 16GB), set the hard limit to N and the soft limit to N/2 - 1.
* This soft limit configuration is to allow two tasks to run briefly during a rolling deployment.
3. **Container**
* Enter an appropriate container name and the image URI registered in ECR.
* Open the port `8000` for service.
* Allocate all resources to the container within the task.
* Enable the `Use log collection` option in `Logging`.
* Leave the CPU/GPU configuration blank.
* Set memory limits as follows:
* If the EC2 instance has N GB of memory (e.g., 16GB), set the hard limit to N and the soft limit to N/2 - 1.
* This soft limit configuration is to allow two tasks to run briefly during a rolling deployment.
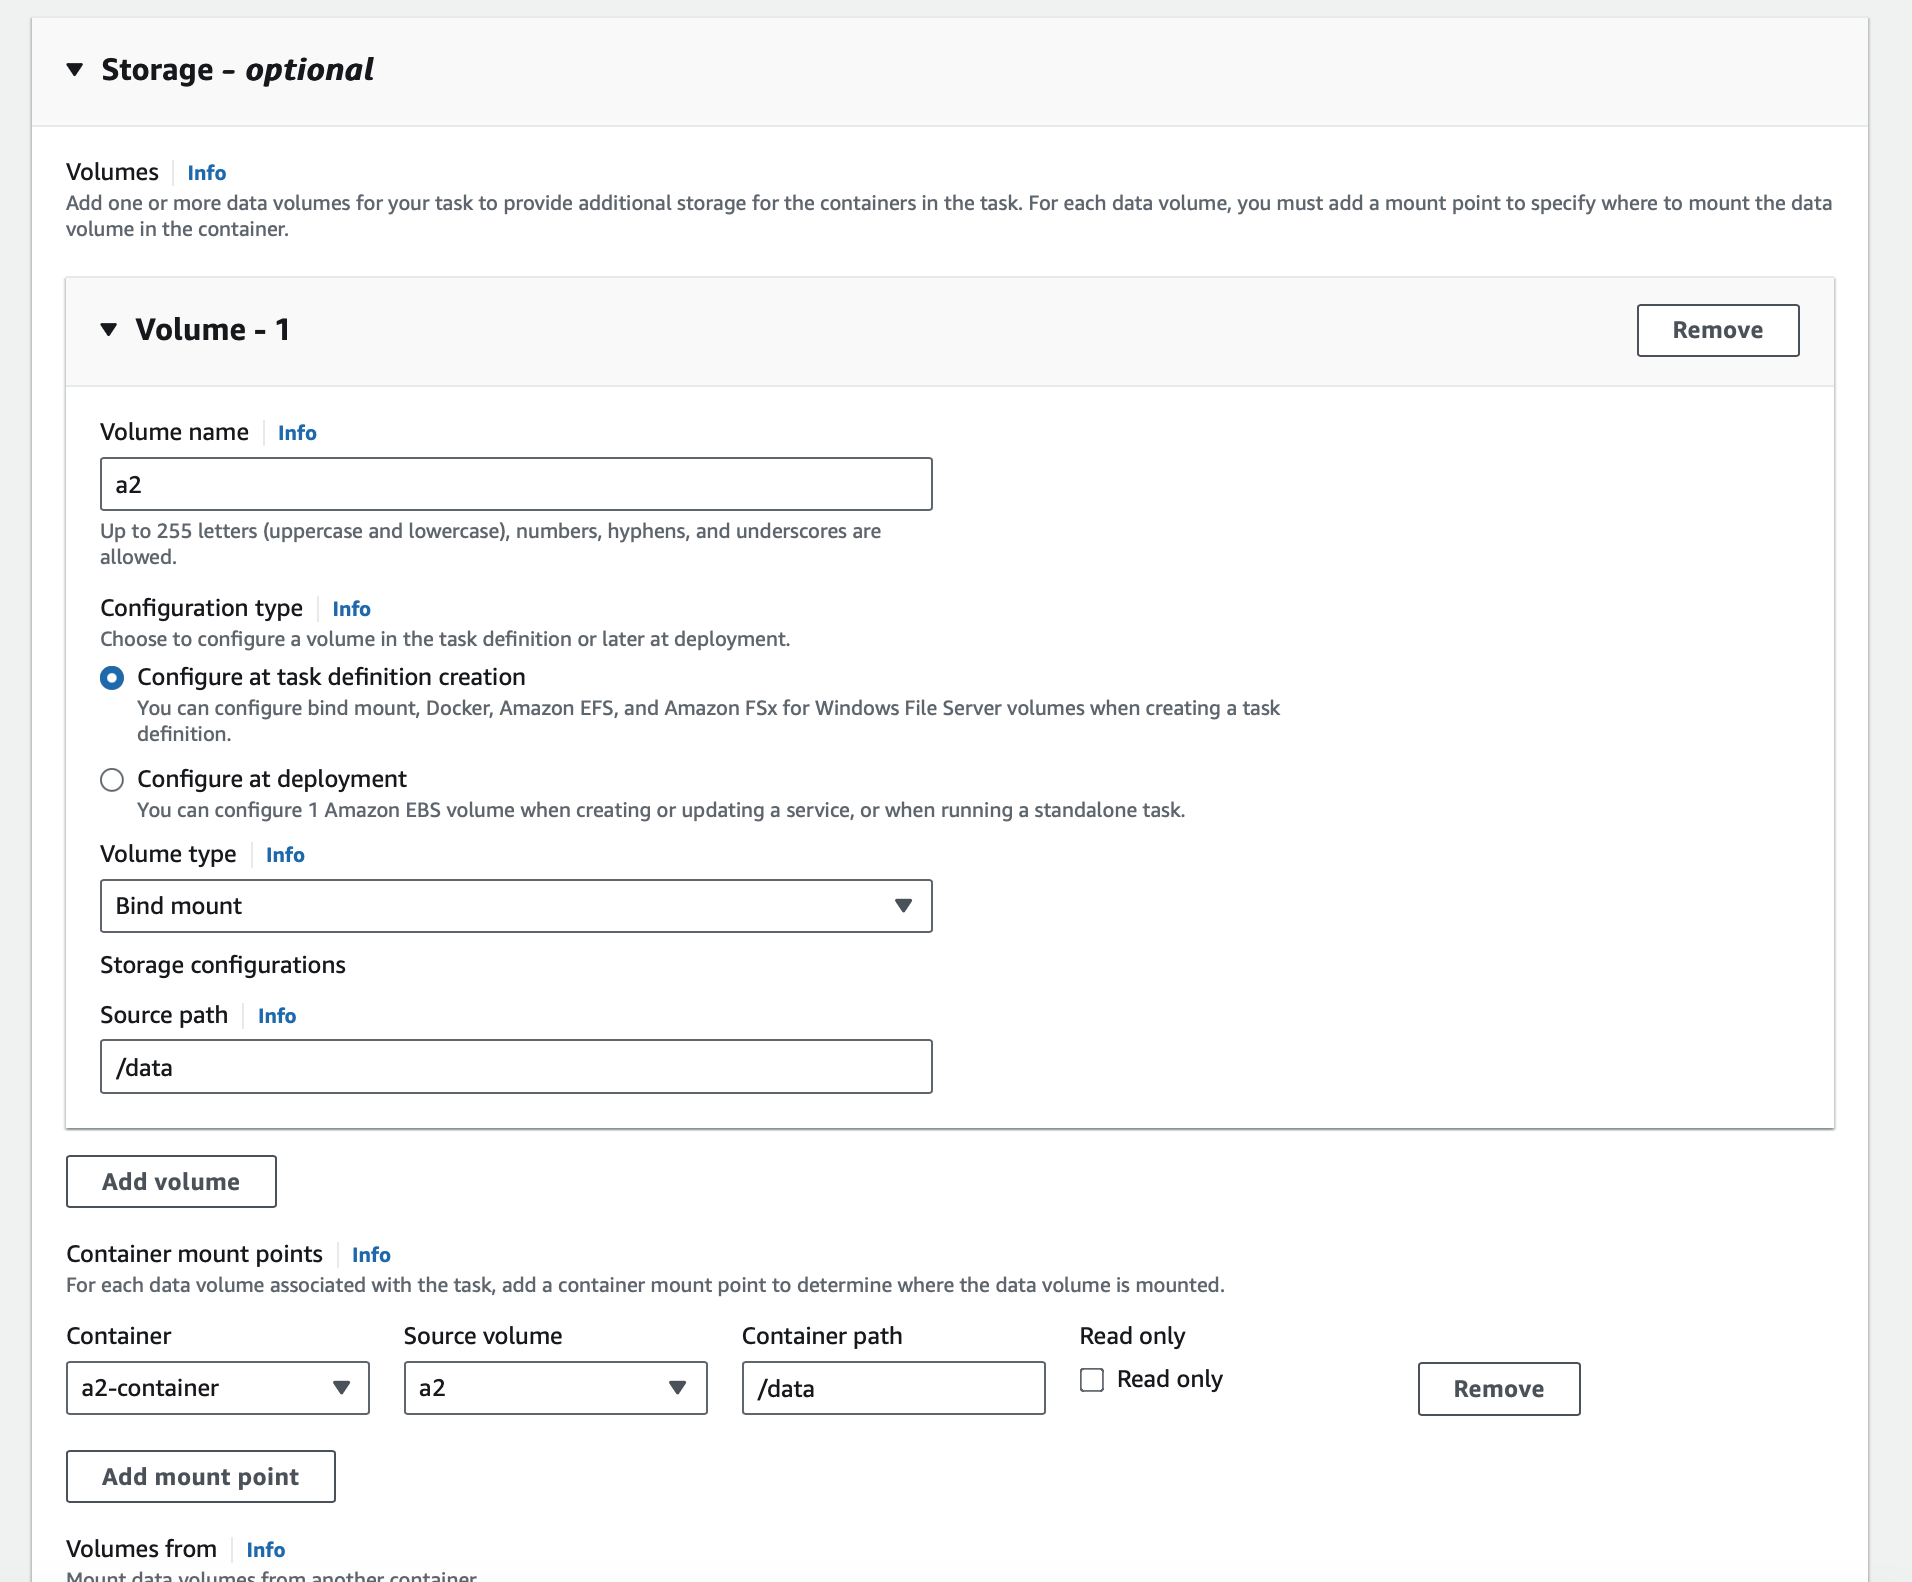
 4. **Volume**
* A2's data is stored in `/data`. To retain the data, define appropriate storage and mount it to this path.
* To retain data using AWS EBS, set `Configuration Type` to `Configure at task definition creation` and choose bind mount for the volume type.
* Enter `/data` as the source path.
4. **Volume**
* A2's data is stored in `/data`. To retain the data, define appropriate storage and mount it to this path.
* To retain data using AWS EBS, set `Configuration Type` to `Configure at task definition creation` and choose bind mount for the volume type.
* Enter `/data` as the source path.
 #### 3. Creating Security Groups
Now, create two security groups to set inbound rules between the microservices. One is for the task, and the other is for the load balancer.
Search for 'security group' in the AWS console's search bar to navigate to the security groups page.
#### 3. Creating Security Groups
Now, create two security groups to set inbound rules between the microservices. One is for the task, and the other is for the load balancer.
Search for 'security group' in the AWS console's search bar to navigate to the security groups page.
 Click the 'Create security group' button in the top right corner to begin the setup.
1. **Security Group for Load Balancer**
Click the 'Create security group' button in the top right corner to begin the setup.
1. **Security Group for Load Balancer**
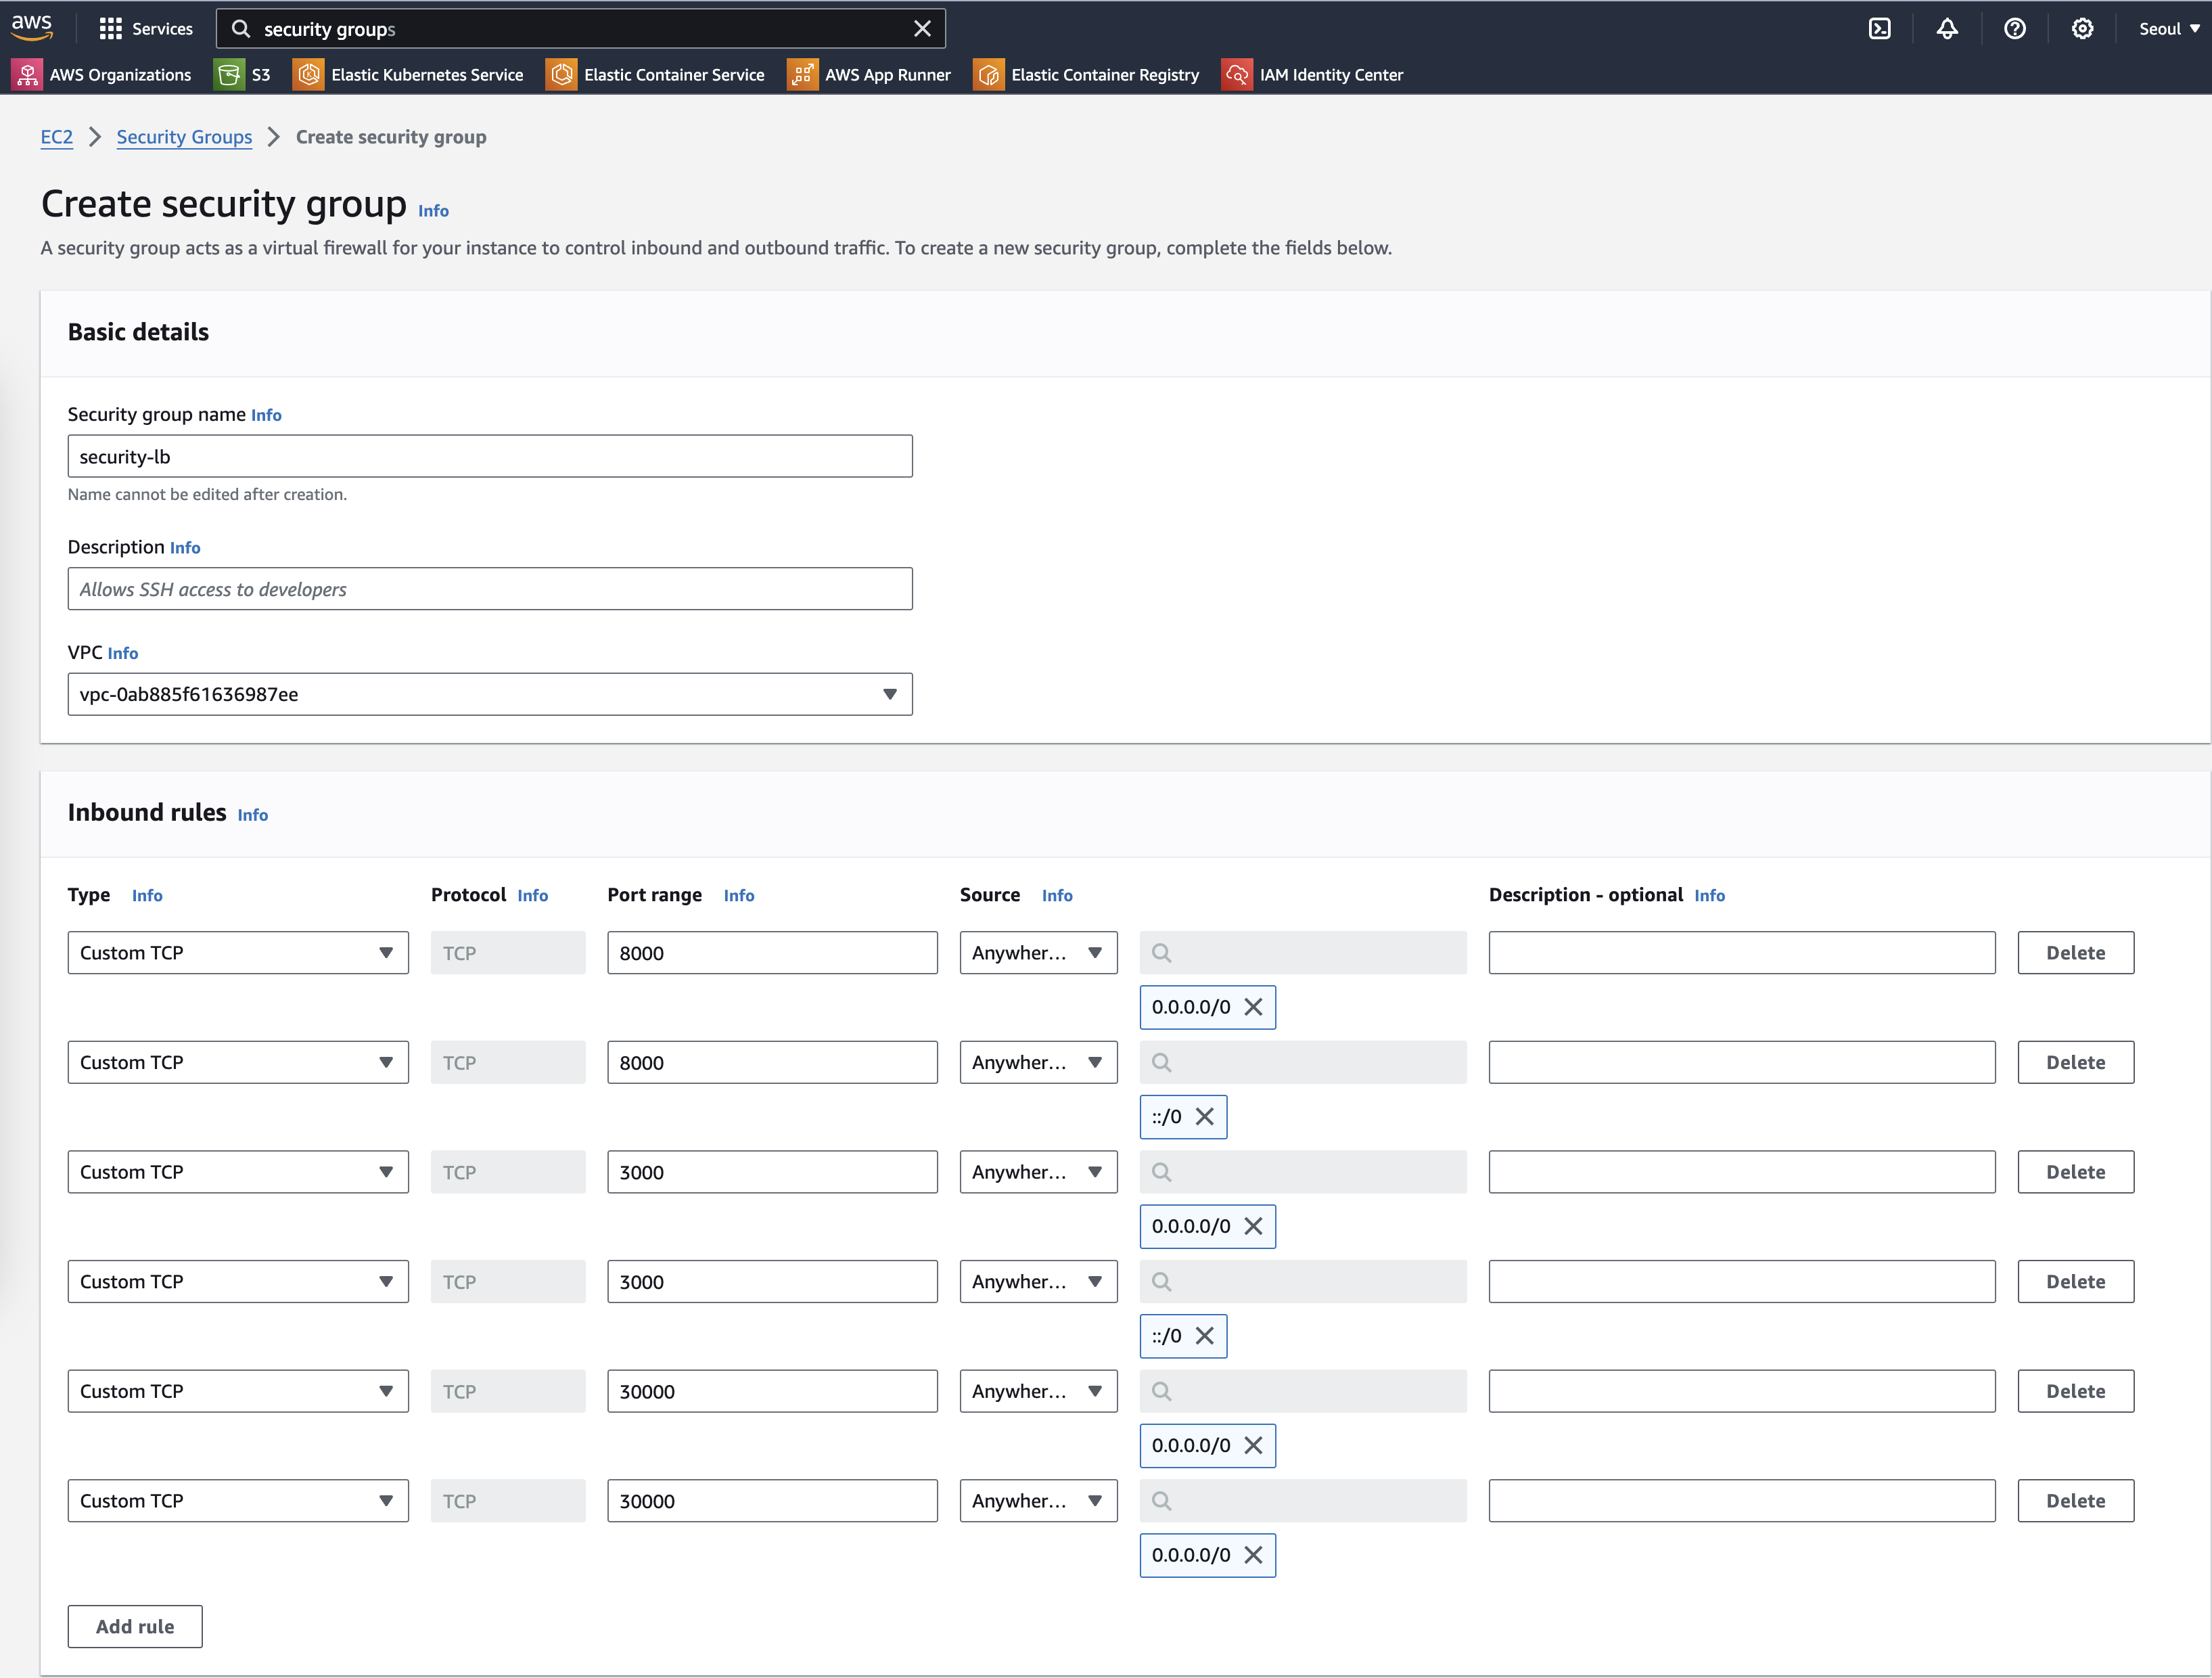 * Set the security group name and inbound rules.
* Example: `security-lb`
* Add inbound rules for port 8000.
* In the example, the source is set to `Anywhere`, but for better security, it's recommended to specify a particular IP.
2. **Security Group for Task**
* Set the security group name and inbound rules.
* Example: `security-lb`
* Add inbound rules for port 8000.
* In the example, the source is set to `Anywhere`, but for better security, it's recommended to specify a particular IP.
2. **Security Group for Task**
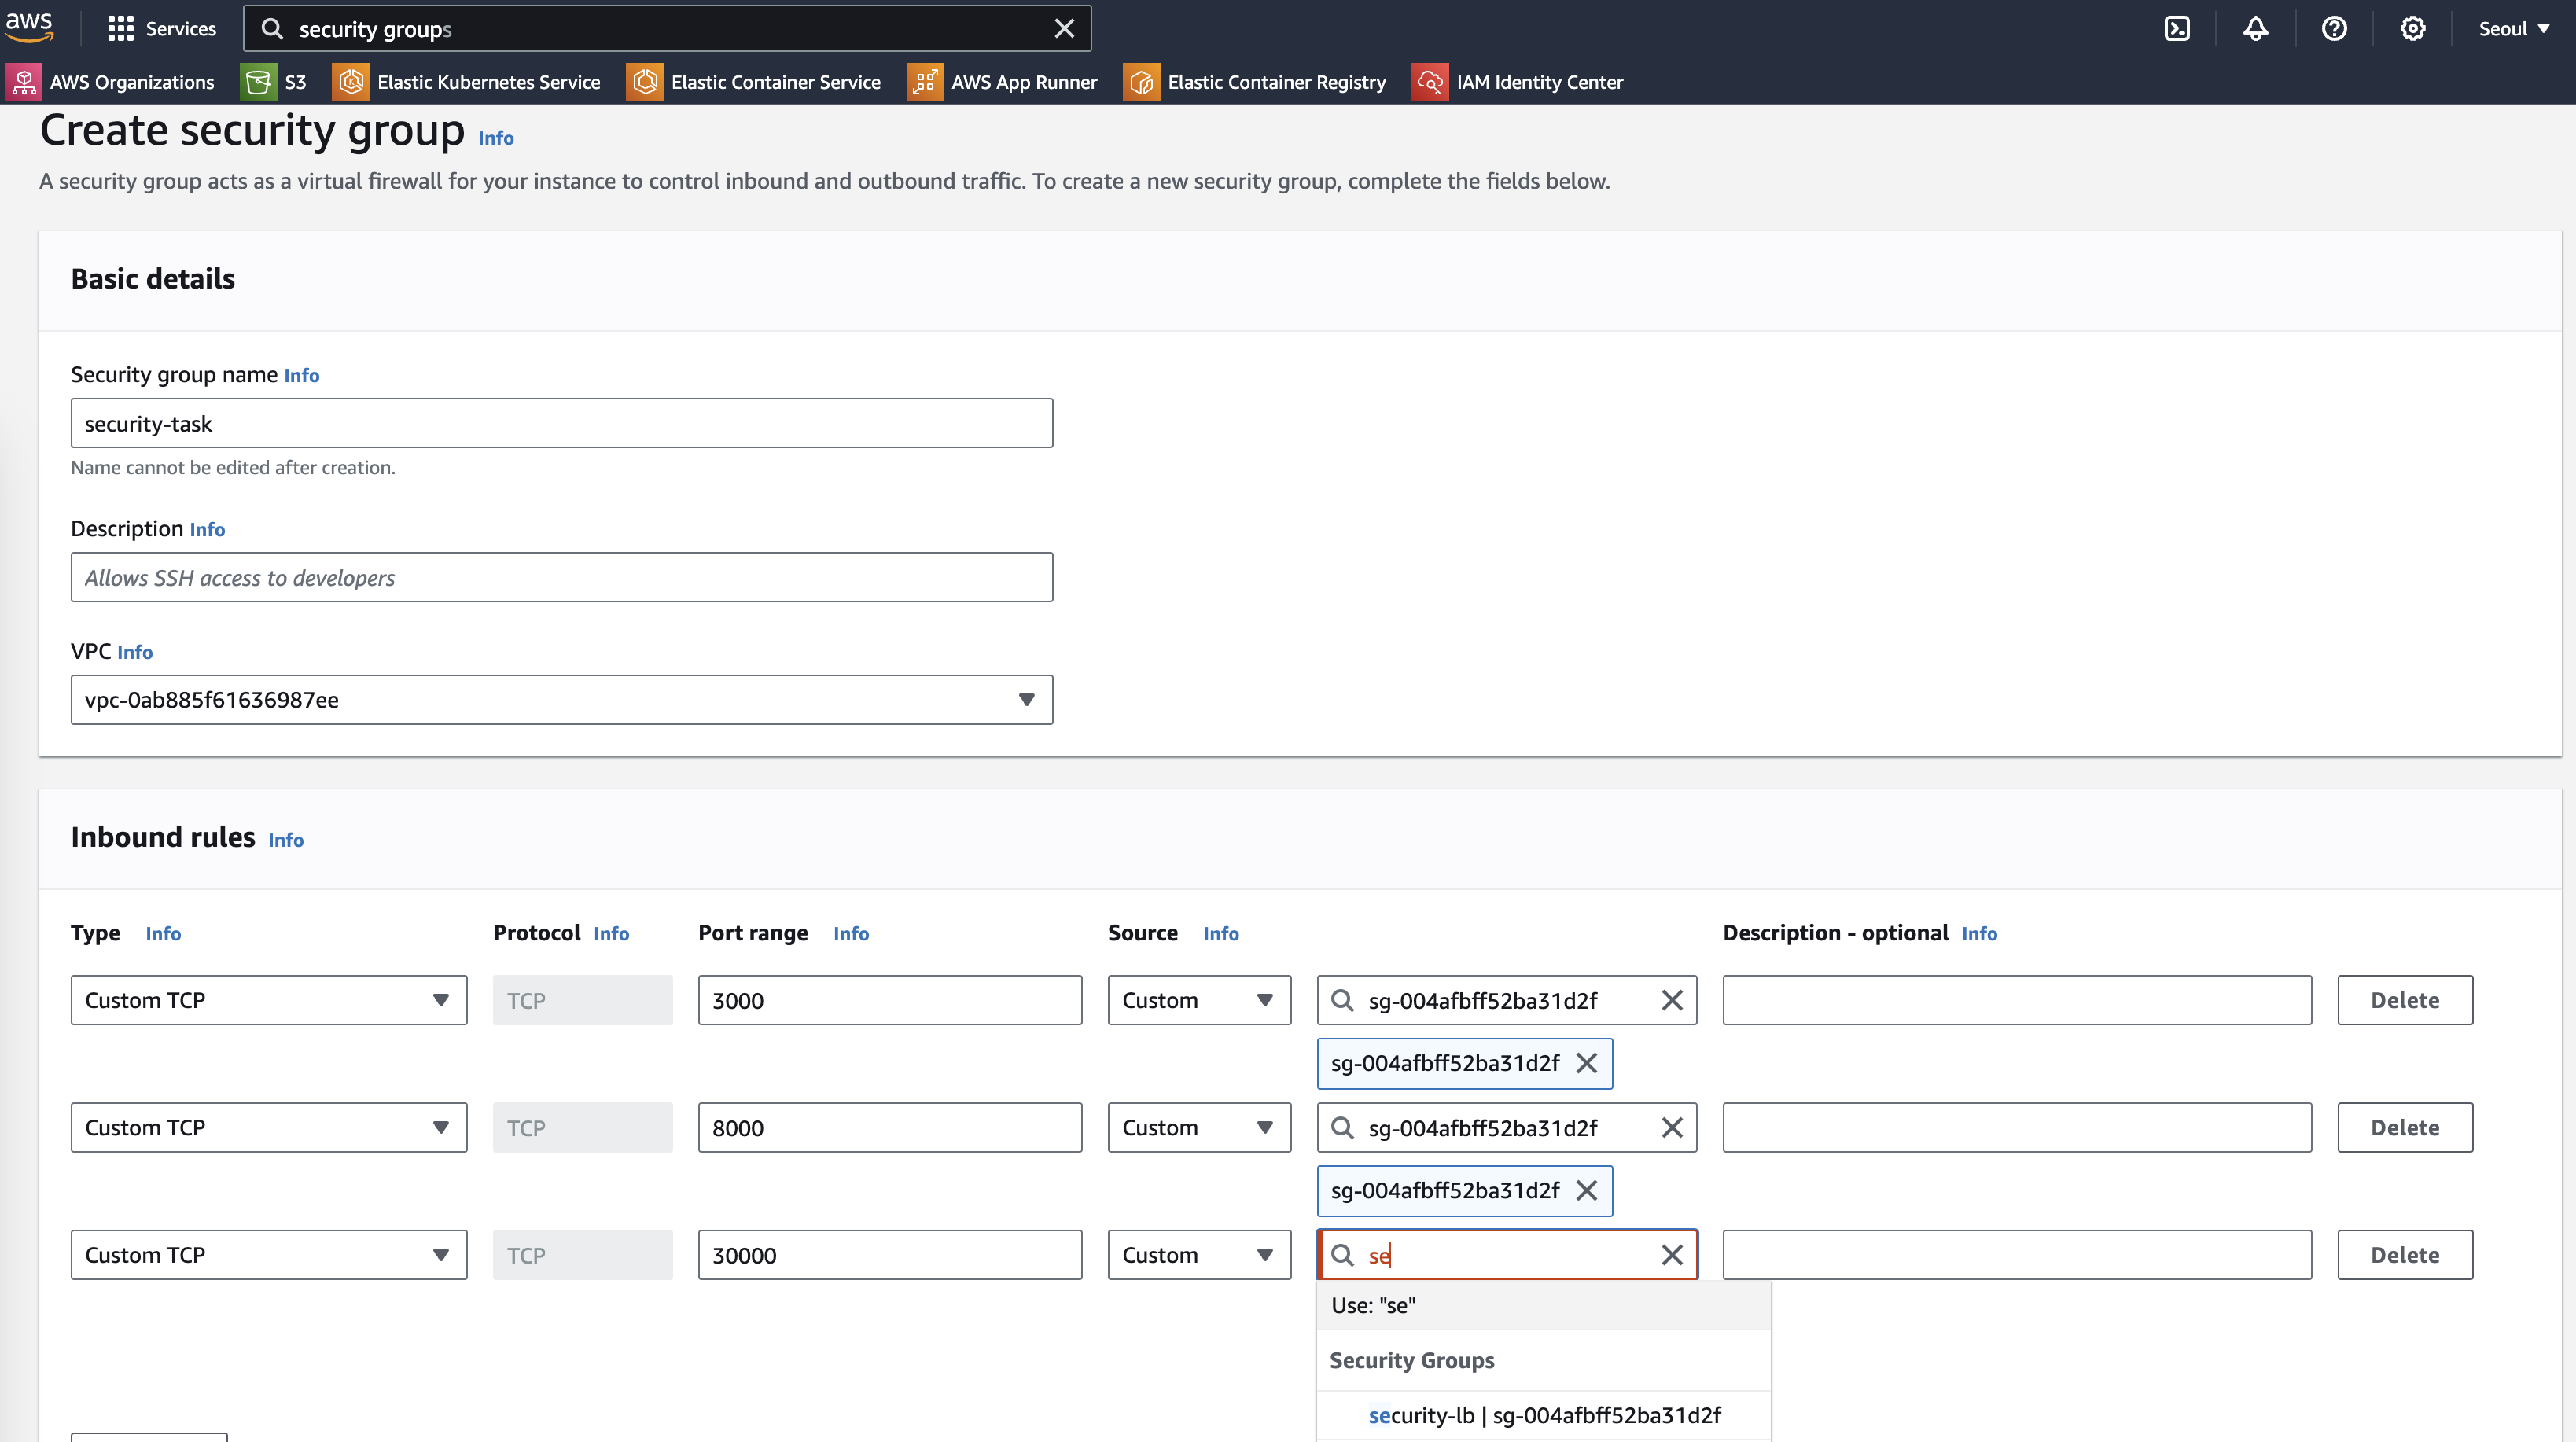 * Add inbound rules for port 8000, and set the source as the security group of the load balancer.
#### 4. Creating Target Groups
Create target groups for the load balancer to forward requests. Search for `Target group` in the AWS console and navigate to the page.
* Add inbound rules for port 8000, and set the source as the security group of the load balancer.
#### 4. Creating Target Groups
Create target groups for the load balancer to forward requests. Search for `Target group` in the AWS console and navigate to the page.
 1. **Target Group for Task**
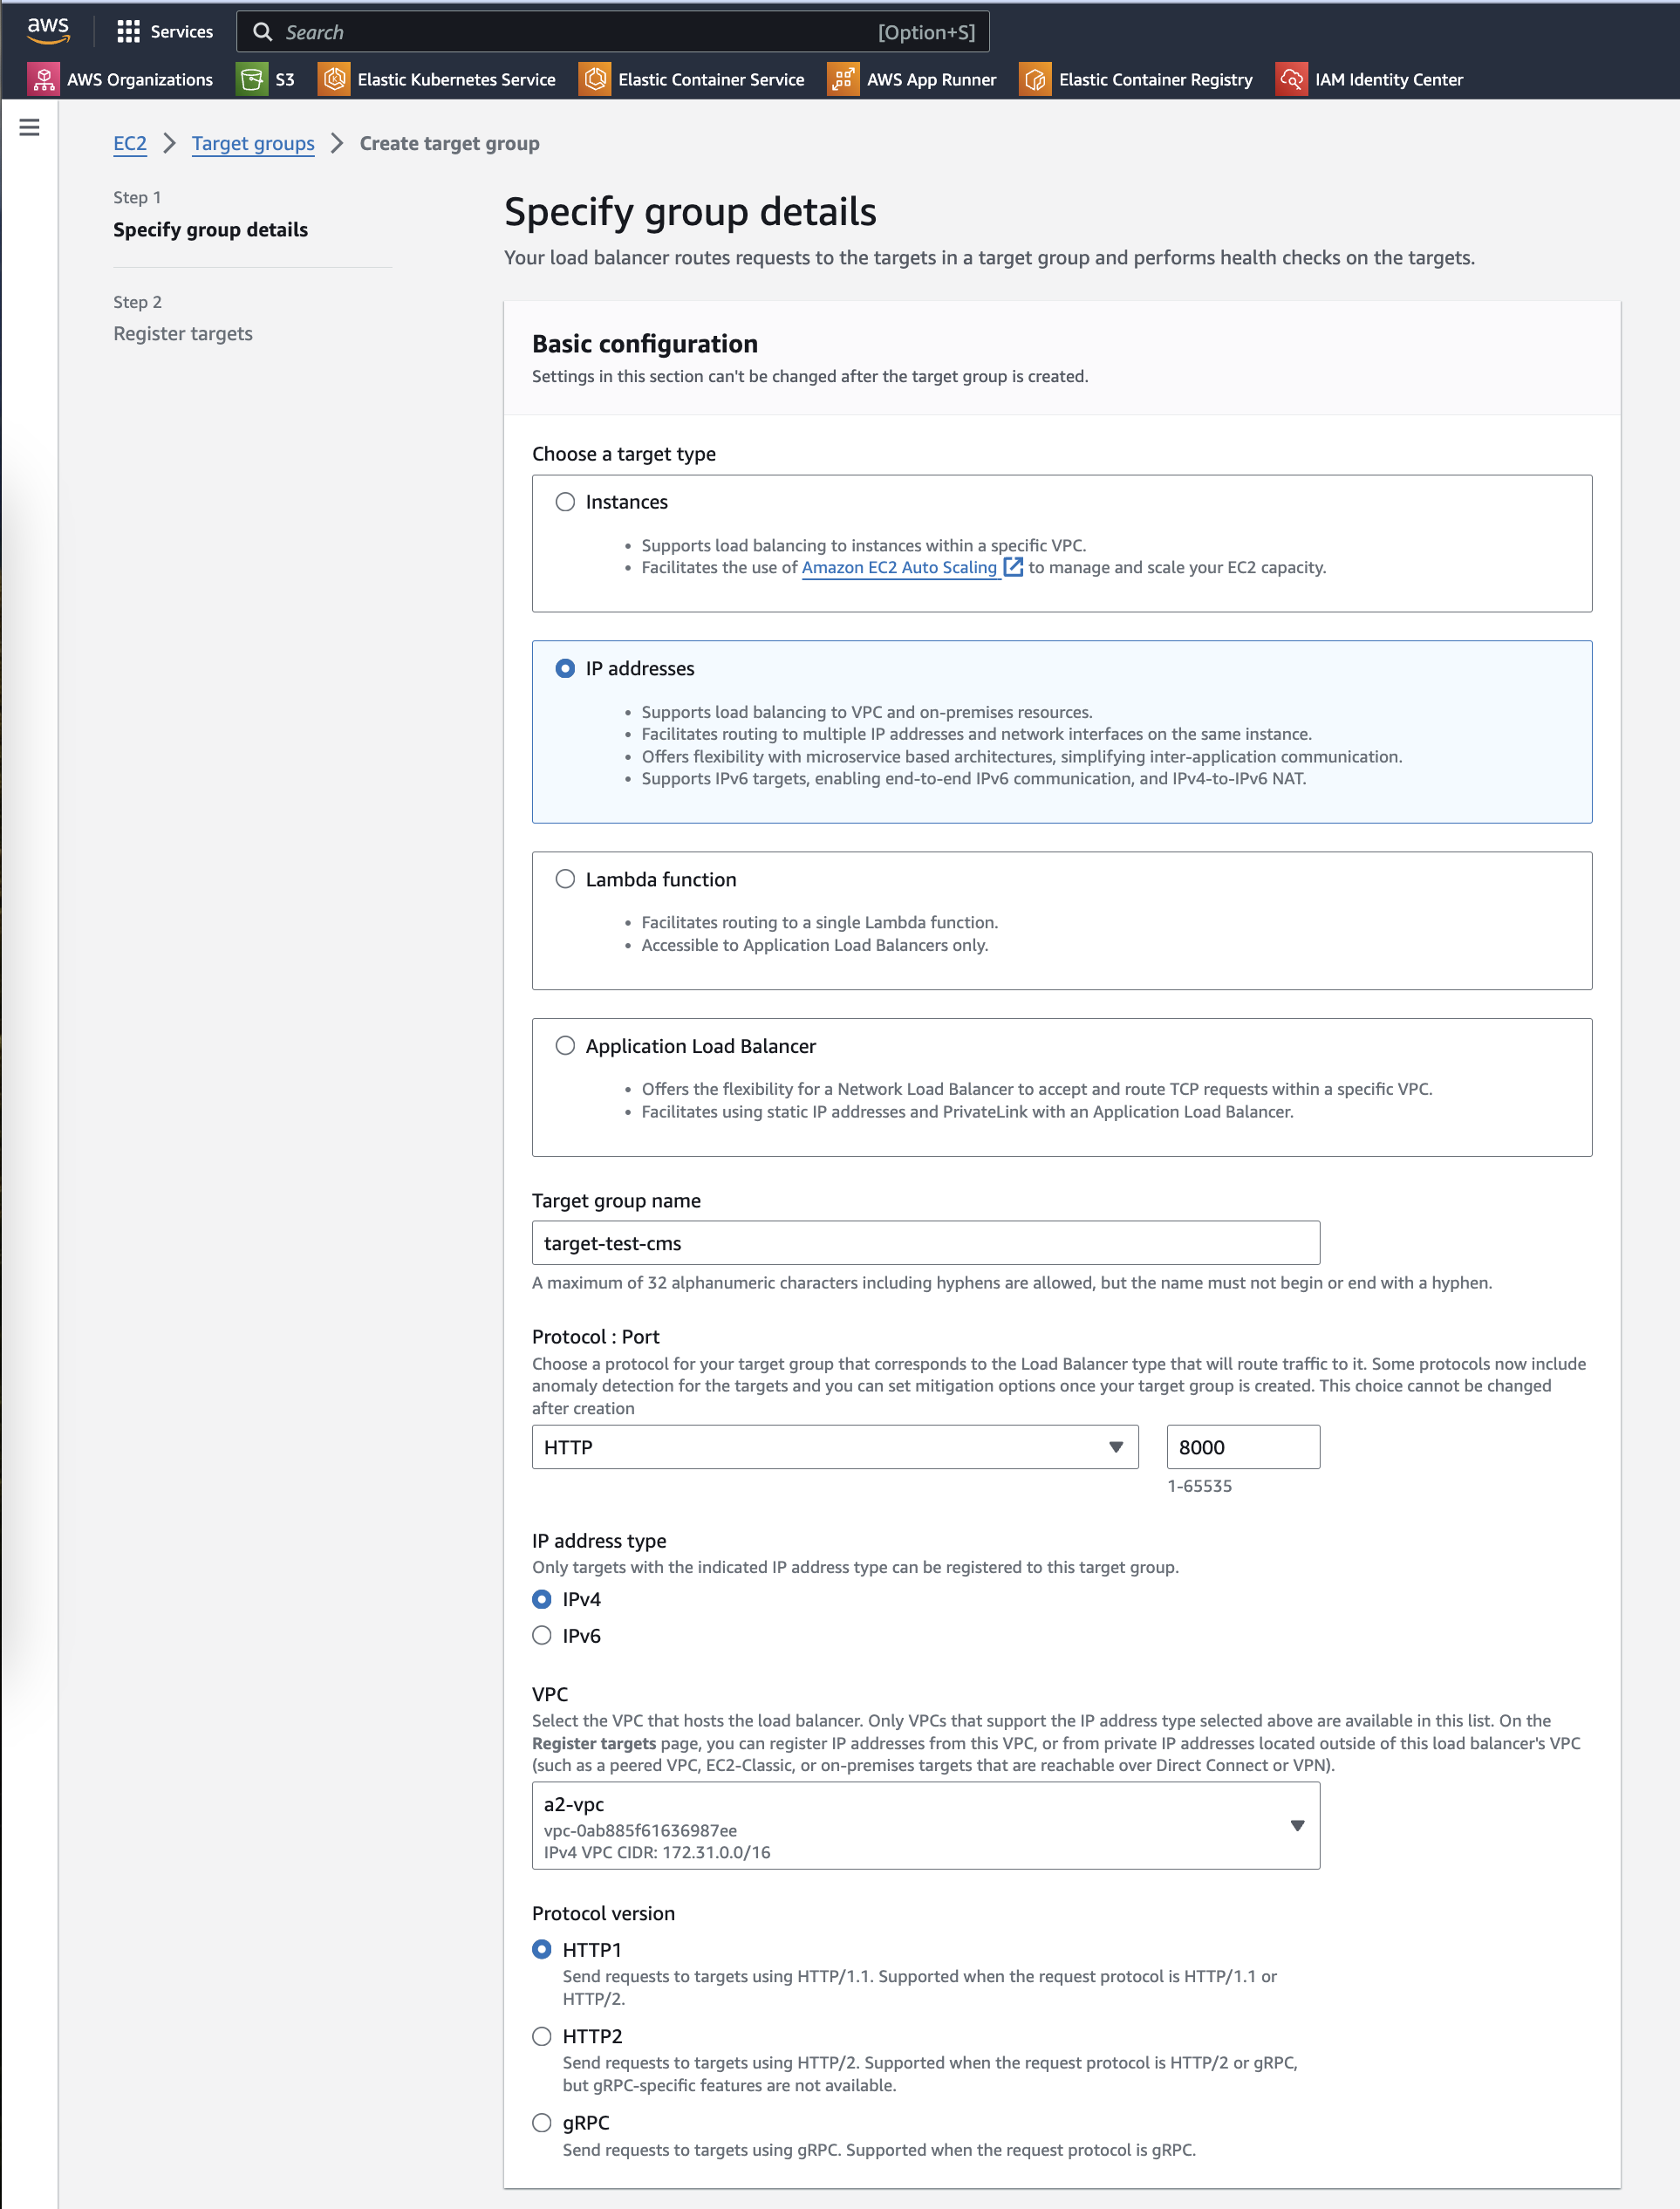 * Create a target group for port 8000.
* Choose IP addresses as the target type and set the port to 8000.
* Create a target group for port 8000.
* Choose IP addresses as the target type and set the port to 8000.
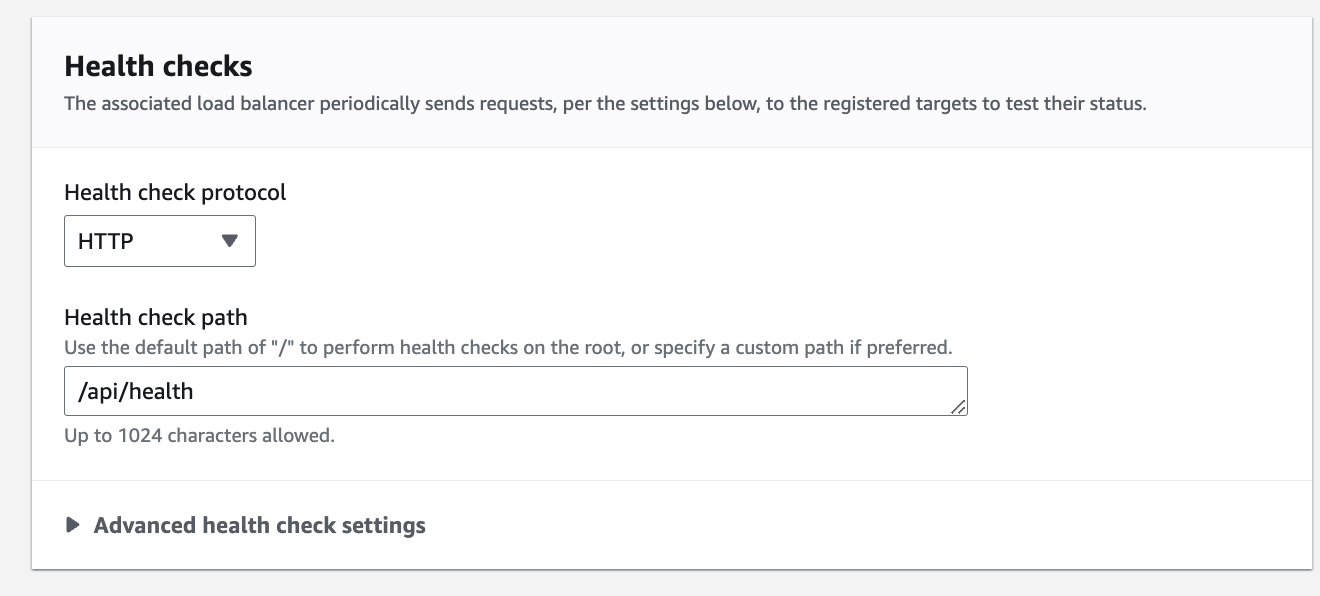 * Enter `/api/health` as the health check path.
* Click `Next` and complete the target group creation.
#### 5. Creating a Load Balancer
Search for `Load Balancers` in the AWS console and navigate to the page.
* Enter `/api/health` as the health check path.
* Click `Next` and complete the target group creation.
#### 5. Creating a Load Balancer
Search for `Load Balancers` in the AWS console and navigate to the page.
 Click the `Create Load Balancer` button in the top right corner, then choose `Application Load Balancer`.
1. **Basic Configuration**
Click the `Create Load Balancer` button in the top right corner, then choose `Application Load Balancer`.
1. **Basic Configuration**
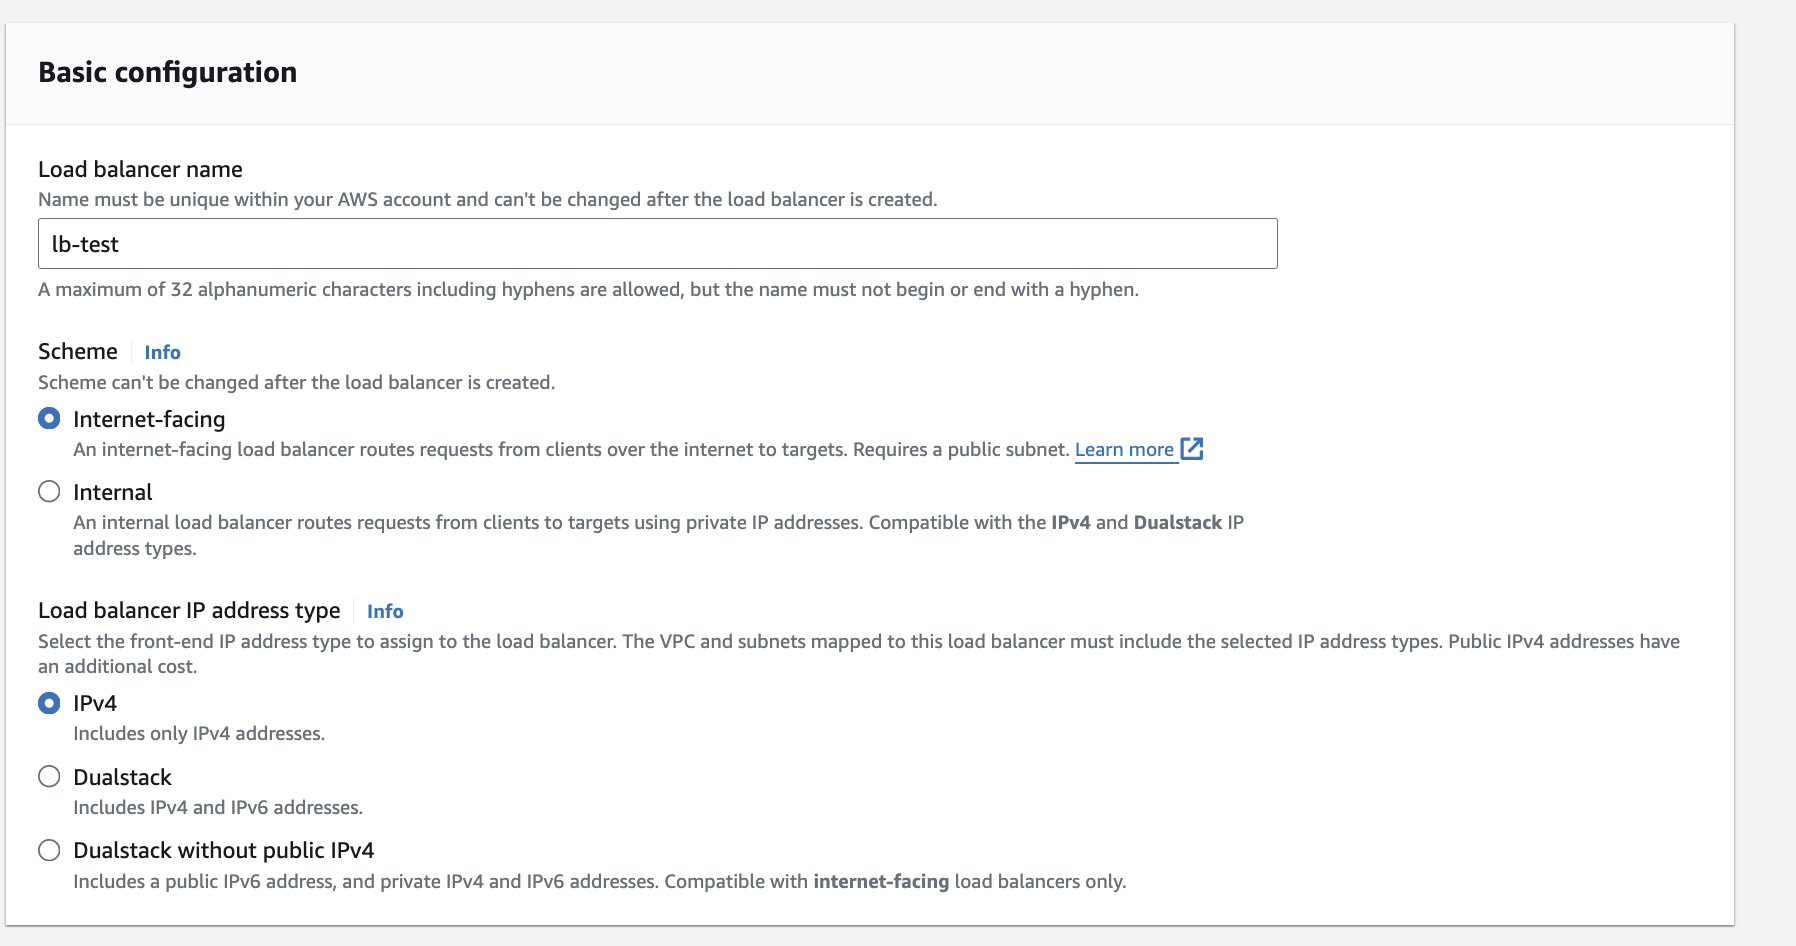 * Select `Internet-facing` for the scheme.
* Set the IP address type to `IPv4`.
2. **Network Mapping & Security Groups**
* Select `Internet-facing` for the scheme.
* Set the IP address type to `IPv4`.
2. **Network Mapping & Security Groups**
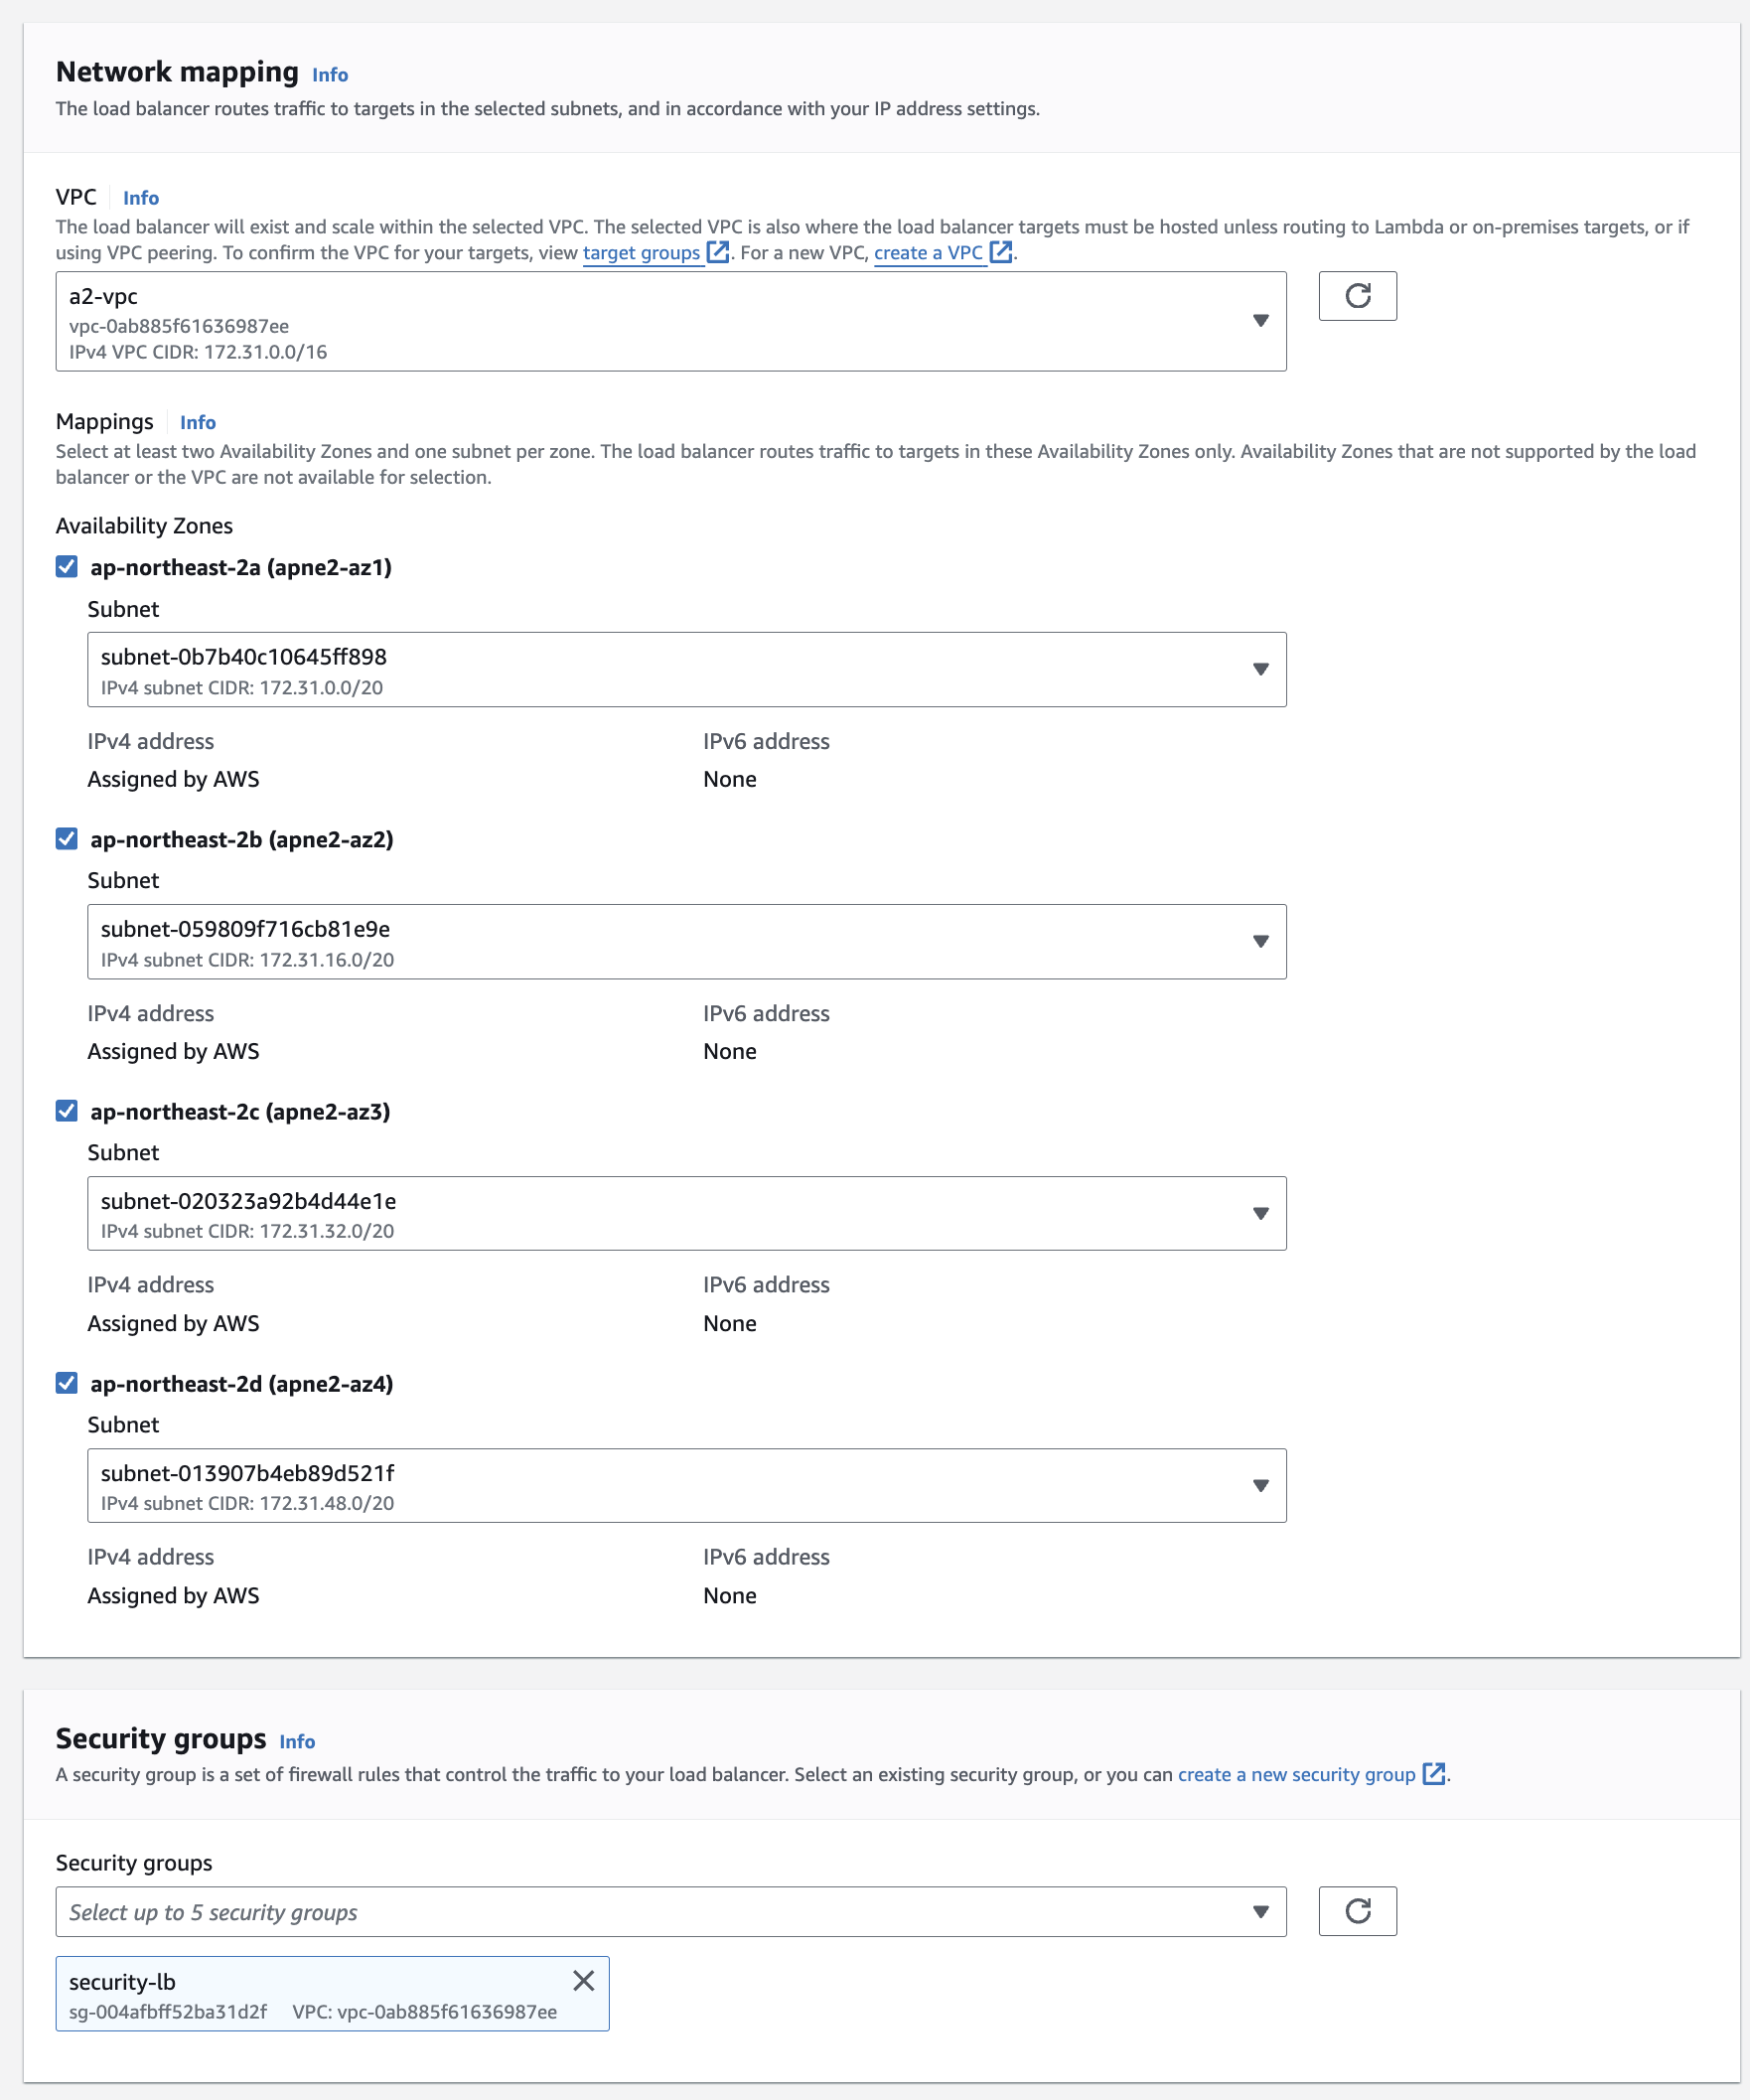 * Select all availability zones for the relevant region (e.g., ap-northeast-2).
* Copy and save the VPC ID and Subnet ID as they will be needed when creating services.
* Choose the security group created earlier for the load balancer.
3. **Listeners**
* Select all availability zones for the relevant region (e.g., ap-northeast-2).
* Copy and save the VPC ID and Subnet ID as they will be needed when creating services.
* Choose the security group created earlier for the load balancer.
3. **Listeners**
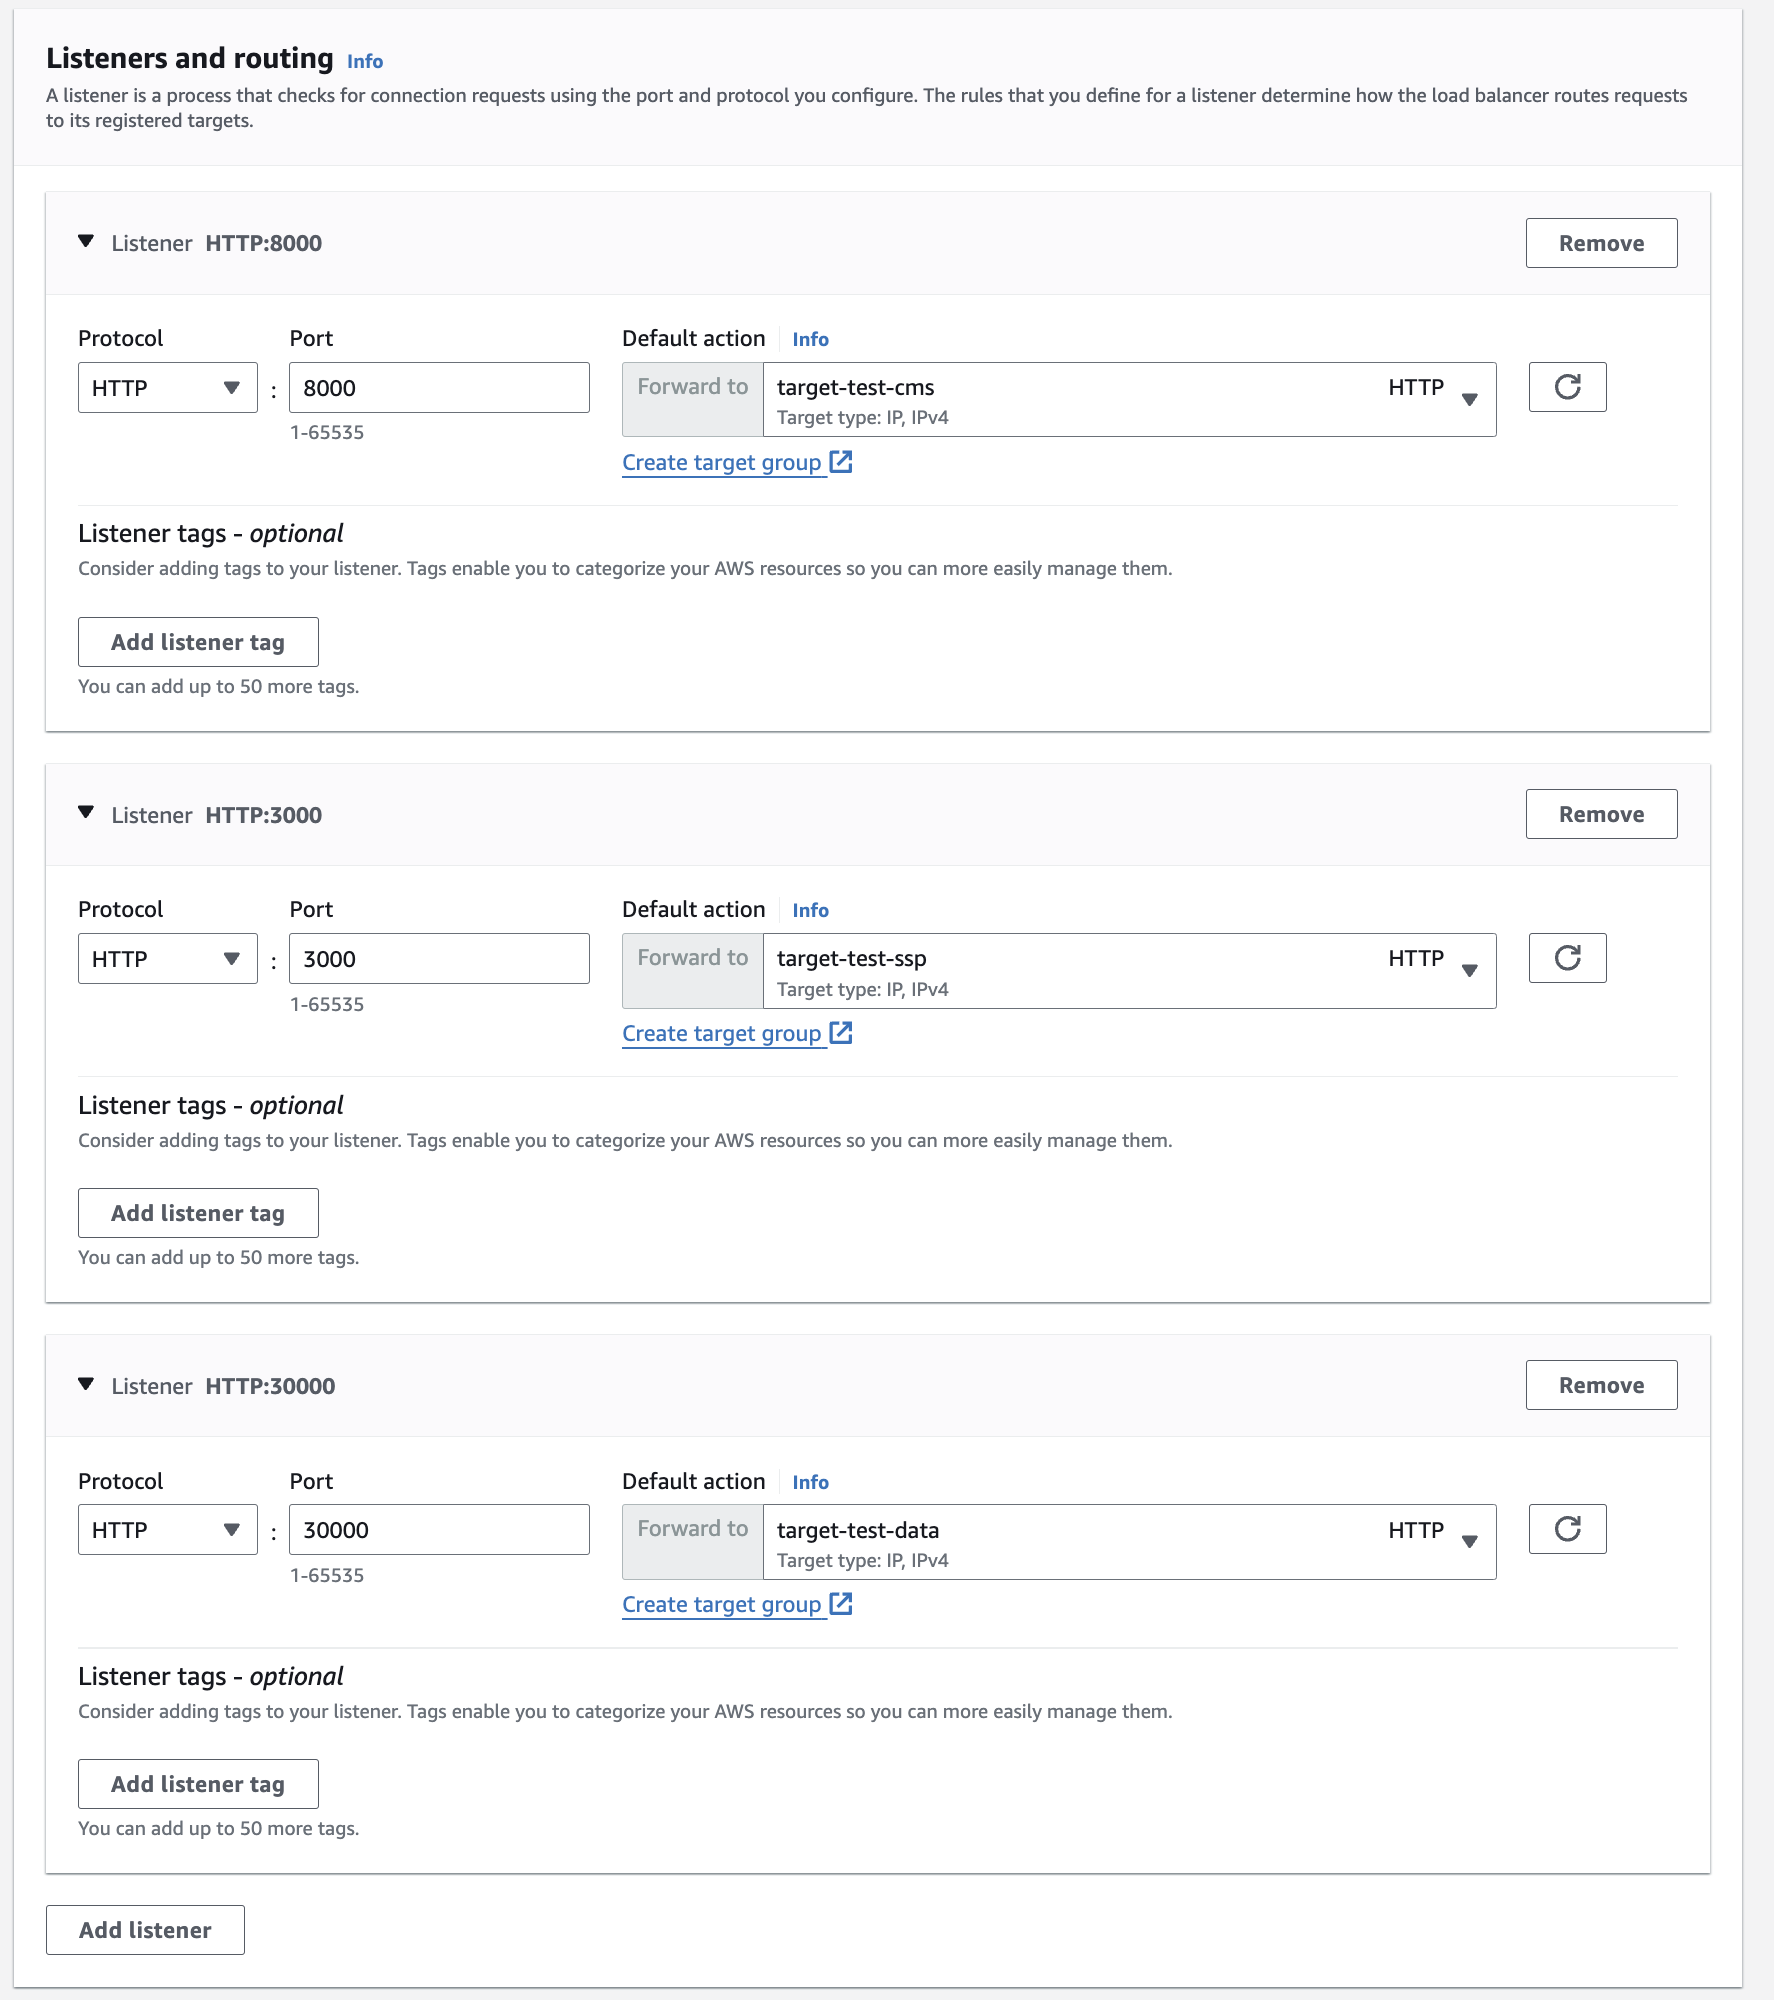 * Connect the listeners to the created target groups.
4. **Finished**
* Connect the listeners to the created target groups.
4. **Finished**
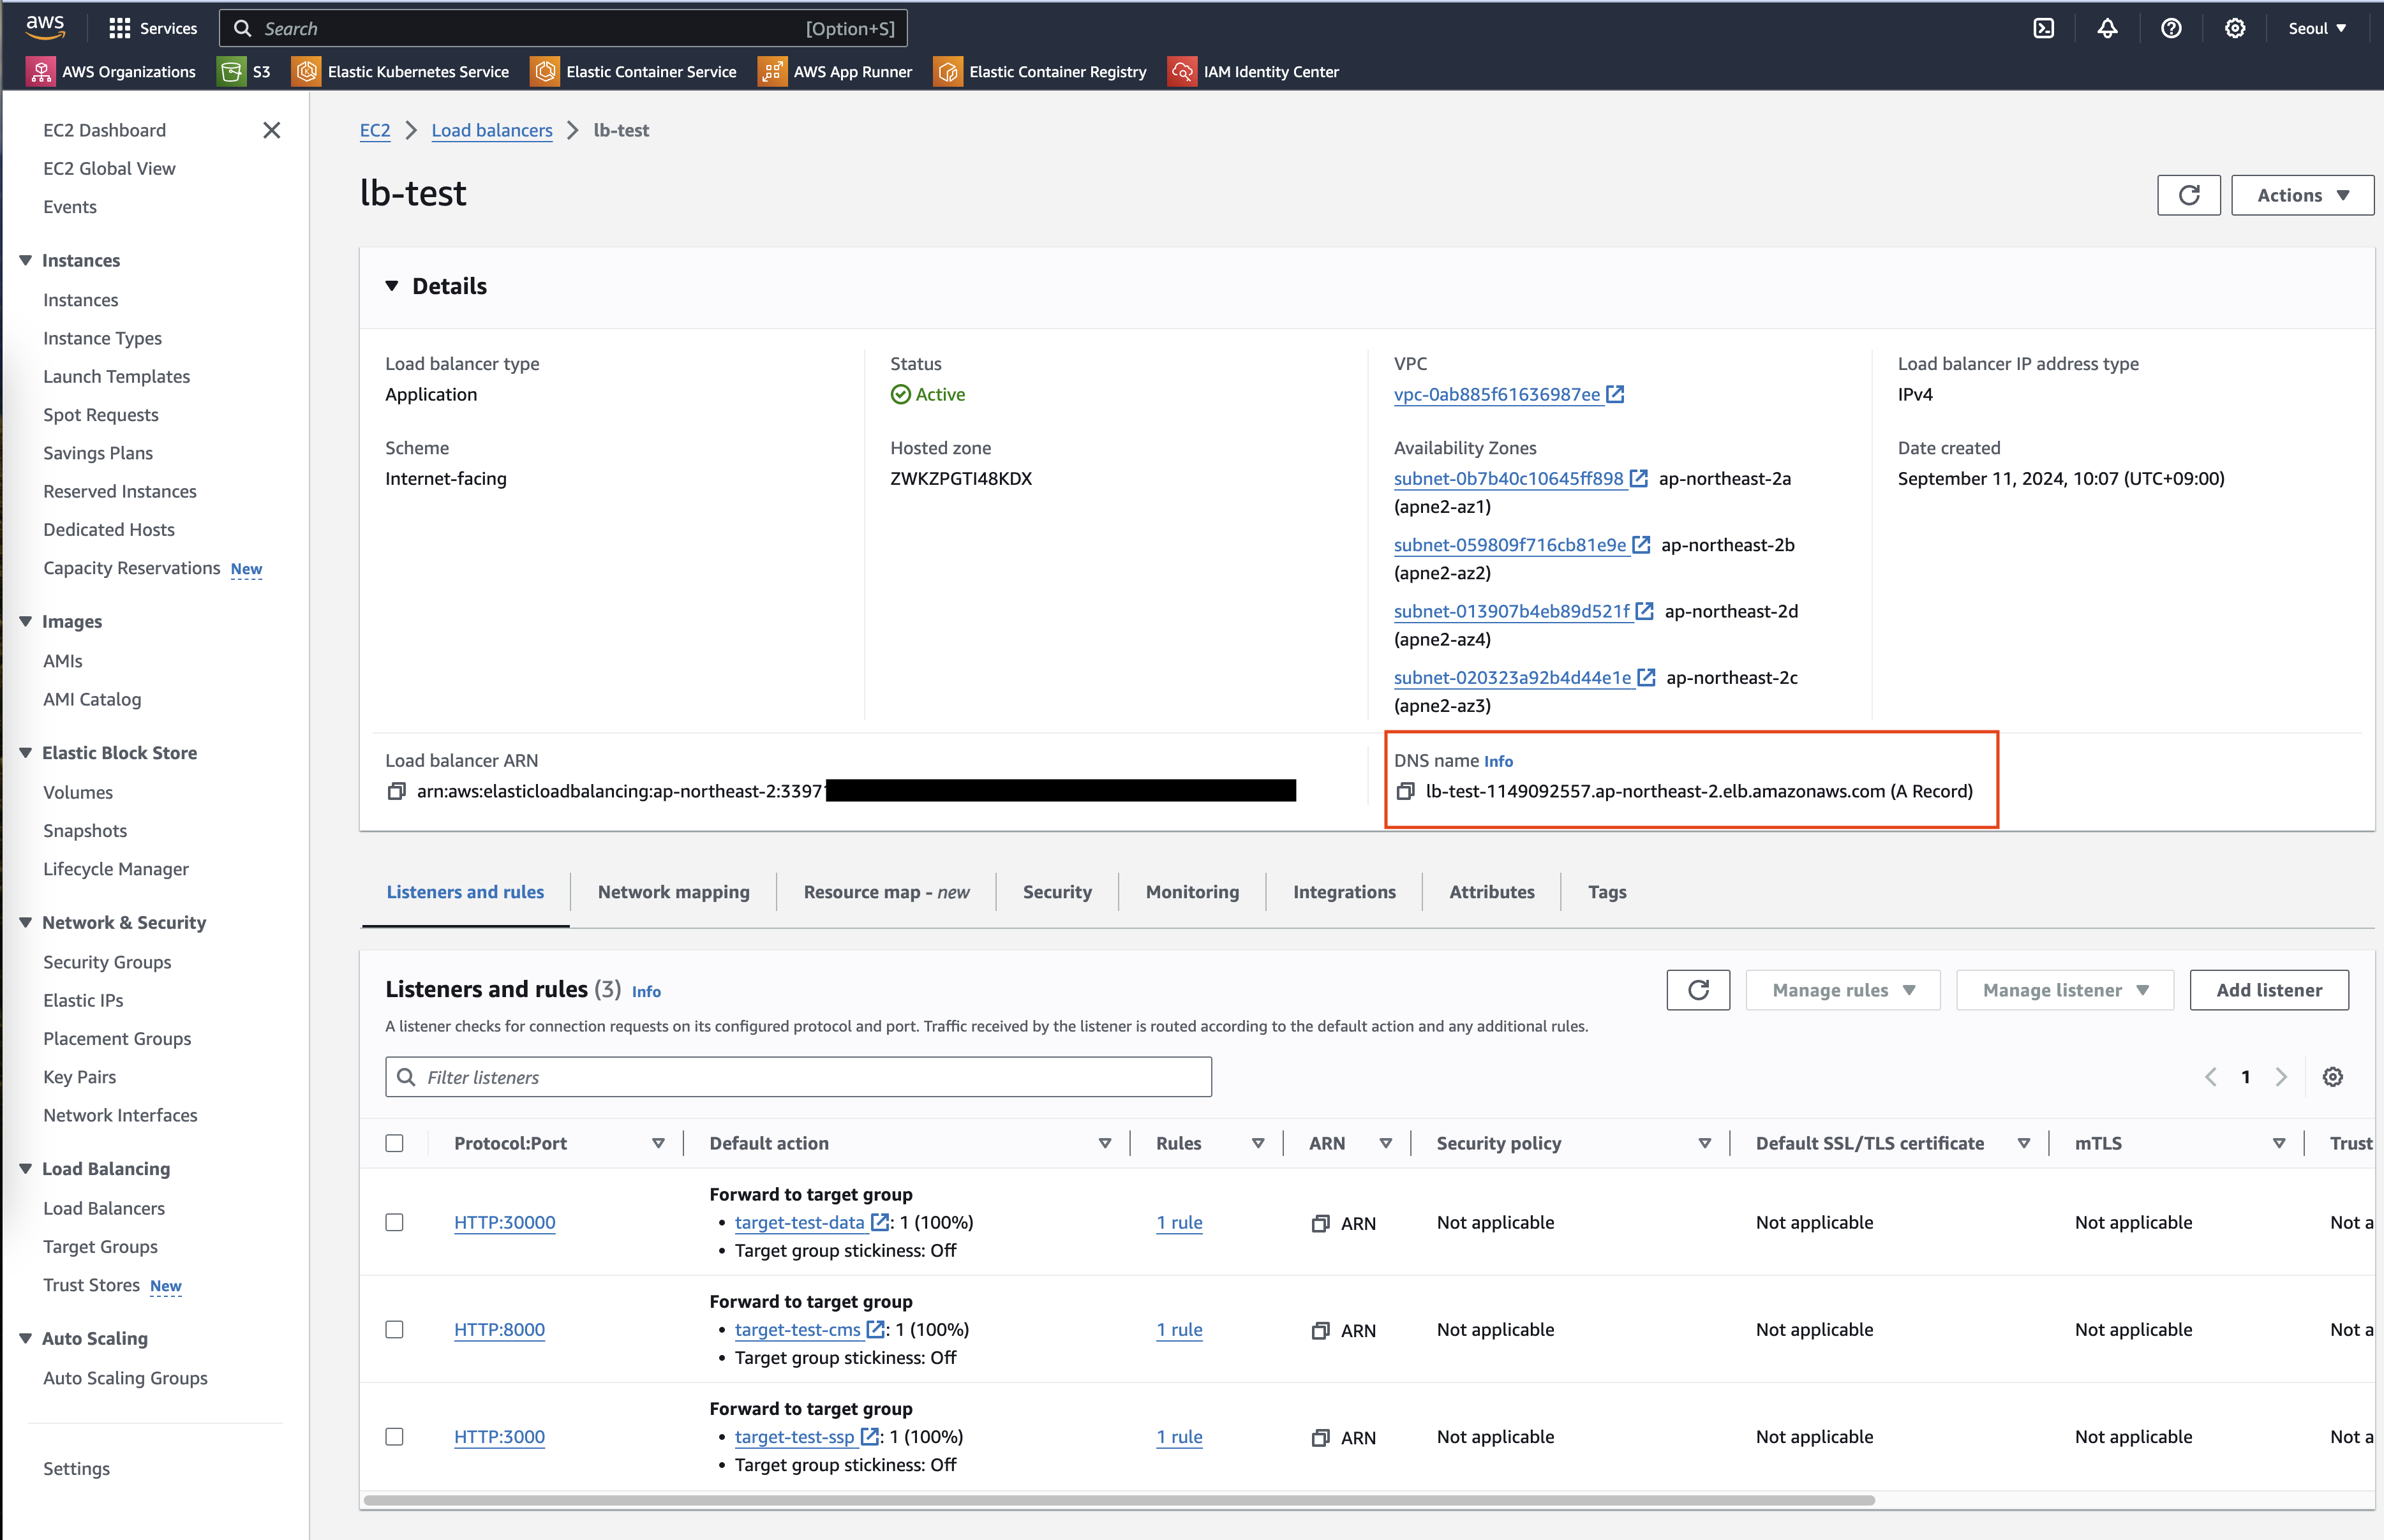 * Once the load balancer is created, save the DNS name highlighted in the red box in the image above. This address will be used to access services like the ADM.
#### 6. Creating a Service
Instead of using the console GUI, we will use CloudFormation to create the service. This is because the GUI does not support associating multiple container ports with the load balancer. More details can be found on [Medium](https://medium.com/@faisalsuhail1/exposing-multiple-ports-for-an-aws-ecs-service-64b9821c09e8).
Search for `CloudFormation` in the AWS console and navigate to the page.
* Once the load balancer is created, save the DNS name highlighted in the red box in the image above. This address will be used to access services like the ADM.
#### 6. Creating a Service
Instead of using the console GUI, we will use CloudFormation to create the service. This is because the GUI does not support associating multiple container ports with the load balancer. More details can be found on [Medium](https://medium.com/@faisalsuhail1/exposing-multiple-ports-for-an-aws-ecs-service-64b9821c09e8).
Search for `CloudFormation` in the AWS console and navigate to the page.
 1. **Create Stack**
* Click the `Create Stack` button in the top right corner.
1. **Create Stack**
* Click the `Create Stack` button in the top right corner.
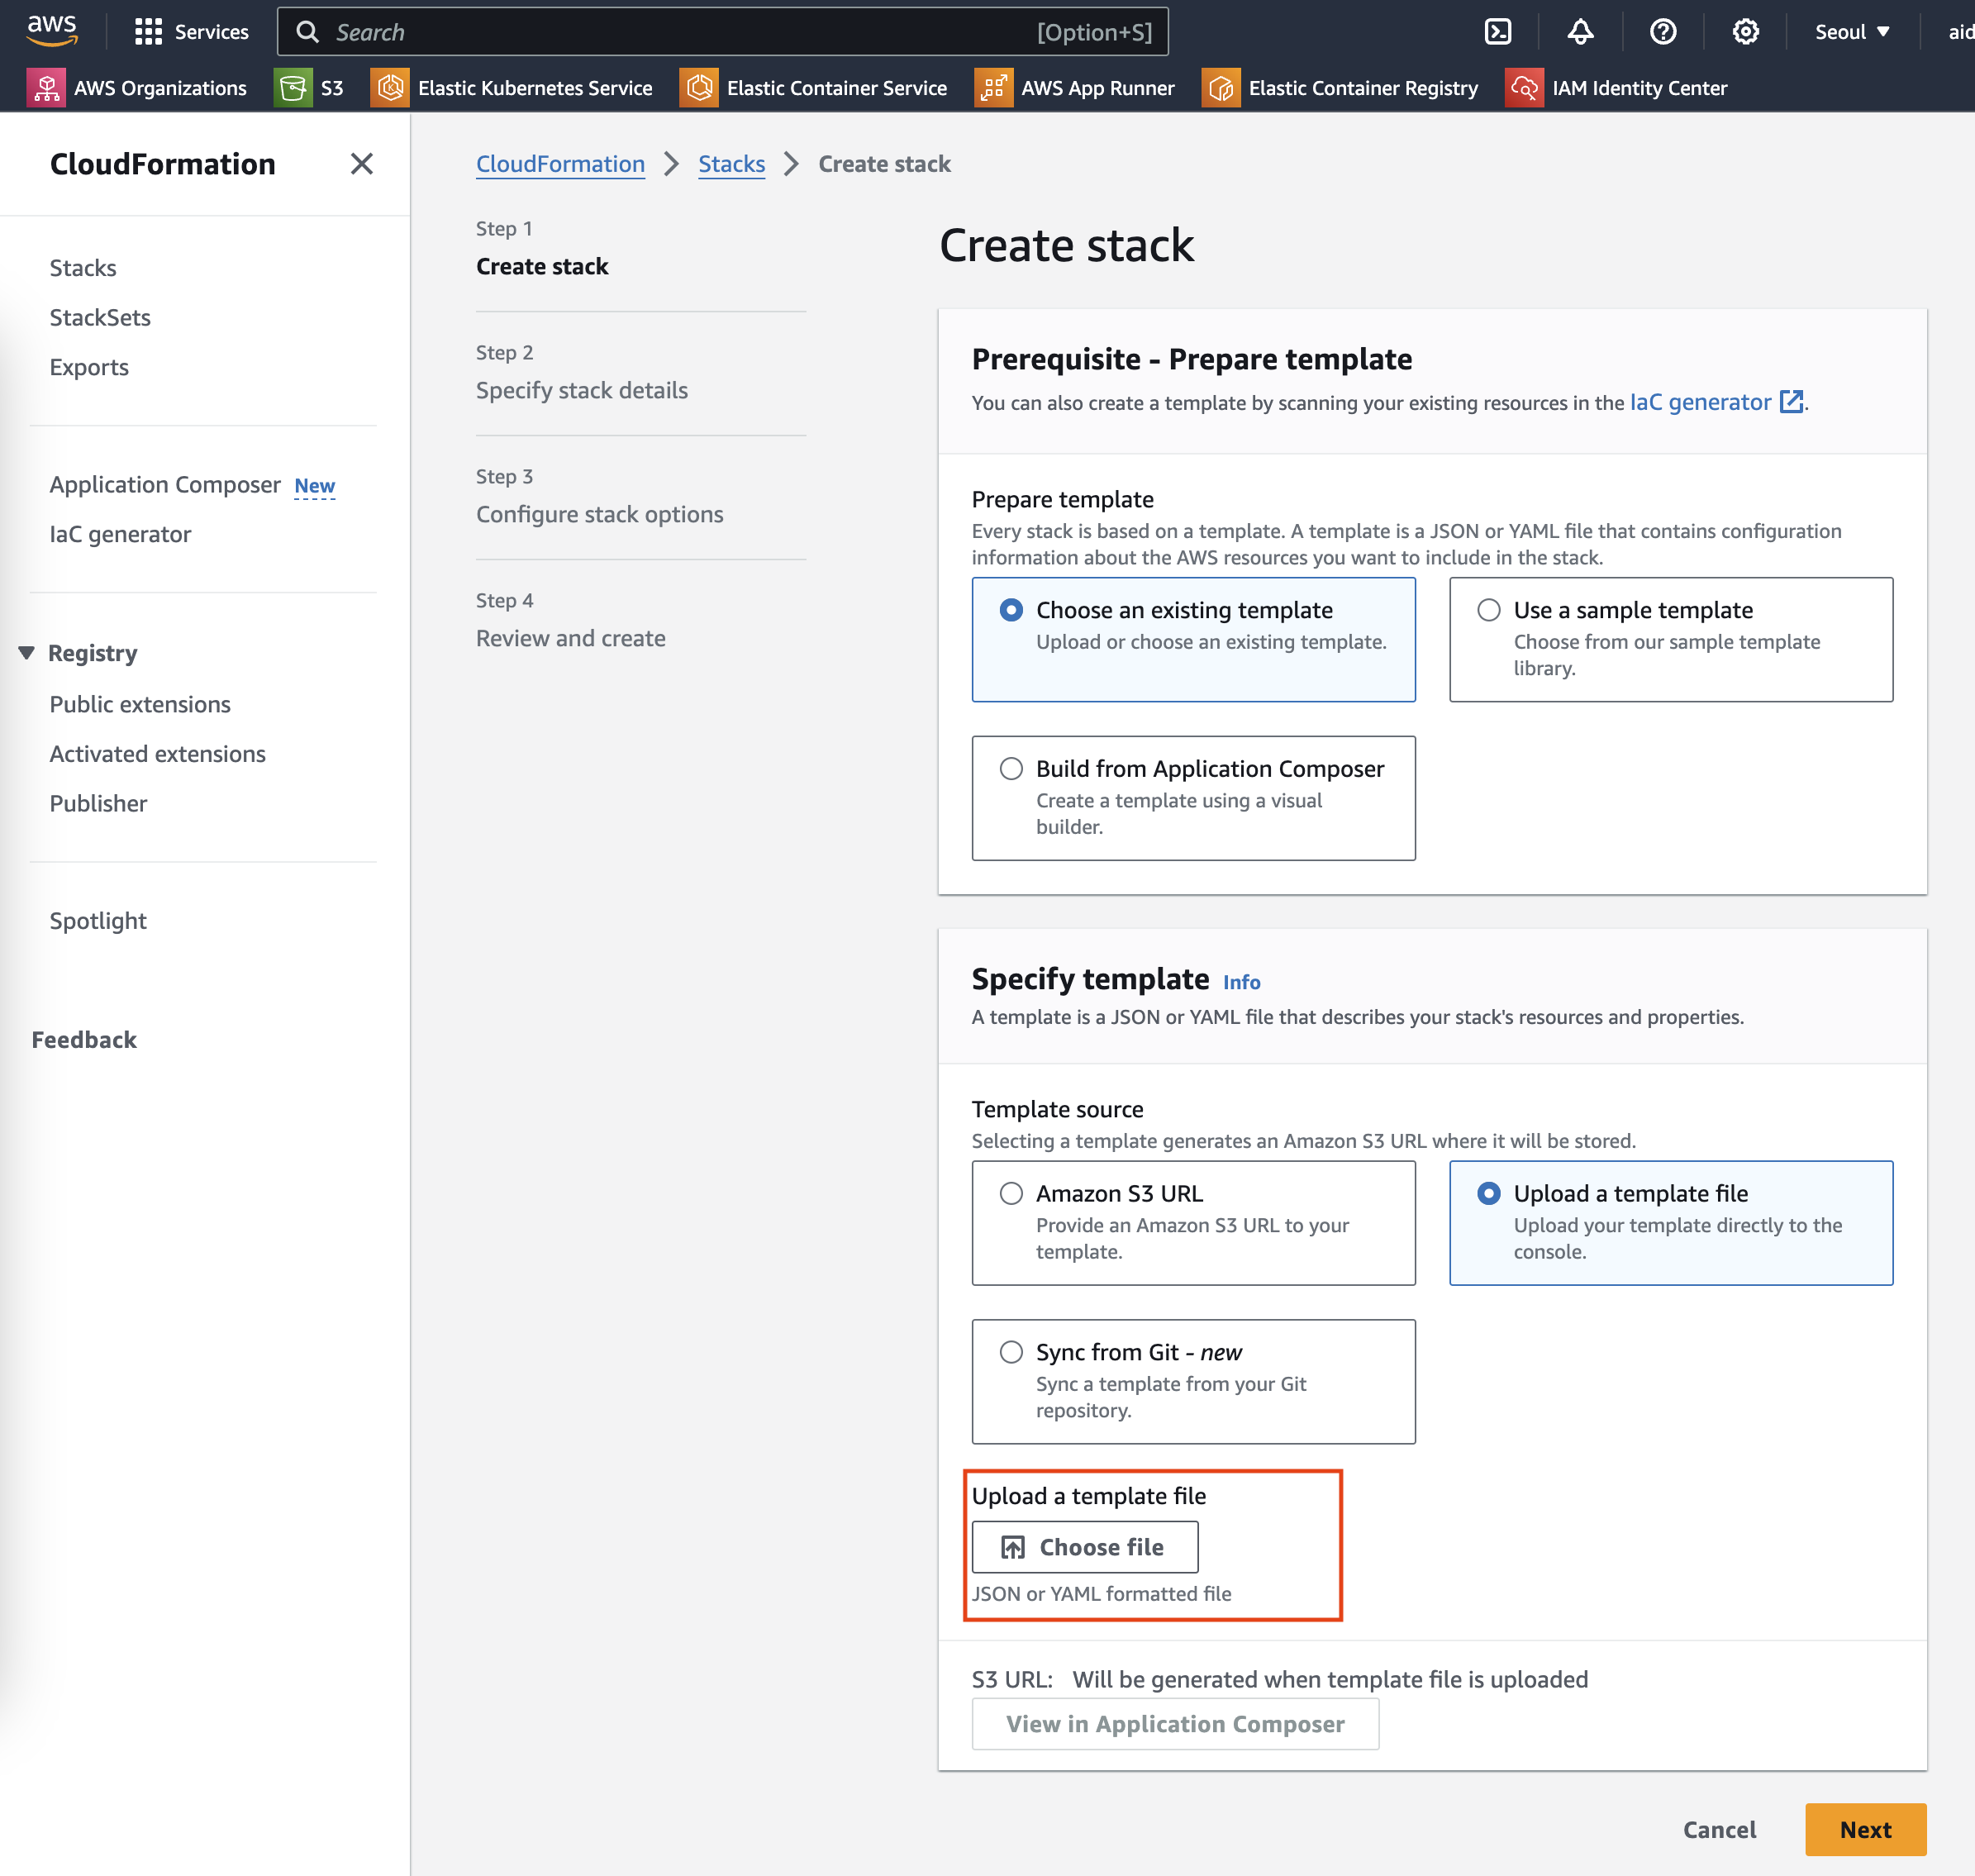 * Choose `Upload a template file` and use the following JSON format for the template file, uploading it afterward. Modify the commented sections to fit your environment (enter the values saved earlier).
* Enter the task security group's ID in `SecurityGroupIDs`.
```json theme={null}
{
"AWSTemplateFormatVersion": "2010-09-09",
"Description": "The template used to create an ECS Service from the ECS Console.",
"Parameters": {
"SecurityGroupIDs": {
"Type": "CommaDelimitedList"
// "Default": "sg-0f21b327b83e33c46"
},
"SubnetIDs": {
"Type": "CommaDelimitedList"
// "Default": "subnet-0b7b40c10645ff898,subnet-059809f716cb81e9e,subnet-013907b4eb89d521f,subnet-020323a92b4d44e1e"
},
"VpcID": {
"Type": "String"
// "Default": "vpc-0ab885f61636987ee"
},
"LoadBalancerName": {
"Type": "String"
// "Default": "lb-test"
}
},
"Resources": {
"ECSService": {
"Type": "AWS::ECS::Service",
"Properties": {
// "Cluster": "cluster-test",
// "TaskDefinition": "arn:aws:ecs:ap-northeast-2:339...",
"LaunchType": "EC2",
// "ServiceName": "service-test",
"SchedulingStrategy": "REPLICA",
"DesiredCount": 1,
"LoadBalancers": [
{
// "ContainerName": "container-test",
"ContainerPort": 8000,
"LoadBalancerName": {
"Ref": "AWS::NoValue"
}
// "TargetGroupArn": "arn:aws:elasticloadbalancing:ap-northeast-2:339..."
}
],
"NetworkConfiguration": {
"AwsvpcConfiguration": {
"SecurityGroups": {
"Ref": "SecurityGroupIDs"
},
"Subnets": {
"Ref": "SubnetIDs"
}
}
},
"DeploymentConfiguration": {
"MaximumPercent": 200,
"MinimumHealthyPercent": 100,
"DeploymentCircuitBreaker": {
"Enable": true,
"Rollback": true
}
},
"DeploymentController": {
"Type": "ECS"
},
"ServiceConnectConfiguration": {
"Enabled": false
},
"PlacementStrategies": [
{
"Field": "attribute:ecs.availability-zone",
"Type": "spread"
},
{
"Field": "instanceId",
"Type": "spread"
}
],
"PlacementConstraints": [],
"Tags": [],
"EnableECSManagedTags": true
}
}
},
"Outputs": {
"ECSService": {
"Description": "The created service.",
"Value": {
"Ref": "ECSService"
}
}
}
}
```
2. **Health Check**
* Click `Next`, enter a stack name, then continue clicking `Next` until you can submit the service creation request.
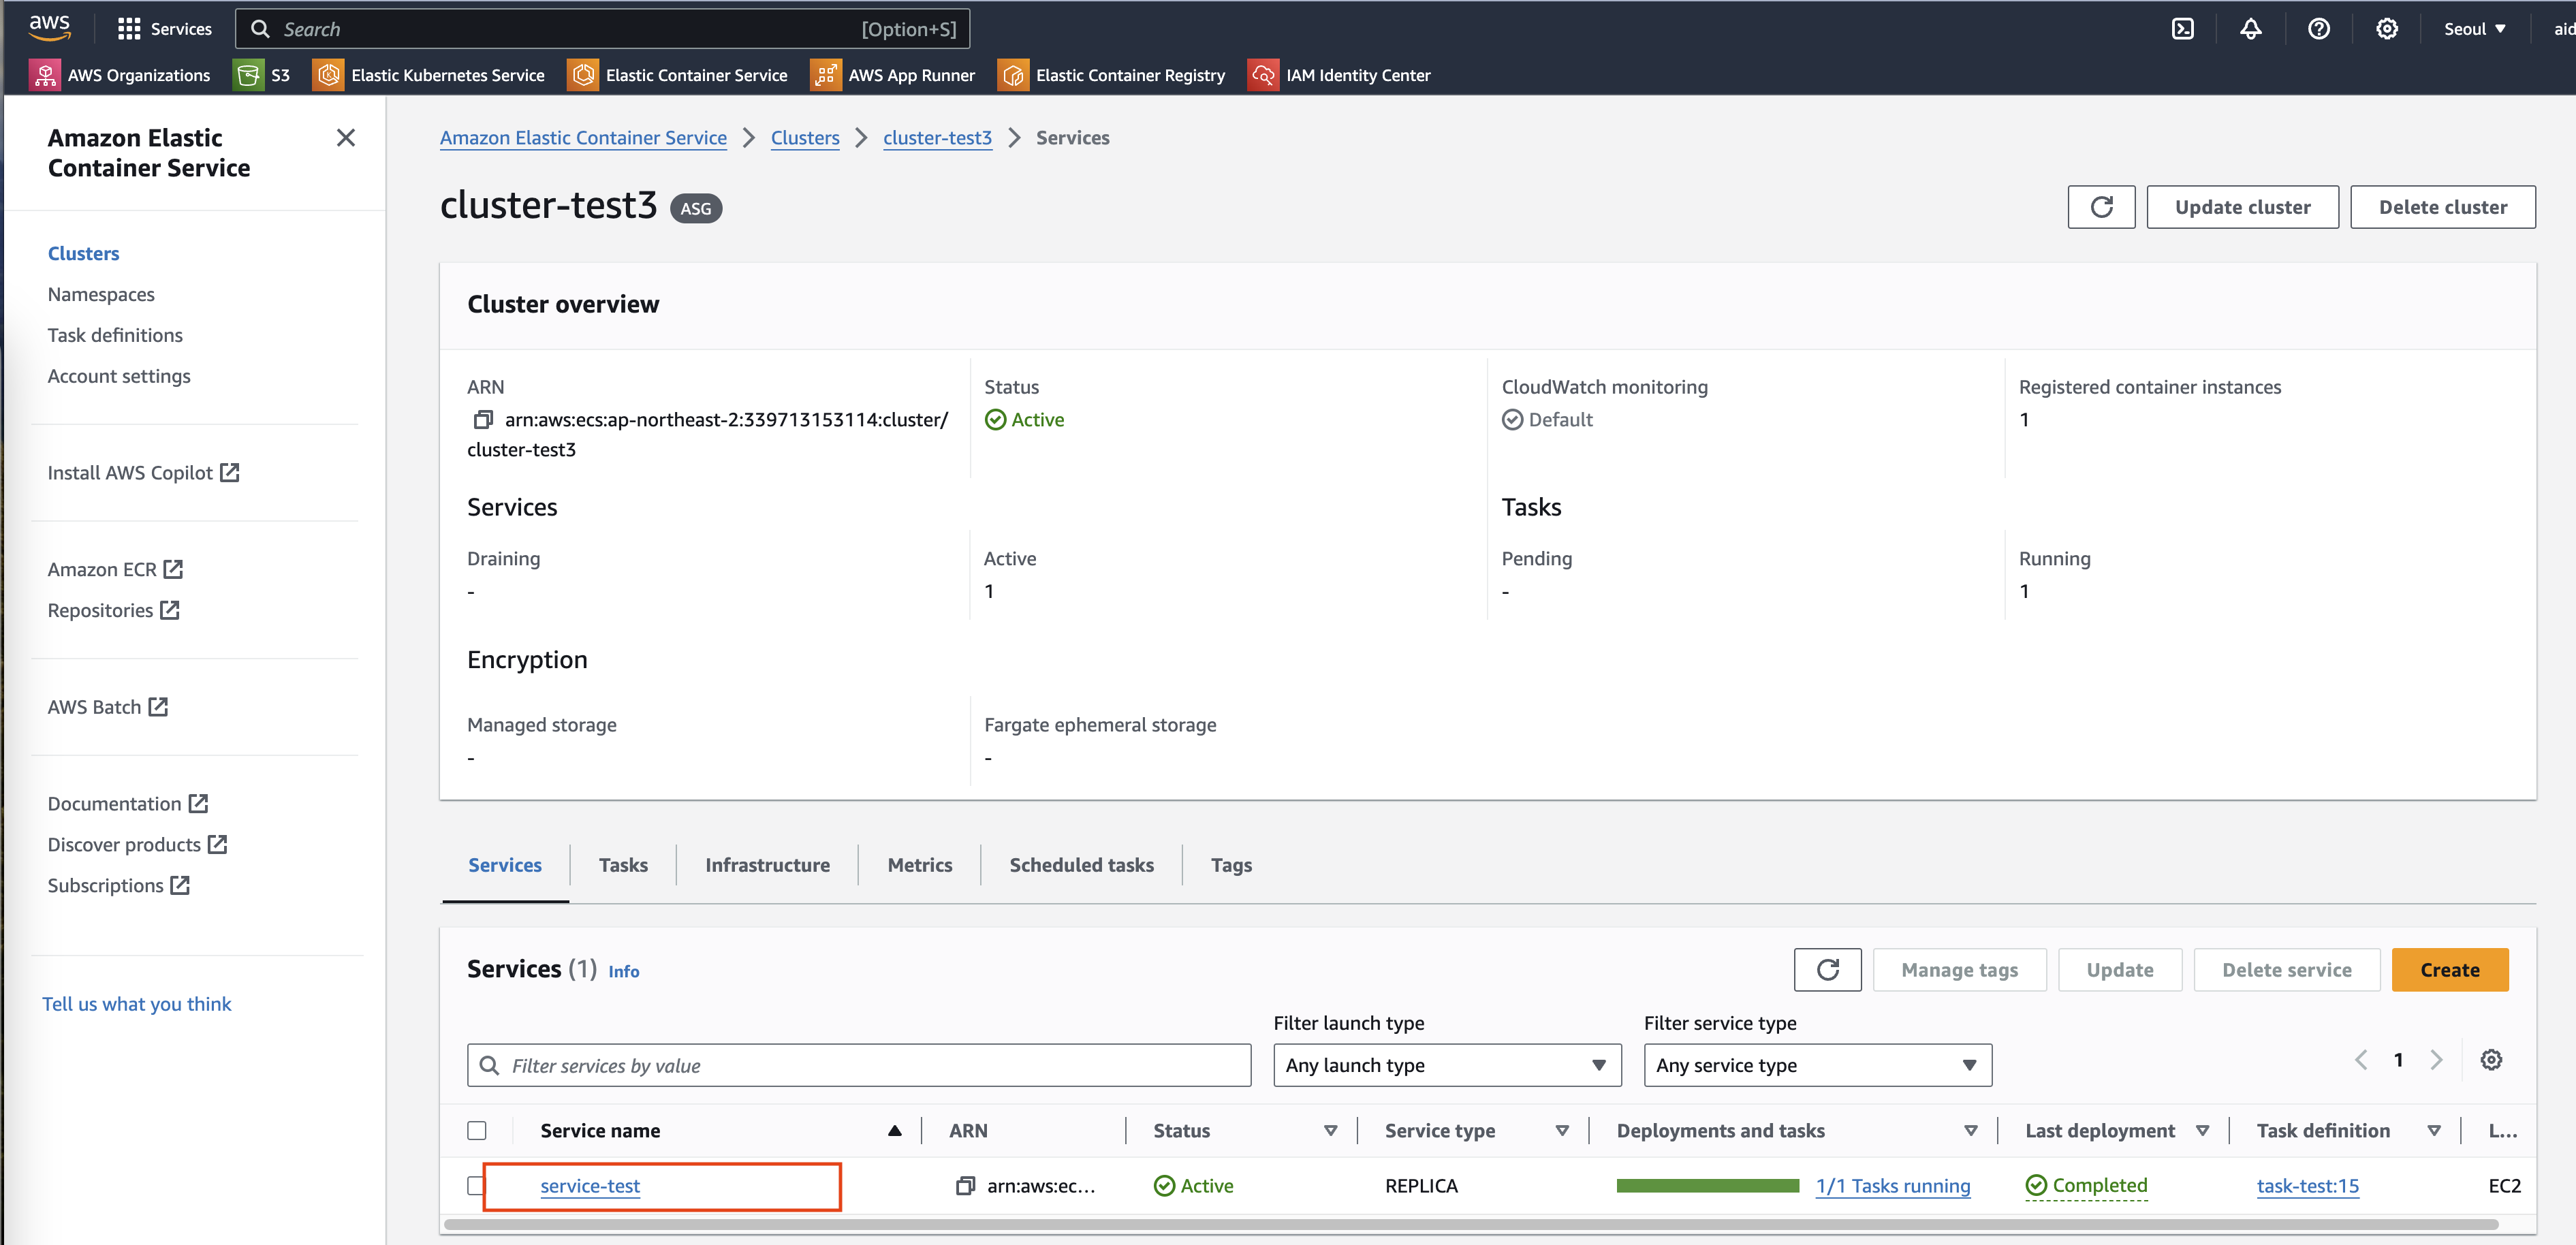
* Navigate to the cluster page and open the service page. Click the button highlighted in red in the image below.
* Choose `Upload a template file` and use the following JSON format for the template file, uploading it afterward. Modify the commented sections to fit your environment (enter the values saved earlier).
* Enter the task security group's ID in `SecurityGroupIDs`.
```json theme={null}
{
"AWSTemplateFormatVersion": "2010-09-09",
"Description": "The template used to create an ECS Service from the ECS Console.",
"Parameters": {
"SecurityGroupIDs": {
"Type": "CommaDelimitedList"
// "Default": "sg-0f21b327b83e33c46"
},
"SubnetIDs": {
"Type": "CommaDelimitedList"
// "Default": "subnet-0b7b40c10645ff898,subnet-059809f716cb81e9e,subnet-013907b4eb89d521f,subnet-020323a92b4d44e1e"
},
"VpcID": {
"Type": "String"
// "Default": "vpc-0ab885f61636987ee"
},
"LoadBalancerName": {
"Type": "String"
// "Default": "lb-test"
}
},
"Resources": {
"ECSService": {
"Type": "AWS::ECS::Service",
"Properties": {
// "Cluster": "cluster-test",
// "TaskDefinition": "arn:aws:ecs:ap-northeast-2:339...",
"LaunchType": "EC2",
// "ServiceName": "service-test",
"SchedulingStrategy": "REPLICA",
"DesiredCount": 1,
"LoadBalancers": [
{
// "ContainerName": "container-test",
"ContainerPort": 8000,
"LoadBalancerName": {
"Ref": "AWS::NoValue"
}
// "TargetGroupArn": "arn:aws:elasticloadbalancing:ap-northeast-2:339..."
}
],
"NetworkConfiguration": {
"AwsvpcConfiguration": {
"SecurityGroups": {
"Ref": "SecurityGroupIDs"
},
"Subnets": {
"Ref": "SubnetIDs"
}
}
},
"DeploymentConfiguration": {
"MaximumPercent": 200,
"MinimumHealthyPercent": 100,
"DeploymentCircuitBreaker": {
"Enable": true,
"Rollback": true
}
},
"DeploymentController": {
"Type": "ECS"
},
"ServiceConnectConfiguration": {
"Enabled": false
},
"PlacementStrategies": [
{
"Field": "attribute:ecs.availability-zone",
"Type": "spread"
},
{
"Field": "instanceId",
"Type": "spread"
}
],
"PlacementConstraints": [],
"Tags": [],
"EnableECSManagedTags": true
}
}
},
"Outputs": {
"ECSService": {
"Description": "The created service.",
"Value": {
"Ref": "ECSService"
}
}
}
}
```
2. **Health Check**
* Click `Next`, enter a stack name, then continue clicking `Next` until you can submit the service creation request.
* Navigate to the cluster page and open the service page. Click the button highlighted in red in the image below.
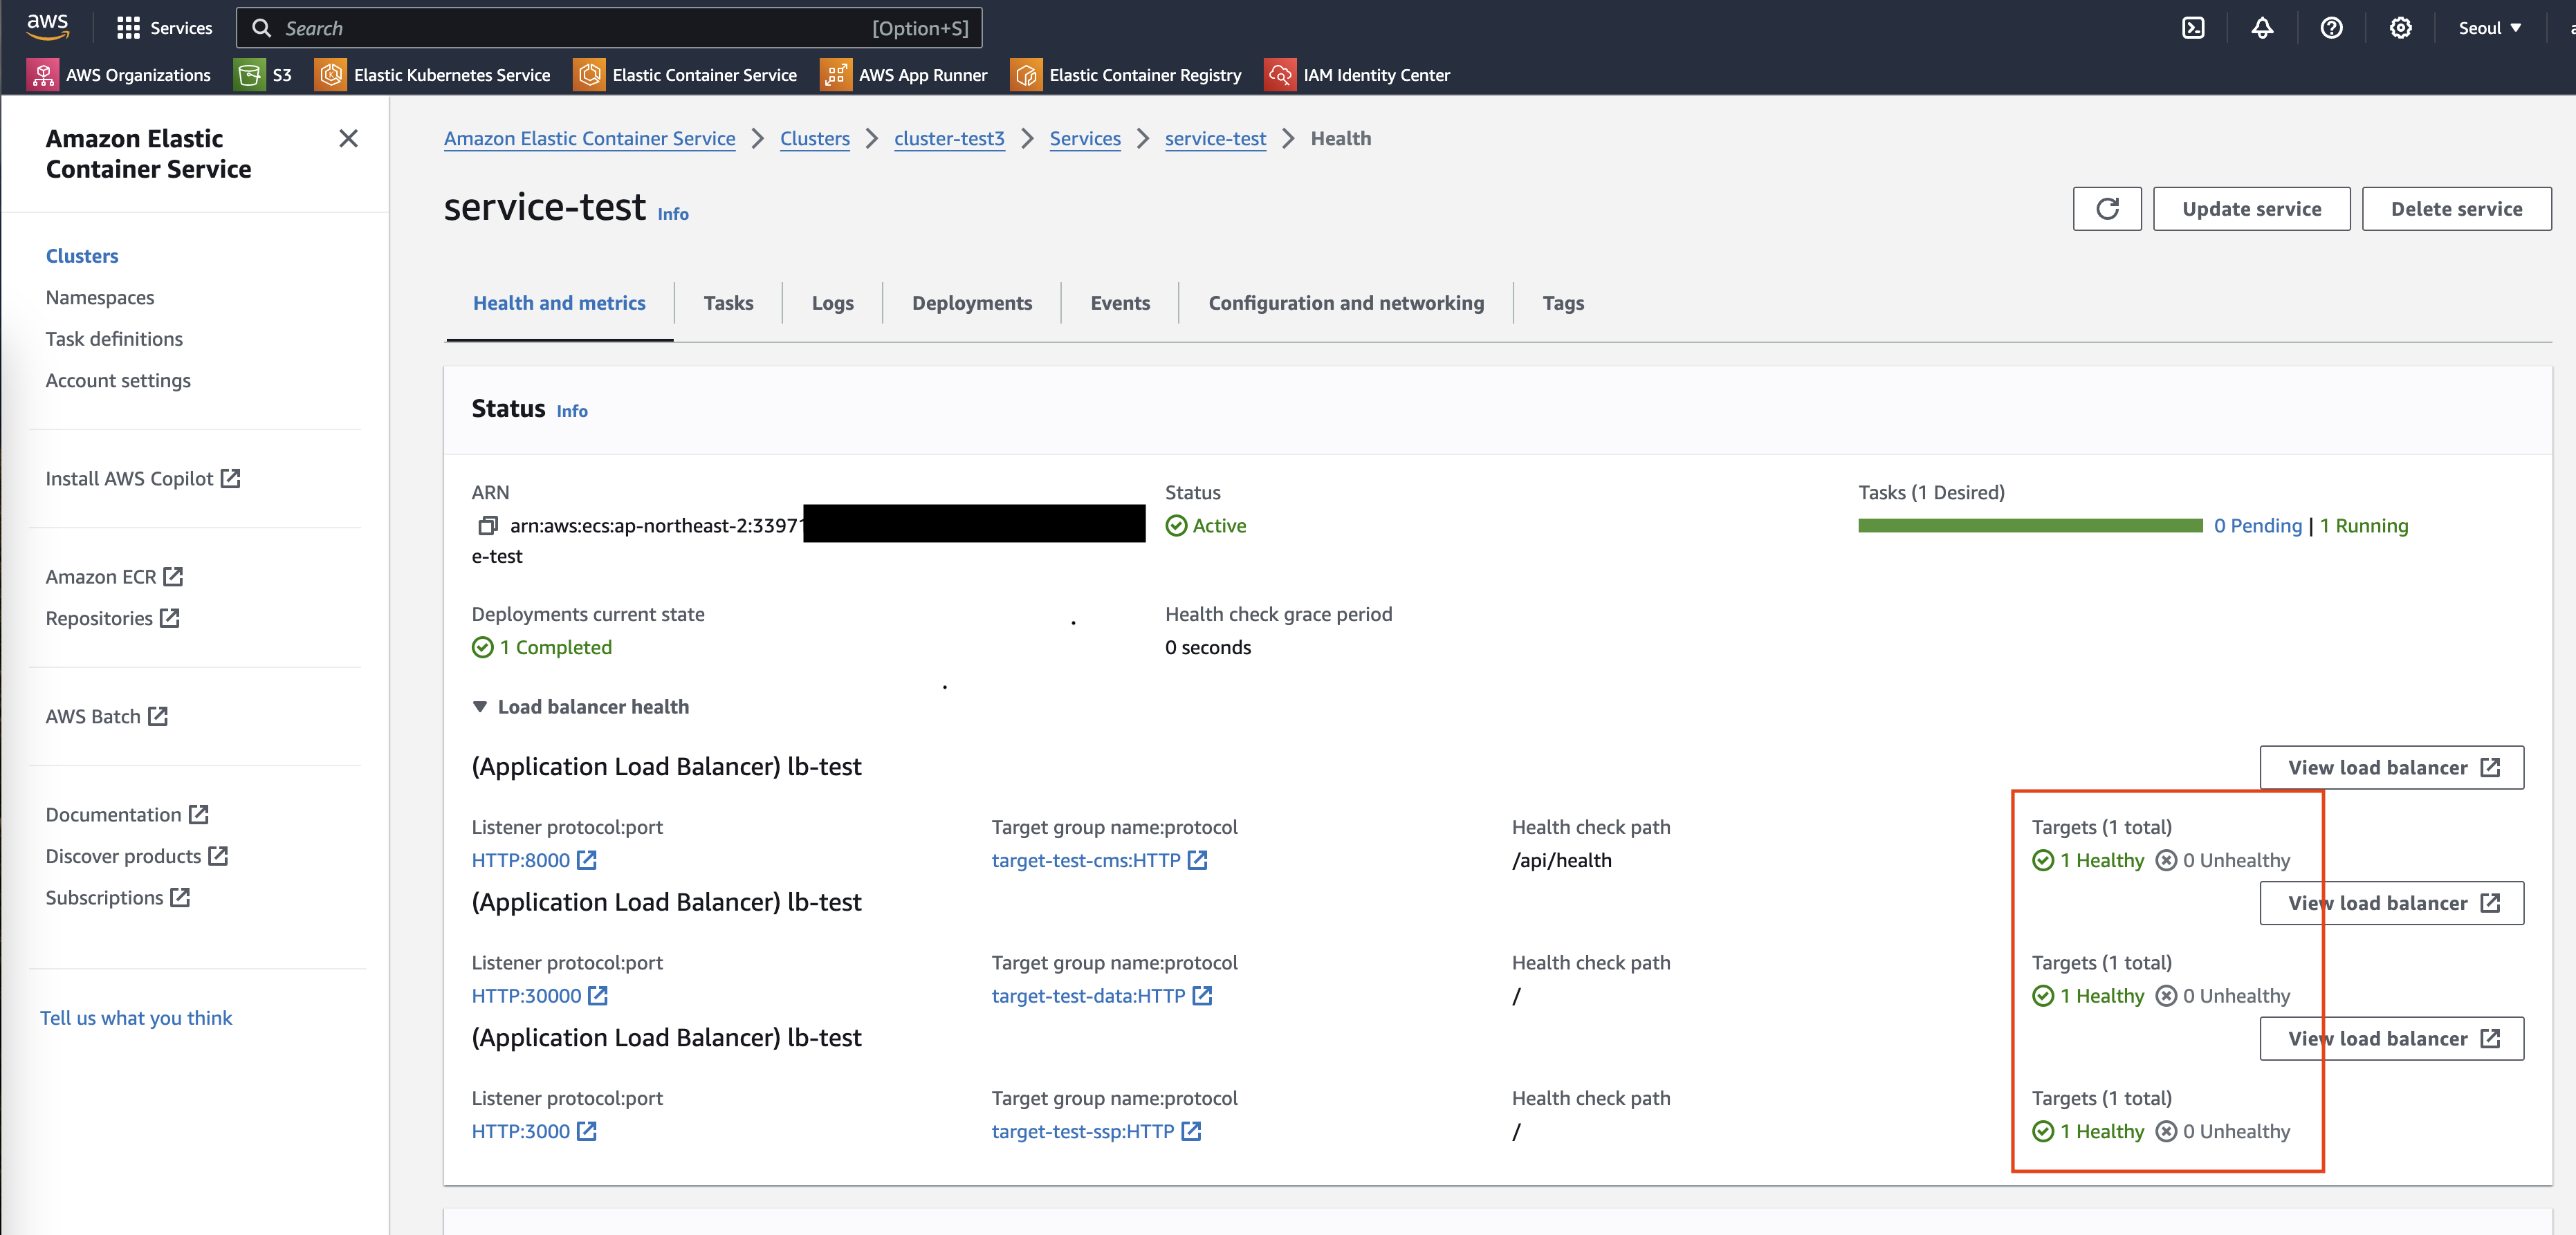
 * Once the service is successfully created, all items highlighted in red in the image below will be marked as `healthy`.
 #### 7. Completion
You can now access the ADM page by navigating to `:8000`, as shown below.
#### 7. Completion
You can now access the ADM page by navigating to `:8000`, as shown below.
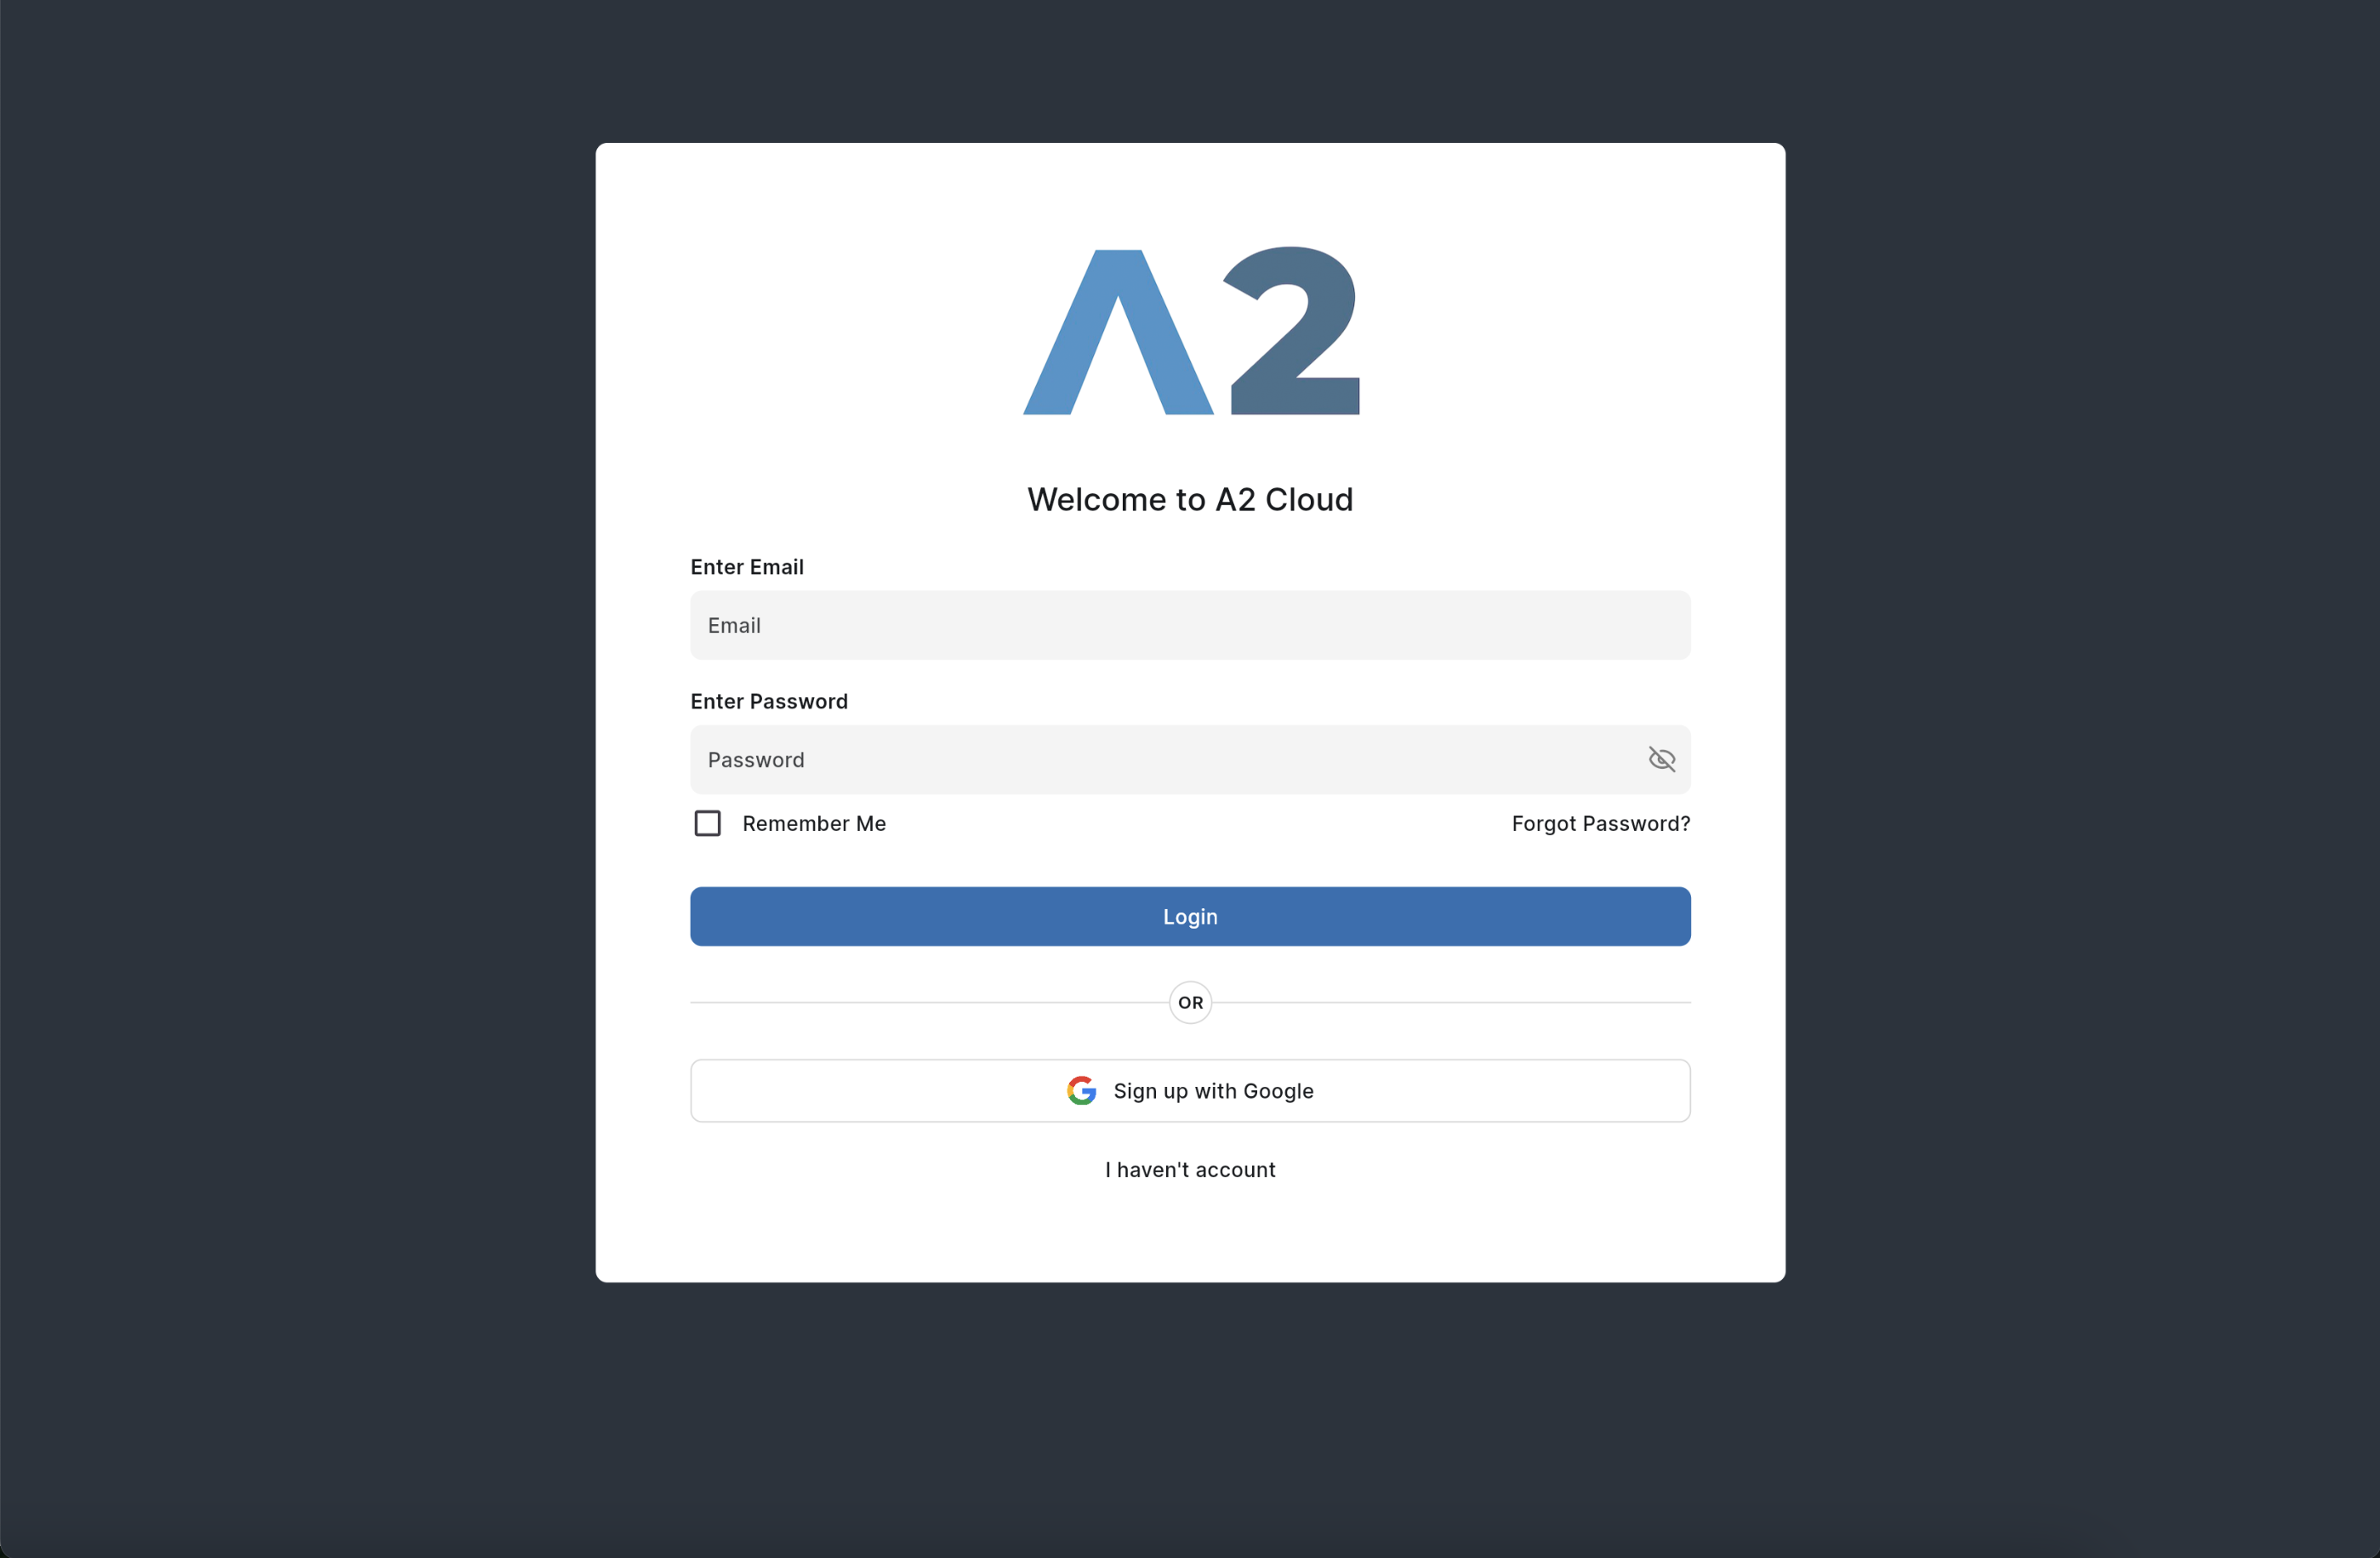 All settings are complete, and you can use A2 through the assigned DNS after deployment.
***
By following this manual, you can successfully deploy A2 on AWS. If you have any additional questions, please feel free to contact our support team.
All settings are complete, and you can use A2 through the assigned DNS after deployment.
***
By following this manual, you can successfully deploy A2 on AWS. If you have any additional questions, please feel free to contact our support team.